Document Customizer
Manual
A TOOL TO CREATE AND MODIFY REPORTS IN MICROSOFT NAV
Version 720.19.02– July 2019
1. Disclaimer
This documentation pertains to an earlier version of Business Central (Microsoft NAV); however, it remains highly relevant. Although the images are from the previous system, the functionality and setup process for the application are largely unchanged. New features have been introduced since the documented version and can be found in the “What’s new and Changed” section.
2. Introduction
Document Customizer is an add-on created by Abakion A/S to make the managing of reports in Microsoft’s NAV easier and more efficient. It is built on the idea of making it possible for end-users to manage their own reports without extensive help from IT-consultants.
This manual will guide you through creating reports in NAV with Document Customizer. All companies have different priorities and wishes in terms of their reports. Therefore, this manual is not a showing of ‘how to create the correct report’, but a guide through all the different options and possibilities Document Customizer offers. This manual shows you how to create reports from scratch with a chronological advancement, but it is also possible to read each chapter independently. Use this document when trying Document Customizer for the first time in order to understand the tool and all the possibilities, and in the future as a quick guide to the various elements of report creation. The possibilities in terms of creating different layouts is endless so please be aware that this manual can only be used as a support during the creation of the reports. The tool is intuitively structured so that everyone can learn to use it quickly and use intuition during the process. You can preview the reports an unlimited number of times and use that function as much as needed in order to keep track with the development. After using Document Customizer a couple of times you experience the implication of the many options and the work will get significantly more efficient. Nevertheless, please have patience and accept that previewing the report numerous times is part of the learning process.
With Document Customizer, it is possible to create several different layouts at a time and link them to a company. This manual will in some of the sub-chapters show you how to manage more than one layout at a time, but it is highly recommended to start out by only creating one single layout in order to gain experience and learn how to work with Document Customizer. After successfully creating the first layout, it is very easy to add another one, so do not worry if the need is for more than one layout.
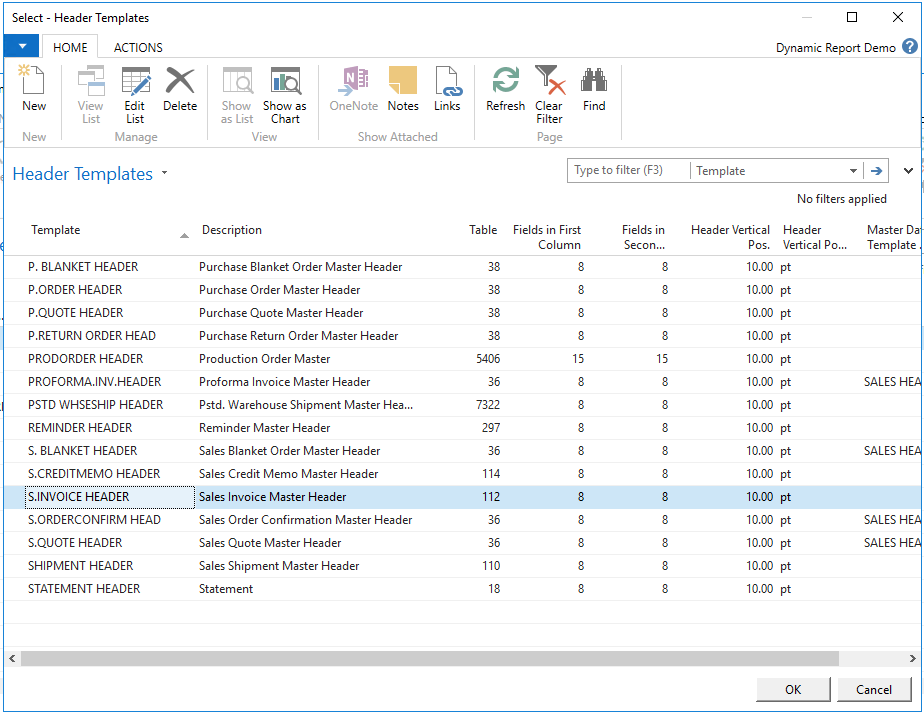
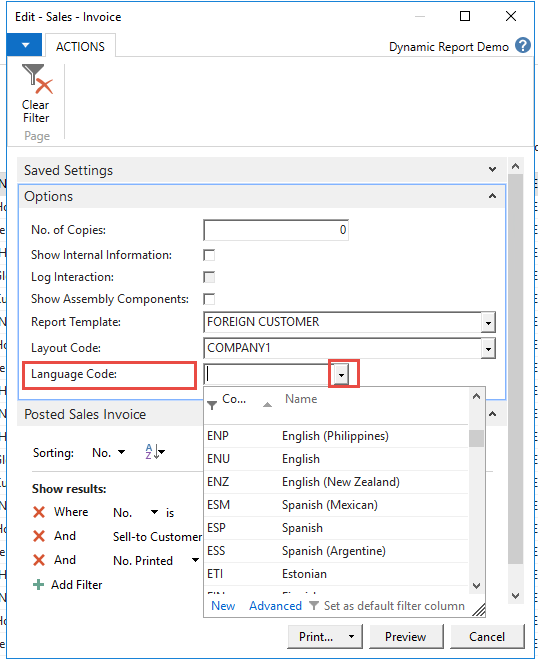
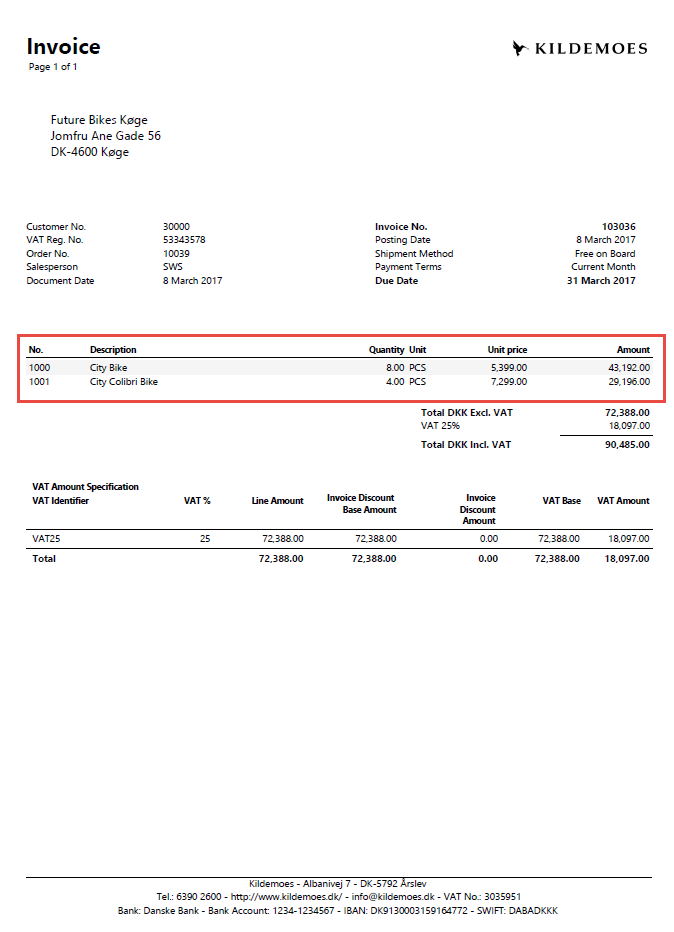
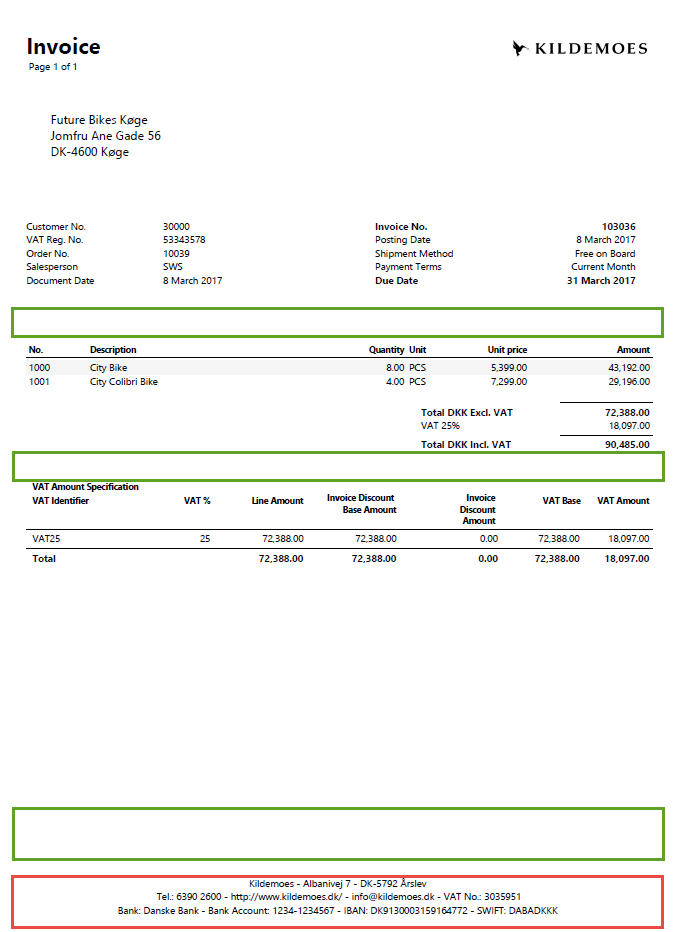
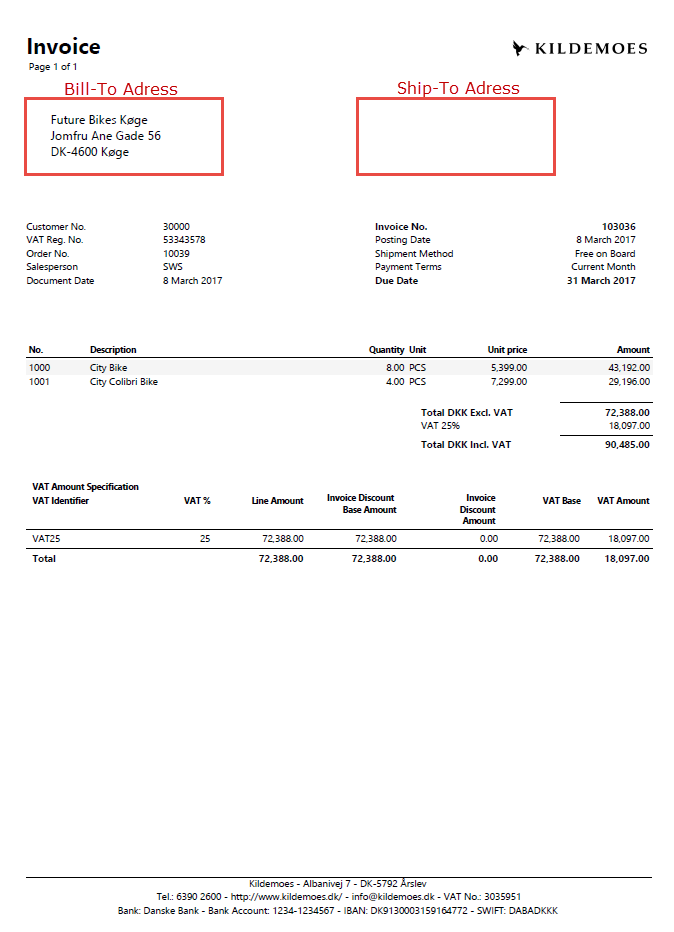
1. To shortly introduce the structure and parts of the reports in Document Customizer, here is shown how a Sales Invoice Report looks like with standard settings after just generating a general layout
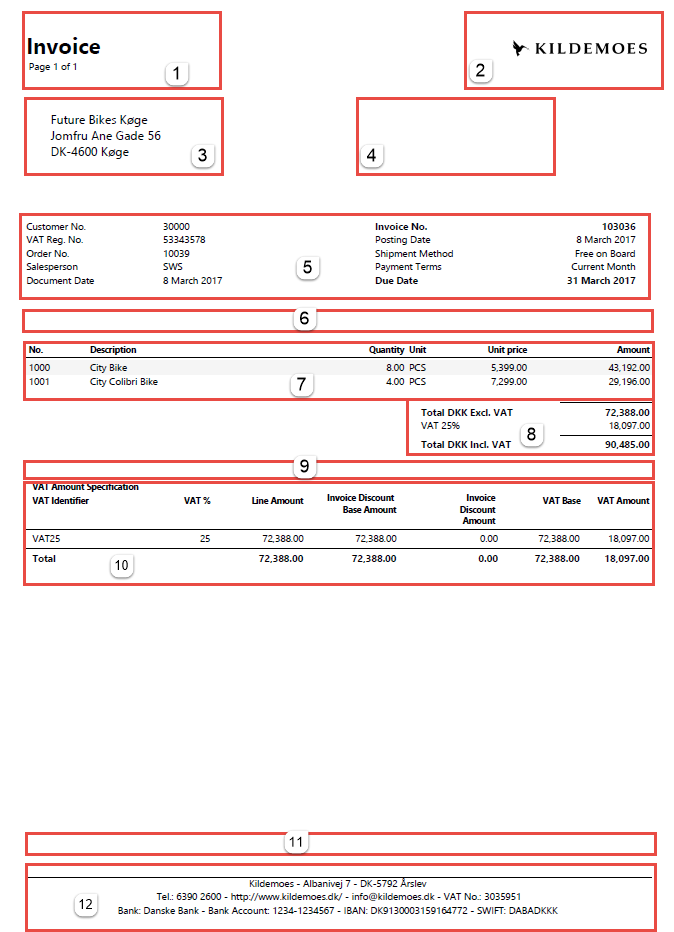
1. Title 2. Company logo 3. Bill-to address 4. Ship-to address (appears separately if it is different from the bill-to address) 5. Header 6. Section 1 | 7. Columns 8. Total Captions 9. Section 2 10. VAT amount specification 11. Section 3 12. Footer |
4
3. Setup of Document Customizer
This chapter reviews how to start the work on creating your own report layout with Document Customizer. It will be shown how to generate a setup and how to manage the general settings such as the font size, logo and element positioning. Please be aware that the setup applies to all companies in the database unless otherwise defined!
3.1 Activate Document Customizer
For Document Customizer to work, the license should be included and the add-on should be activated.
Search for Supply Chain Box Setup
In the “Sales Suite” mark Document Customizer
The setup will now be added automatically, with the standard setup.
3.2 Generate setup
If the set-up is blanked, or if deleted mistakenly, it is possible to set it up automatically from within the Document Customizer layouts, with the standard setup.
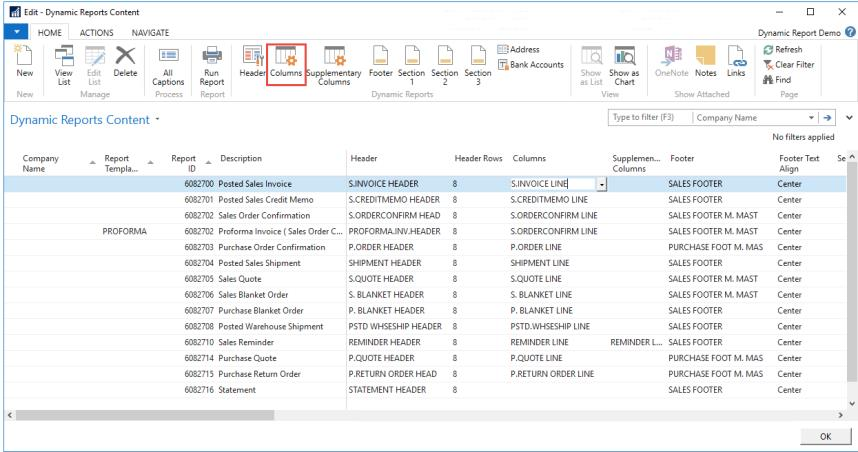
Start by opening Document Customizer using the search function
Press on “Layout” in the ribbon
Under the tab “Actions”, press “Generate Setup” to create a base for the report
[IMAGE PLACEHOLDER: Screenshot of Document Customizer window showing the ribbon with "Layout" and the "Actions" tab, highlighting the "Generate Setup" button, and the Dynamic Reports Layouts table below]
The setup is now generated and some general settings have been applied. If data in already in the underlying tables, you will be asked if you want to replace or add setup.
These settings are created based on a standard report layout. It is now possible to work on this layout and modify the report until it looks as desired.
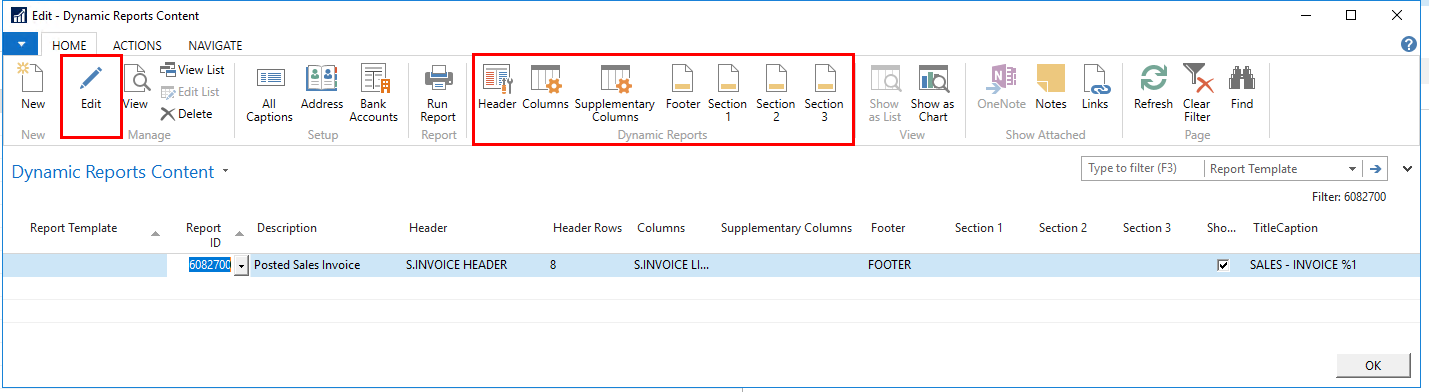
4. Document Customizer Menu
Document Customizer can be found by searching in the search menu.
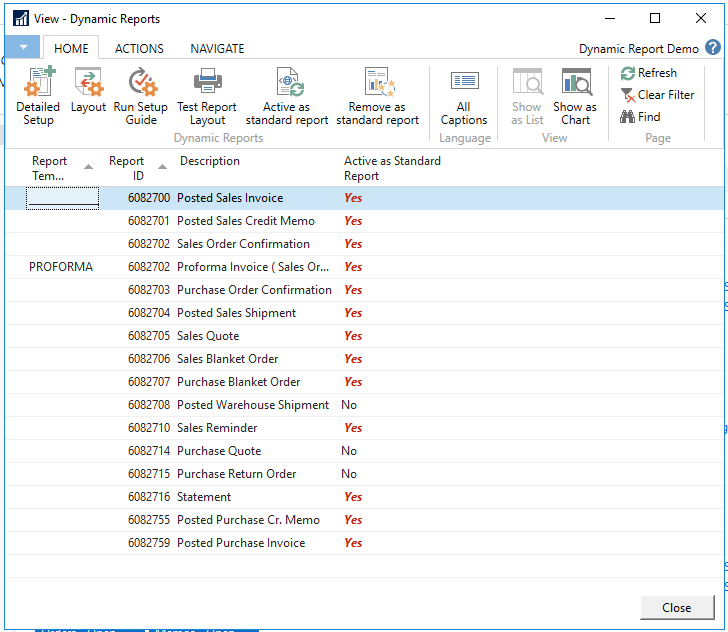
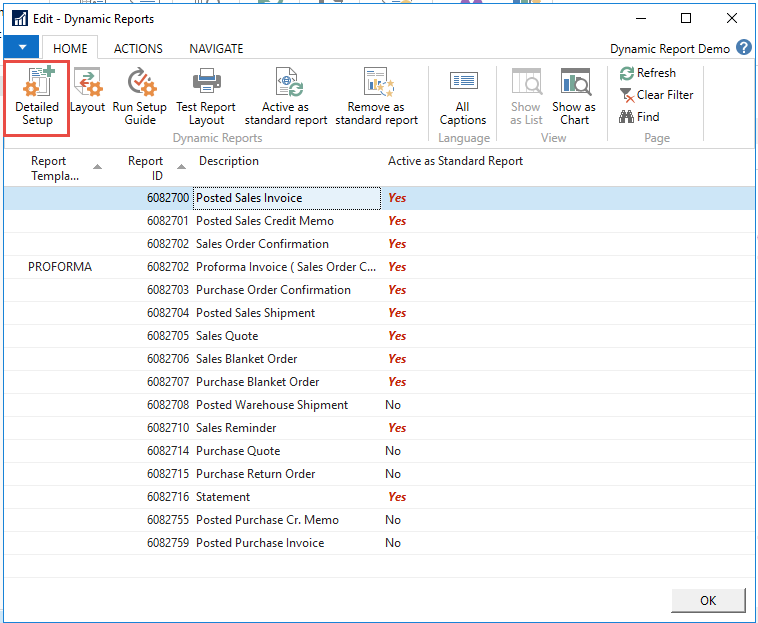
On the start page is it possible to see all the reports that have been setup in the company, and if this is activated as a standard report.
In the ribbon, several actions are possible.
Detailed setup: will open the detailed setup of the document marked on the lines
Layout: will open the overall setup of the document, such as font and picture
Run Setup Guide: This will open a wizard that will take you through the most common changes in a report
Test Report layout: This will open the print function of the document marked, and will let you preview or print a test document
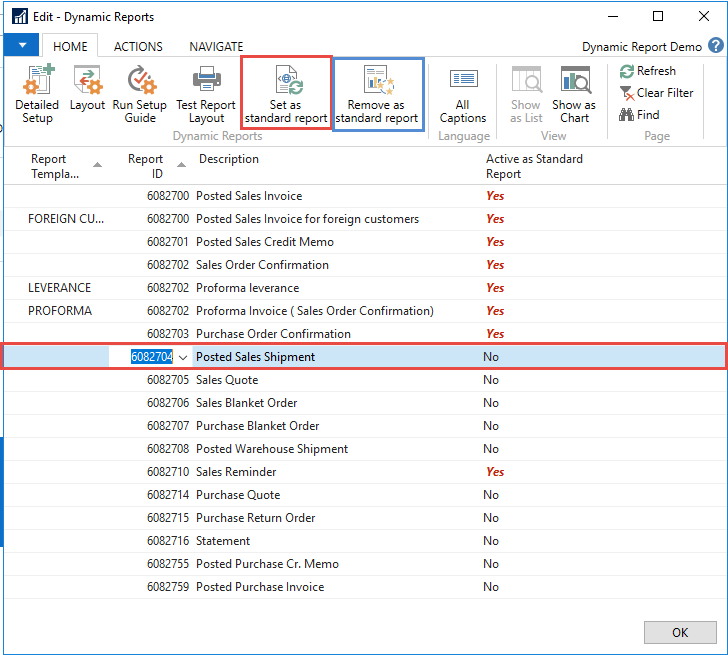
Activate as standard report: This will set the marked document as the standard report in the system.
Remove as standard report: This will reset the report to use the standard report instead of Document Customizer
4.1 Activating the reports
Directly in the Document Customizer menu, it is possible to activate Document Customizer, as standard reports.
Mark the document you want to activate and press on “Activate as standard reports”.
In the column “Activated as standard reports” it is possible to see if the report is activated or not.
If you want to deactivate the Document Customizer, mark the report and choose “Remove as standard reports”.
7
5. Manage Layouts – overall setup
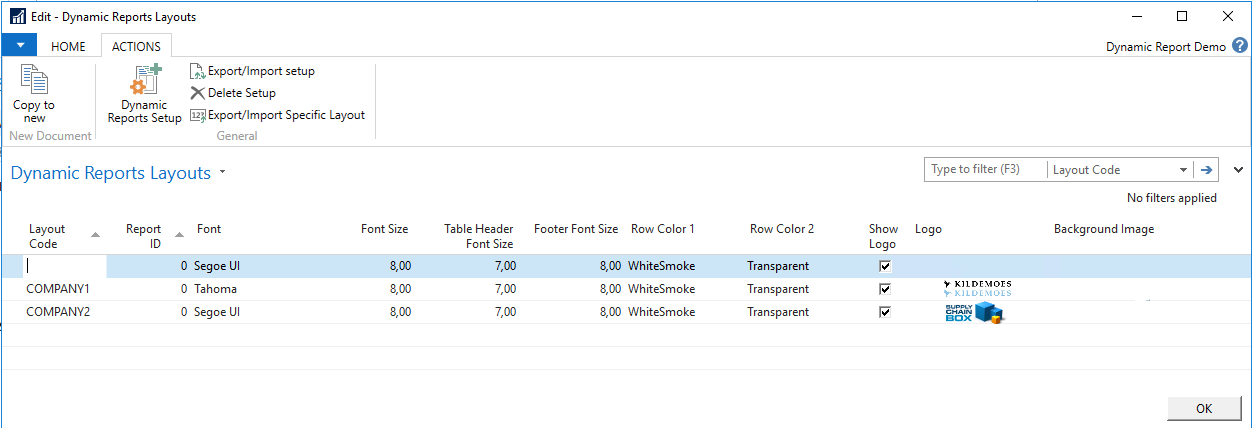
In the overall setting in “Document Customizer Layouts” settings for fonts, font size, logo and position of addresses are configured.
5.1 Layout code
It is possible to have more than one layout even in the same company. E.g. if two different brands are in the same company, it is possible to have two different logo’s applied to the documents. This can be managed by the layout code.
You can make a new Layout code, by copying an existing setup line.
Mark the line you want to copy, in the tab select Actions and press on “Copy to new”
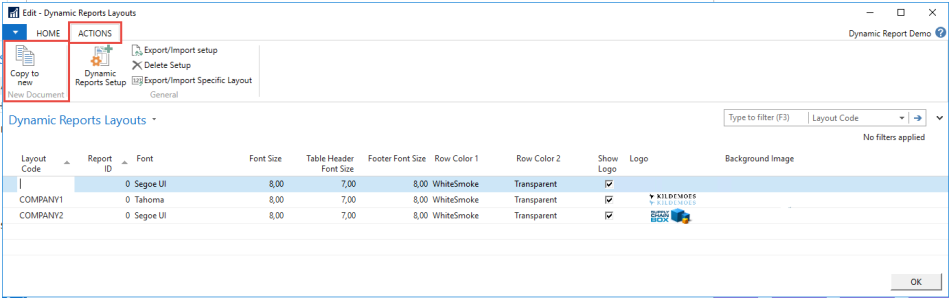
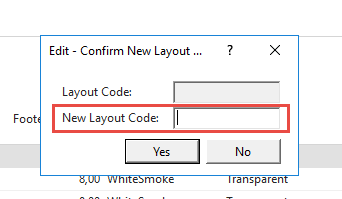
State a new code, in the field “New Layout Code” and press ok.
Your setup has now been copied, and you can edit it as you please with other pictures, fonts etc.
8
5.1.1 Naming of Report Code
If working with more than one Layout code remember to have a blank code, like below, this will be used as the default if nothing else is actively chosen.
5.2 Report ID
The setup can also be done for each Report ID, if different setup is wanted for each report. If this is desired Report ID is specified on the line. But please note it can't be used in combination with Layout code. It is one or another.
5.3 Design
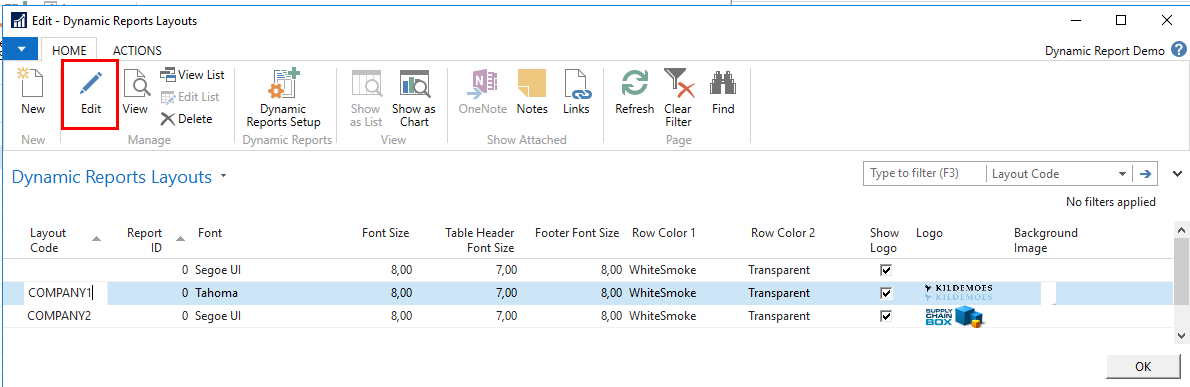
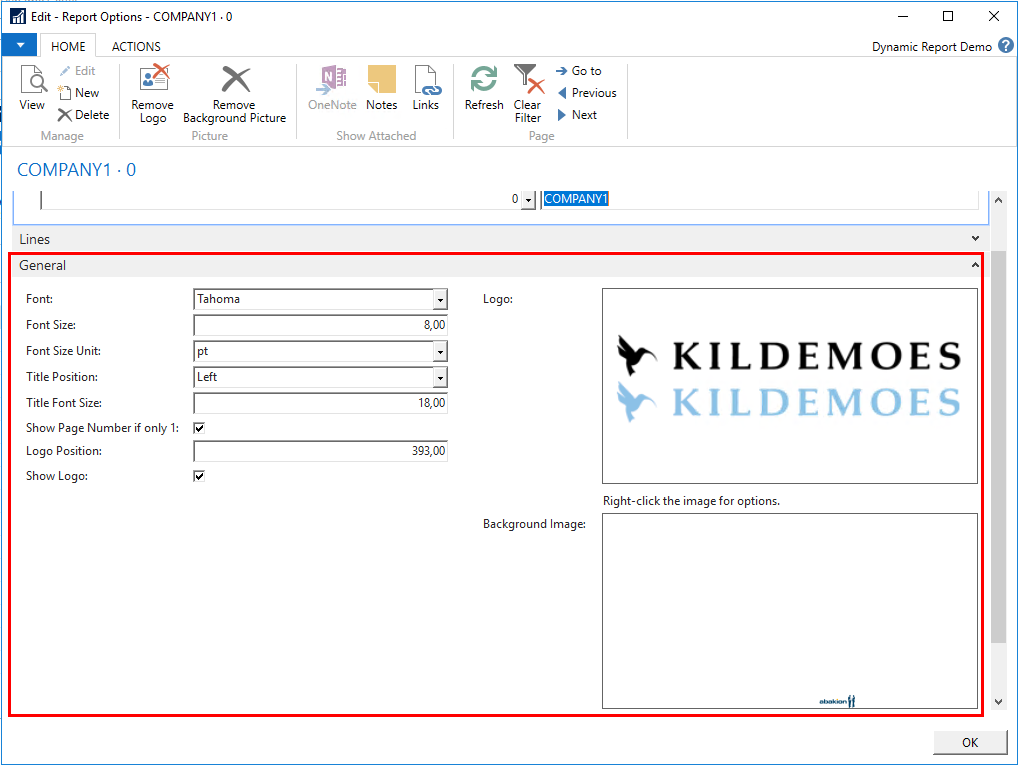
The rest of the setup columns is modification of the layouts appearance. Such as Font, Font Size, Position of addresses and logo.
Mark the layout you want to modify, and press on edit in the ribbon
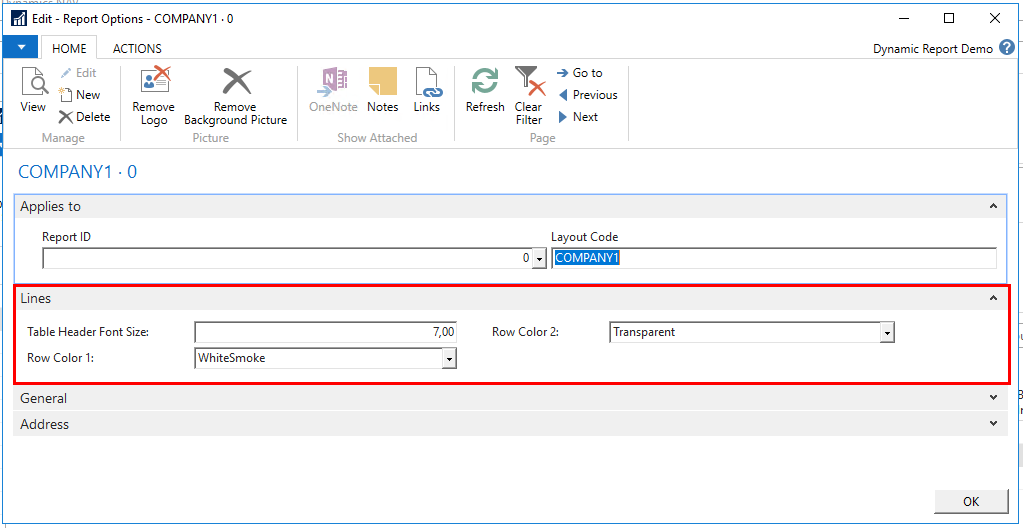
In Lines you can define the font size for the table header, and if the lines on the report should contain a color. "Row Color 1" and "Row Color 2", define if the lines on the report should be the same or different colors. "WhiteSmoke" makes the lines light grey and "Transparent" will be transparent.
3. In General you can edit, Font and font size, and title font size.
Title position defines if the title should be right or left. The Title and Logo are place opposite each other on the page and the logo will automatically be shown opposite.
The report is as a default set only to show page number if the report is longer than one page. It is possible to mark the “Show Page Number if only 1” if you also want page number shown when the report only is covering one page.
Another relevant modification could be the positioning of the logo. The higher the number, the more to the right the logo moves.
You can mark if Logo’s should be visible on the reports or not.
If the “Logo” is left blank, the logo is automatically imported from Company Information, as long as “Show Logo” is active. To add a picture right click with the mouse and select “Select Picture…”. The format should be PNG.
It is also possible to add a background picture. The formats for the picture is 713px x 1009px and should be DPI 96. The picture should be in PNG format. There is a margin of 1,5 cm all around the document, so this should be taken into account when designing the background pictures. Please be aware that NAV does not handle graphics in high resolution, so your background pictures containing small details, might not be as desired. We therefore only recommend using this functionality for watermarks on documents.
10
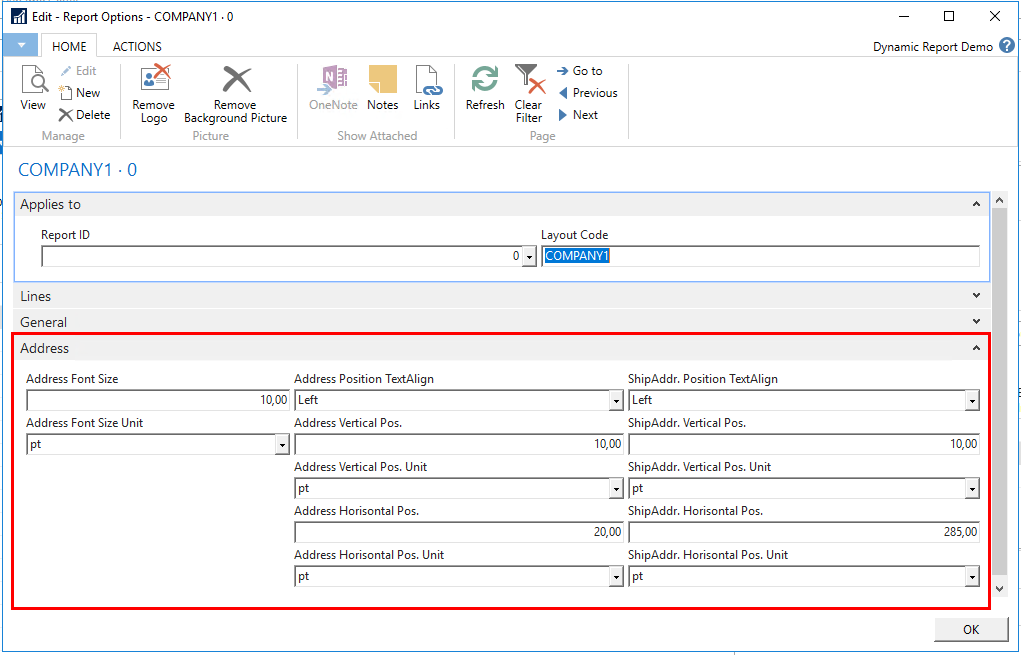
4. In adress it is possible to set the font size of the address and the position this.
11
6. Manage Detailed Setup - setup of individual reports
After managing the general settings, it is time to open “Document Customizer Setup”. You now move from the general overall settings, to the managing the individually reports (invoice, credit memo etc.).
6.1 Templates
Before starting editing your reports, you should make general decision on templates. Will you edit in the standard templates already provided, or would you like to used them as a template for your own templates, so you always have the standard template to go back to.
The procedure for making templates based on standard templates are the same for headers, columns, total captions, footers and sections. In this section header will be used as a case example.
6.1.1 Make a new template based on a standard
This chapter describes how to make your own templates based upon standard templates.
In Header, Open ‘Advanced’.
2. Here is shown the current Header Templates
12
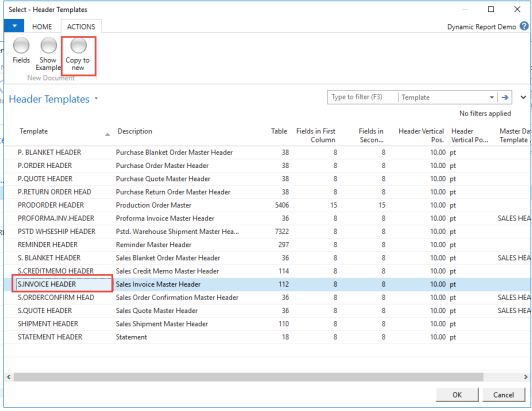
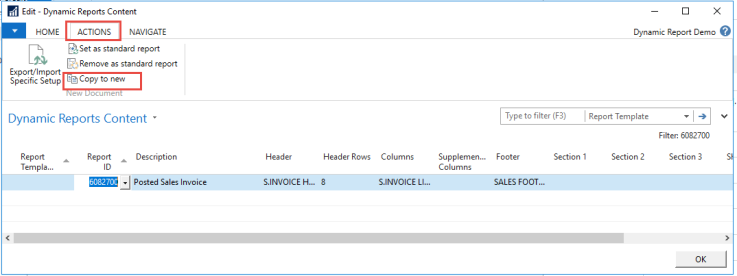
3. Start by selecting one of the existing master templates, Sales Invoice, and use the function ‘Copy to new’ under the tab ‘Actions’.
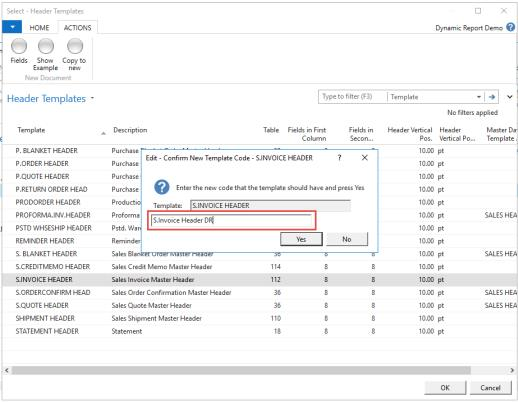
4. You are now creating a new Template code that is identical with the master Template Code. By doing that you will not be working from scratch but will have a basis for the design.
5. Give the new Template a new name.
13
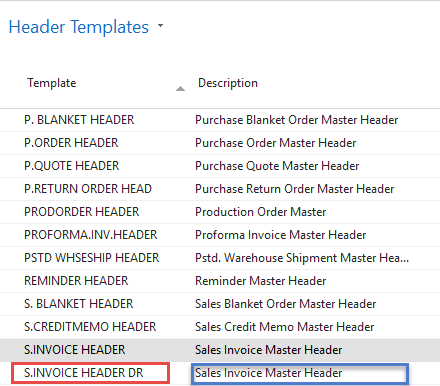
The new Template is now created and listed with the other templates. Remember to change the Description, so that it is more saying.
<
 >
>Repeat this procedure with every template for header, columns, footers etc.
7. Managing changes in reports
In this part it is shown how to preview the reports and how to manage the different parts of the report by adjusting and designing the layout. It is important in working with Document Customizer to understand the different parts of the reports and the position of the elements.
7.1 Editing the reports
It is possible to edit the report in from the list, but it is also possible to edit them from the card view. In the card view you will have more options to edit in.
From the list, you can press edit, this will open the card view.
Card view for editing the report template.
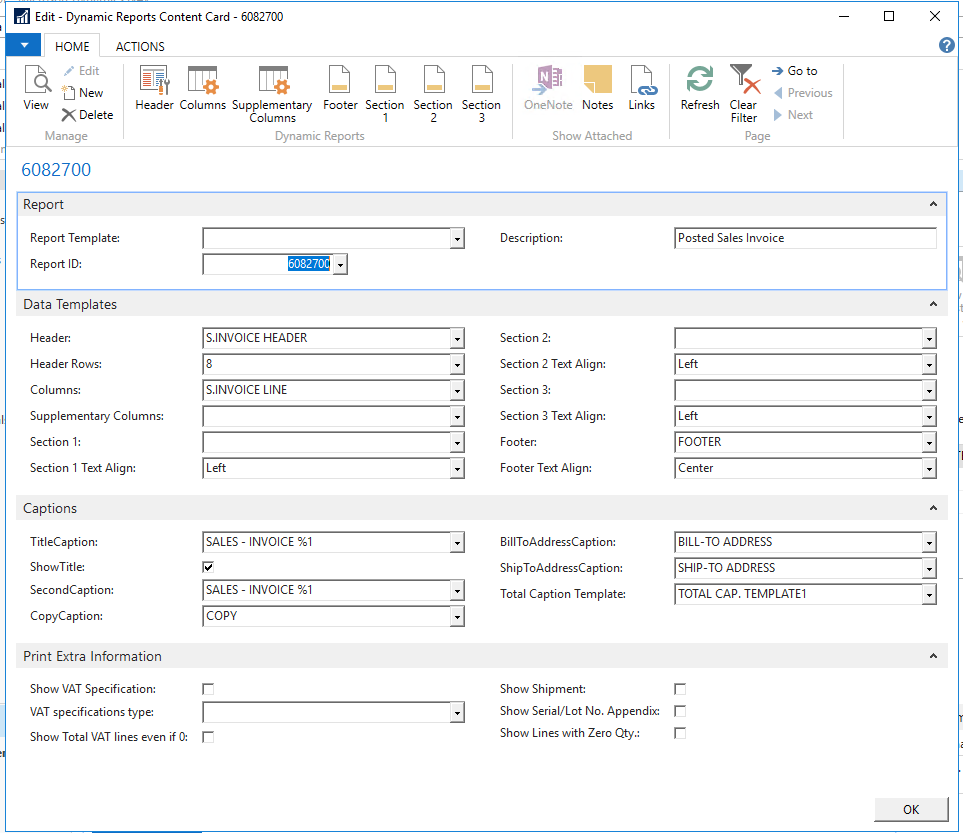
On this page you can setup alignment of sections, specify captions on addresses, and documents, and choose more information to print on the document. See section “Show/hide extra information_” for more
7.2 Preview a report
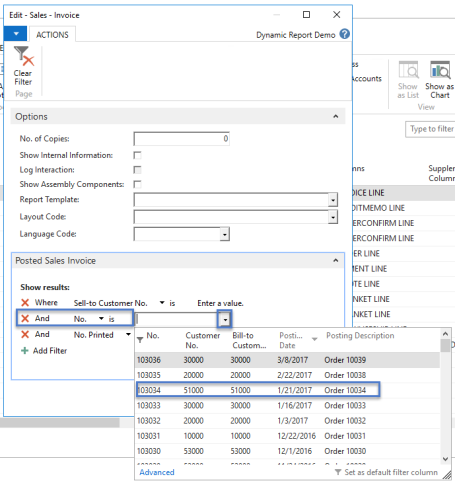
When working with the reports, it can be useful to check one’s changes repeatedly. This can be done directly from the Document Customizer constant page, by the function “Run Report”.
Mark a report that you want to check and press “Run Report”.
Select a document no and click “Preview” in order to see the layout of the report. Please be aware that missing data in NAV will result in an incorrect layout.
When previewing the report it is recommended to note the areas of the report in which modifications is needed in order to remember everything. Nevertheless, remember that you can preview the report an unlimited number of times and the first couple of times using Document Customizer this will be done quite a lot when testing the effects of different settings. If you realize that some of the general settings are wrong just go back and adjust, and then move back into Document Customizer Setup. When all the general settings are correct, you will now work with Header, Columns, Footer and Section 1-3.
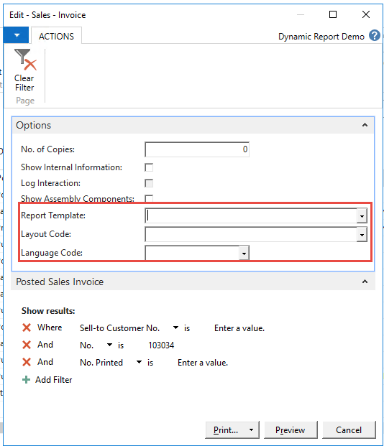
7.2.1 Preview with Report Template, Layout Code and Language Code
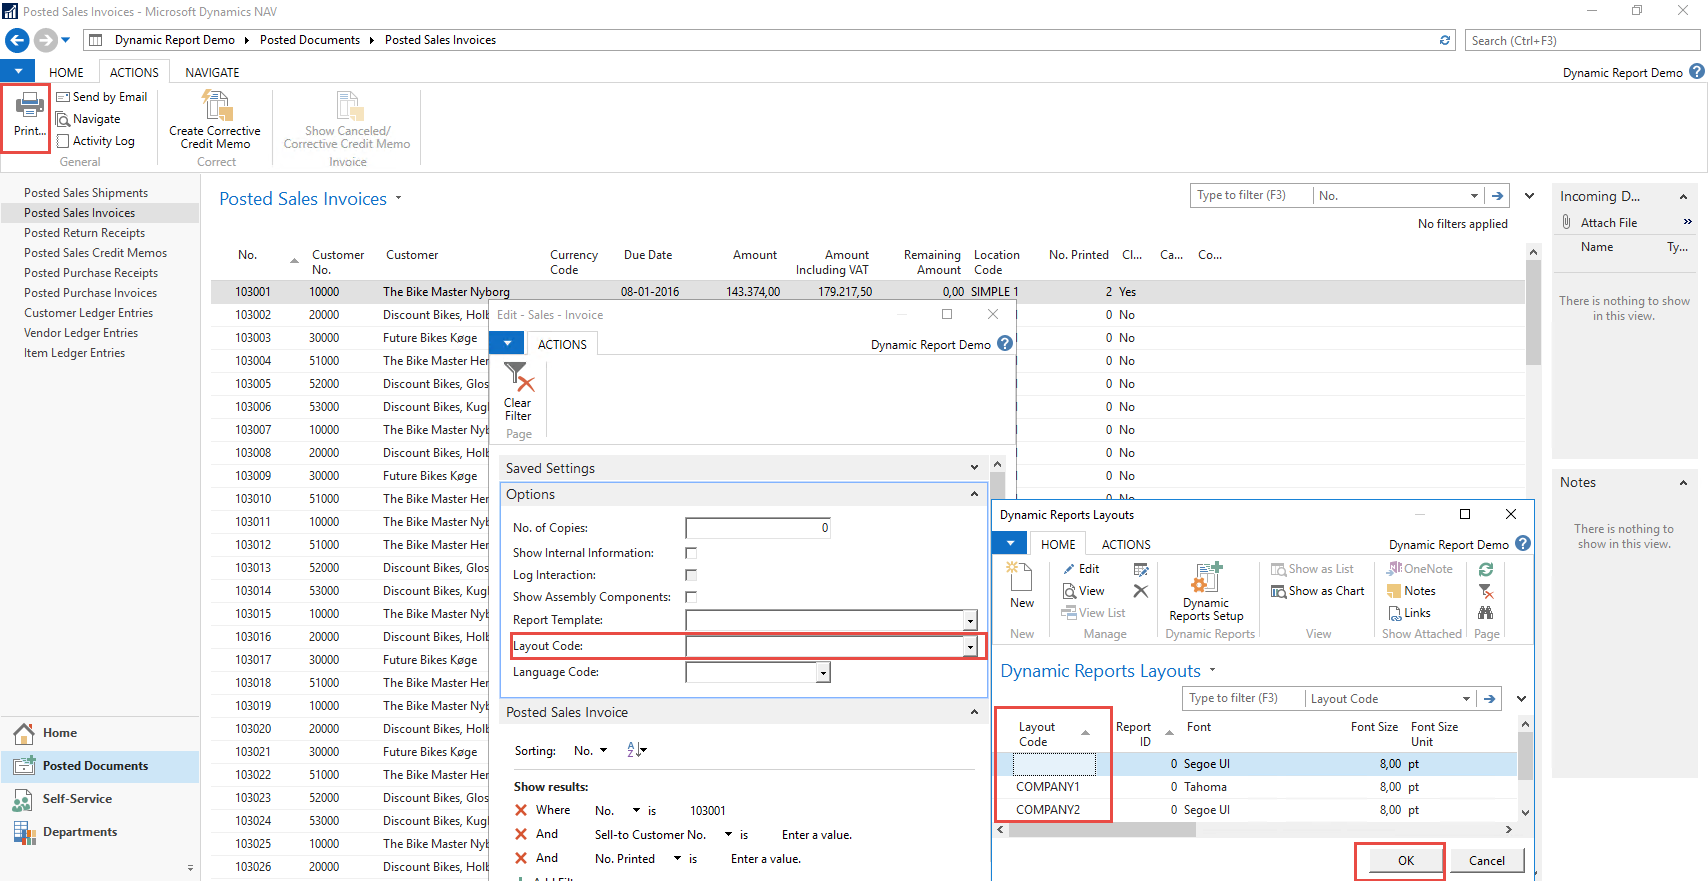
When previewing or printing the reports it is also possible to change the Report Template, Layout Code and Language Code. Please see sections for the description of this. See 8.3 Choose Layout code and Template code when printing for info.
Report Template: Relates to the individual report level
Layout Code: Relates to the overall setup, with fonts and logos
Language Code: Makes it possible to preview or printing the captions of the report in another language than specified on the document.
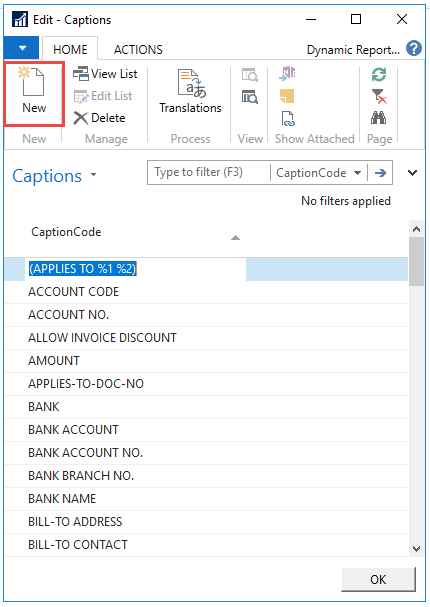
7.3 Managing All Captions
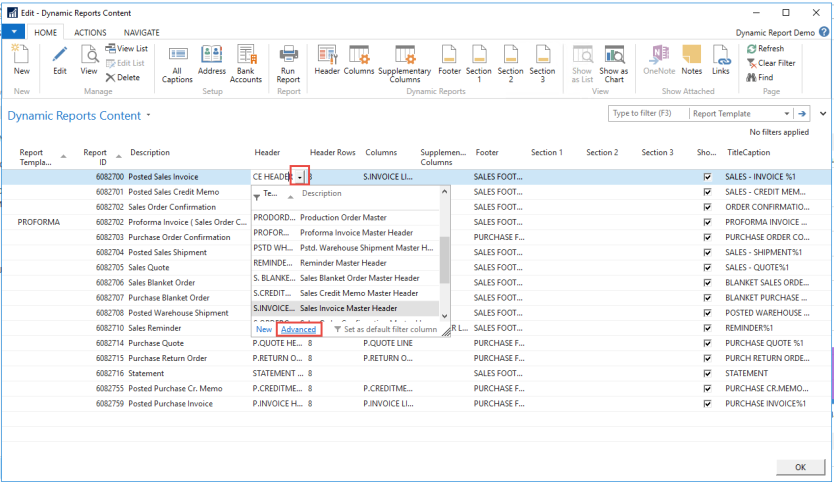
Across all reports captions are used to handle the translations of captions used for fields and columns.
The total list can be found in the ribbon, in 'All captions'.

Dynamic Reports Content
The list comes up with all captions already defined. CaptionCode is the name of the Caption.
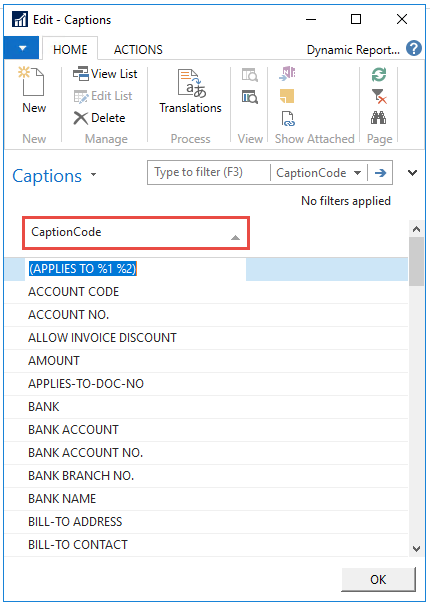
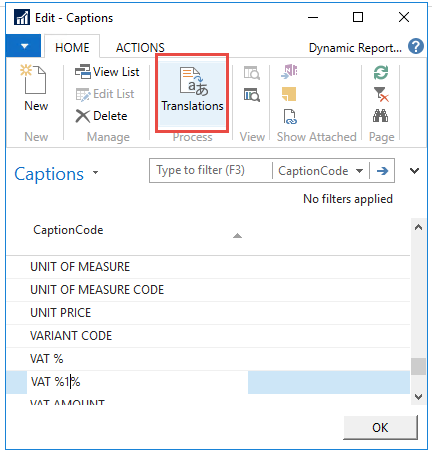
The captions actual text is defined in 'Translation'
17
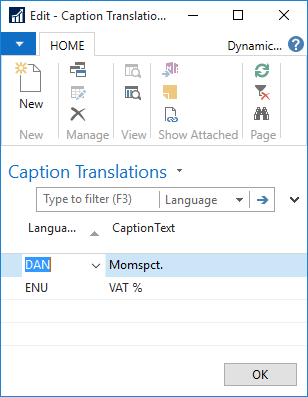
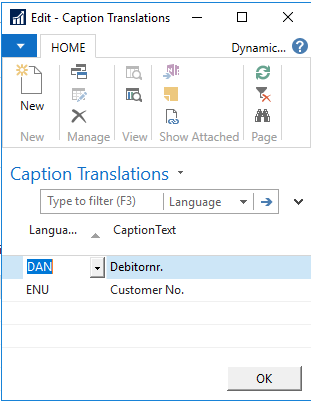
4. In the ‘Caption Translations’, each specified language is linked with an actual CaptionText. You can add as many translations as wanted.
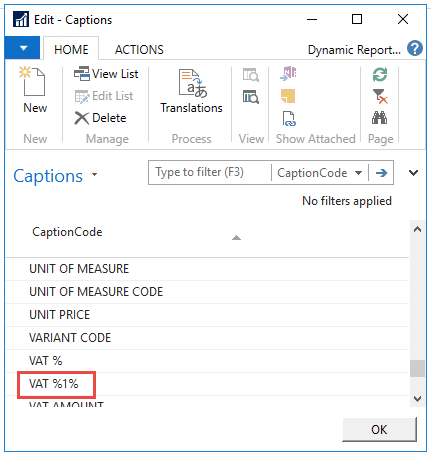
5. Some CaptionsCode contains a parameter, stated as %1. It is not possible to change this parameter. It has a default value connected to the specific caption.
6. Please note that the captions are used across the reports. So if the text is changed, it will be changed everywhere that the specific caption is used. You might be better off creating a new caption to your specific needs than changing and already existing one. You do this be pressing ‘New’.
7.3.1 Setting the default language for captions
It is possible to choose which language code that should be used as a default, if it has not been defined on the costumer card.
In Actions press on “Default language”
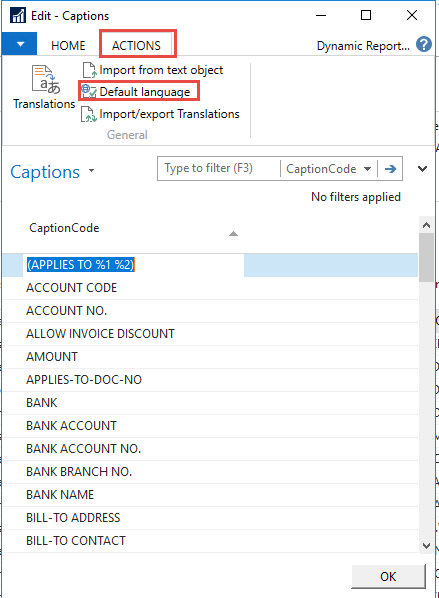
Choose the language that you want to use as default
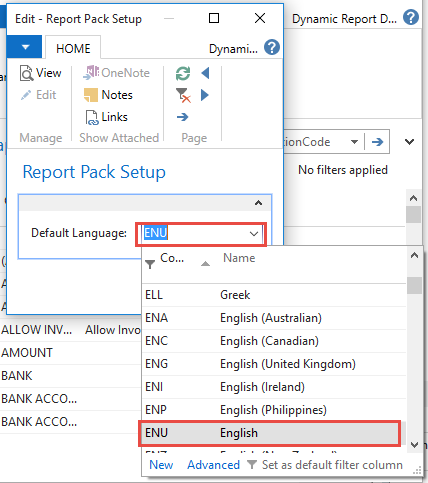
The system will now use the ENU caption, when not other way defined.
Please note that in order for it to work, you will still need to have translated all captions into the chosen language.
If you chose a language that have not been translated the system will take the translation for the first alphabetic language. In this case as we only have DAN and ENU, it would take the DAN caption translation.
7.3.2 Translate captions in Excel
It is possible to export all your captions to Excel and translate then and import them back into the system. This makes it fast to ass translations to new language.
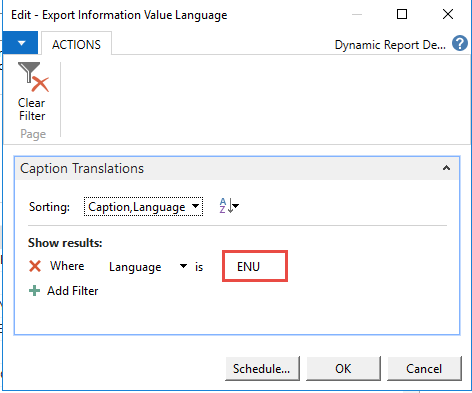
In Captionm in the tab Actions, choose Export to excel
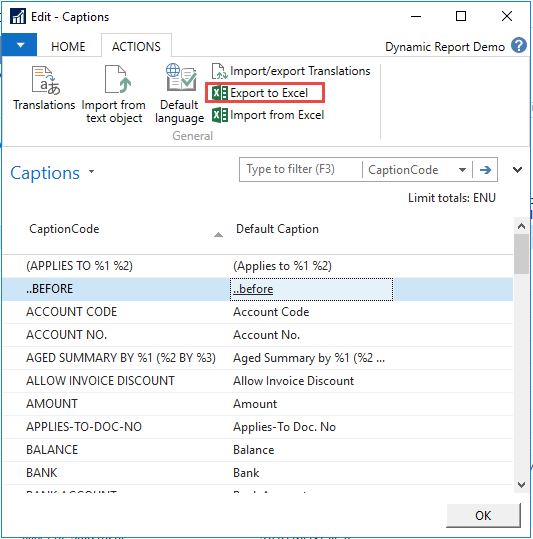
Define which language you want to export, and press ok
Open the Excel file.
Add the New Language code and the Caption text
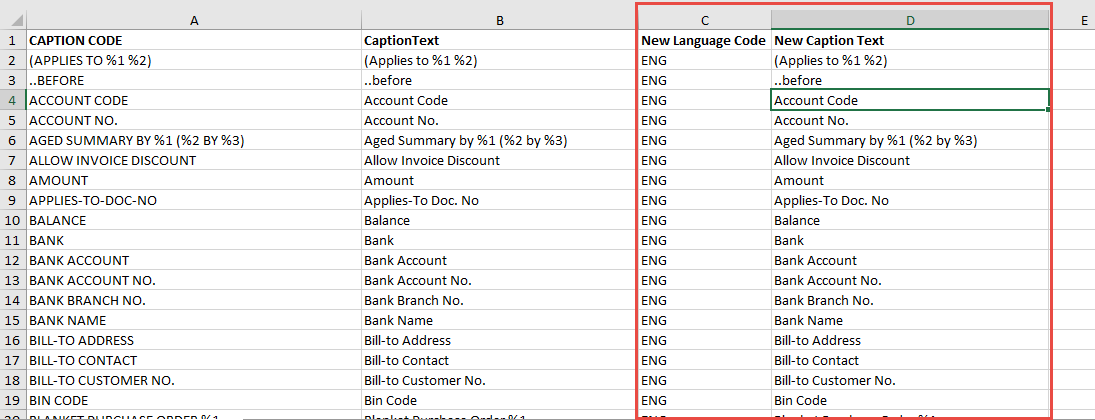
5. You can also add new caption for multiple caption in the excel file. Give it a Caption in the first column and add the language code and the caption text for each language defined.
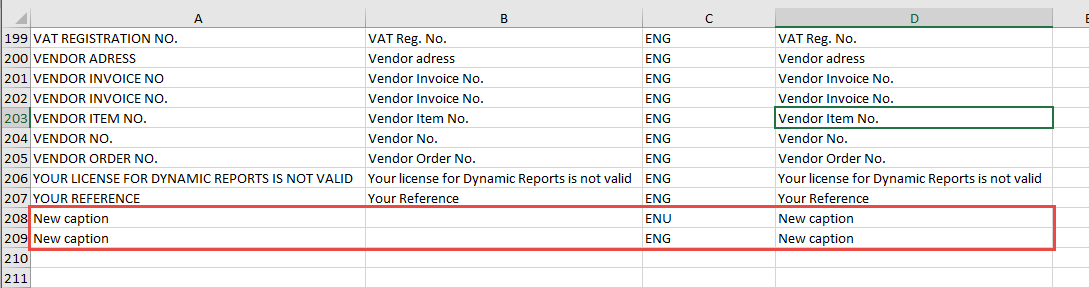
6. Save the file.
7. Press on Import from excel, in the Caption window.
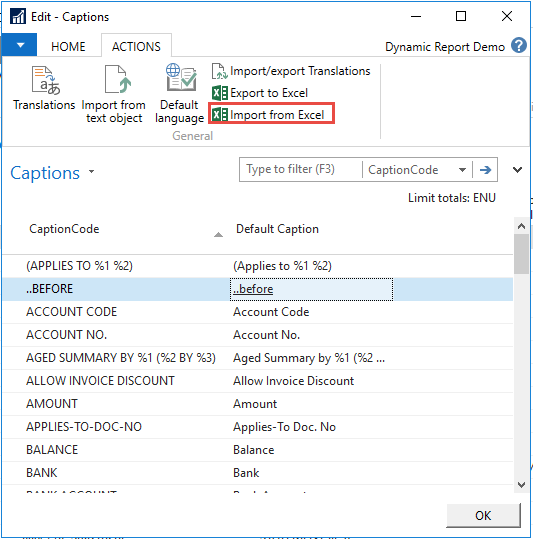
8. Find you file and press on OK.
9. Be because we added a new caption, you will be asked if you want to add it. Press yes if you want to add it, else press no.
10. All your translated captions have been imported.
7.4 Managing Report Template
There are cases where it is wanted to use the same report, with small changes between them. E.g. A Sales Order Confirmation and a Sales Proforma Invoice is nearly the same except for the caption of the document title and the header. This can be achieved with the function of layout code.
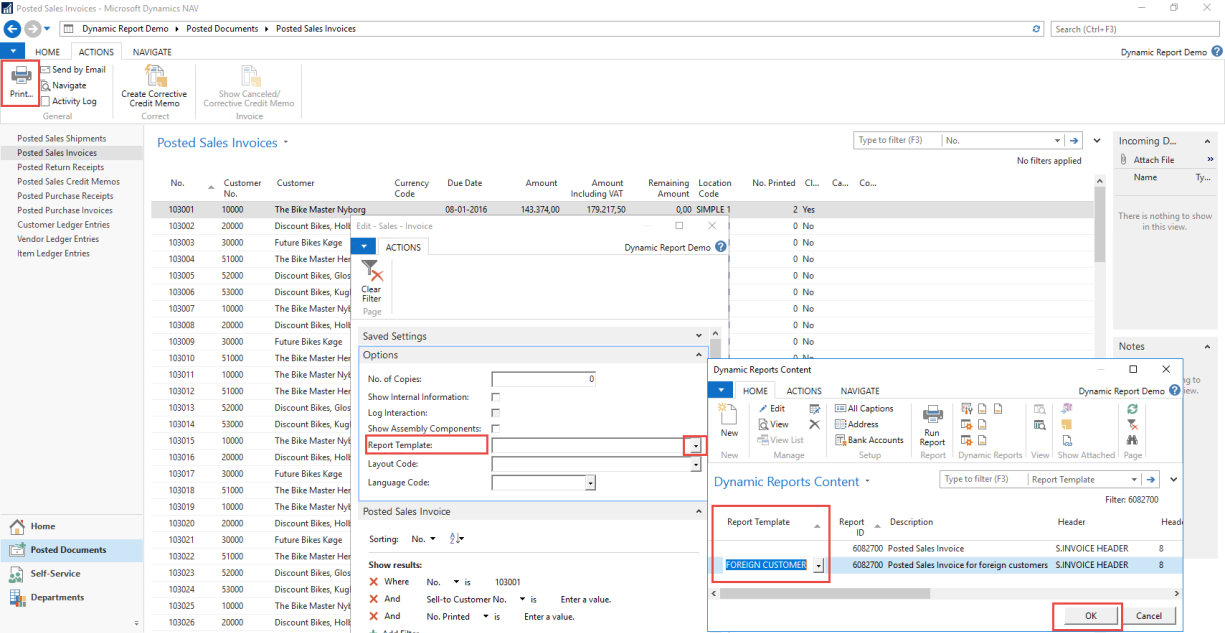
Mark the document that you want to make a similar template of. In the ribbon tab Action, press on Copy to new.
Give it a template name and a description. It is possible to use the same template name for more than one document.
Edit the new Report template as you want to

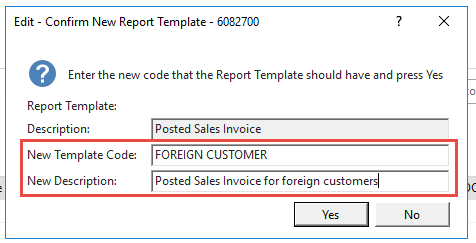
When printing the document, it is possible to choose which layout to use, and then it is possible to choose Proforma invoice.
7.5 Printing different Layouts, Templates and Languages
When printing the reports, it is possible to choose both a Layout, Report Templates and Language code and make endless combinations.
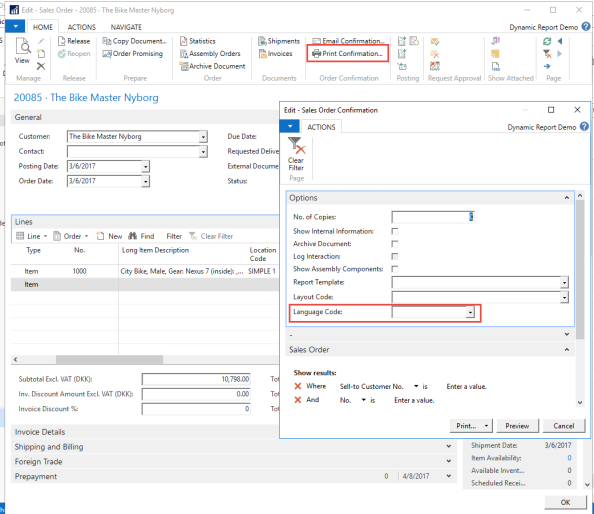
In the Print screen choose a layout code. The layout code is automatically filtered to only showing the ones relevant for the report in question. Shown here is the layout for the Sales Order Confirmation.
If the layout code is left blank, the system will take the blank layout. If there are no blank layout for the specific report, the system will automatically print out the layout that alphabetically comes first.
23
It is also possible to choose a Layout code, where the overall settings with logo is defined.
Thirdly it is possible to print out the report in different languages. If the field is left blank, the report will be printed in the Language Code define on the customer card. Please note that the translations around the system should be in place for this translations to work. From a report perspective captions needs to be translated. Other translations such as "Item translations" will need to be in place.
24
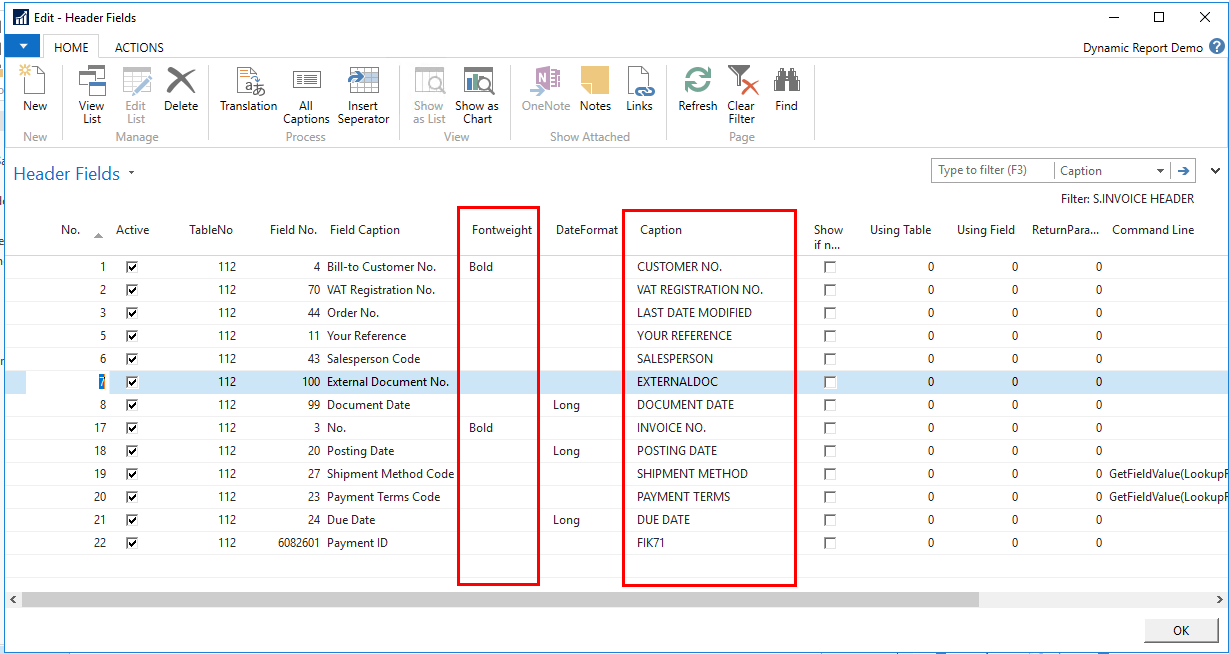
7.6 Managing Header
25
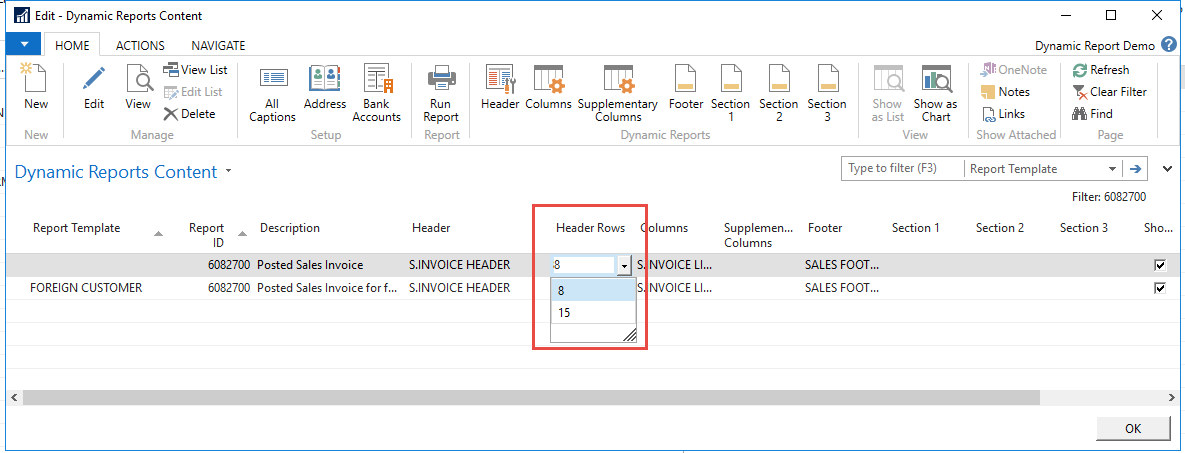
In the setup table choose between 15 or 8 fields in each side of the header. The left fields will be numbered 1-14, right fields will be numbered from field 15 and forward.
To manage reports header content, mark a line and press “Header”
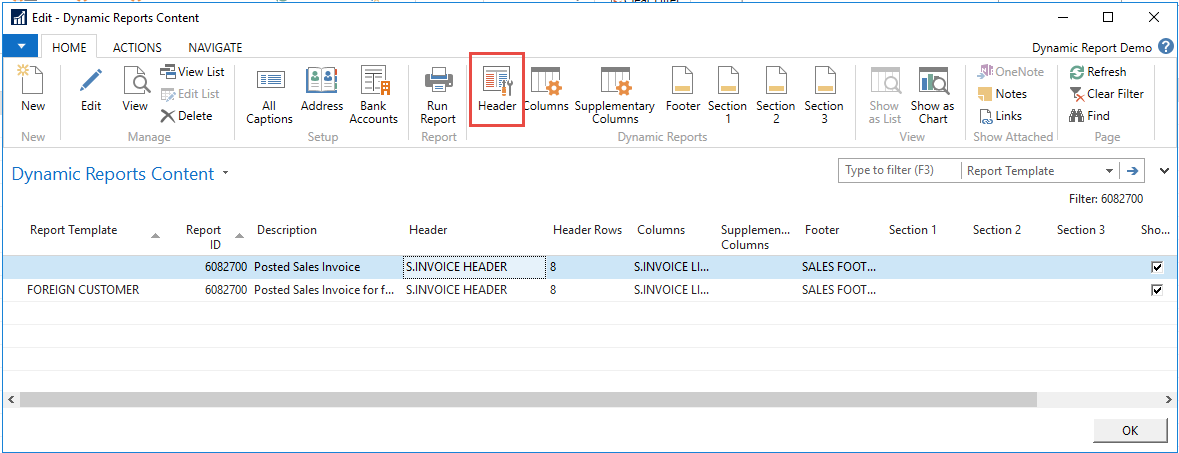
This is the menu for editing the header. Here you choose which information will appear in the header of the report. The header consists of 8 or 15 lines to the left (No. 1-15) and 8 or 15 to the right (No. 16-23). It is not necessary to have data on both sides of the report or to have the same number of lines; it can be combined and built in any way that suit your needs.
You can inactivate any field without deleting anything. This way you can quickly control the number of fields in the header. However, please be aware that the field will not appear without any data unless you activate the function ‘Show if no data’ just beside the ‘Active’ function.
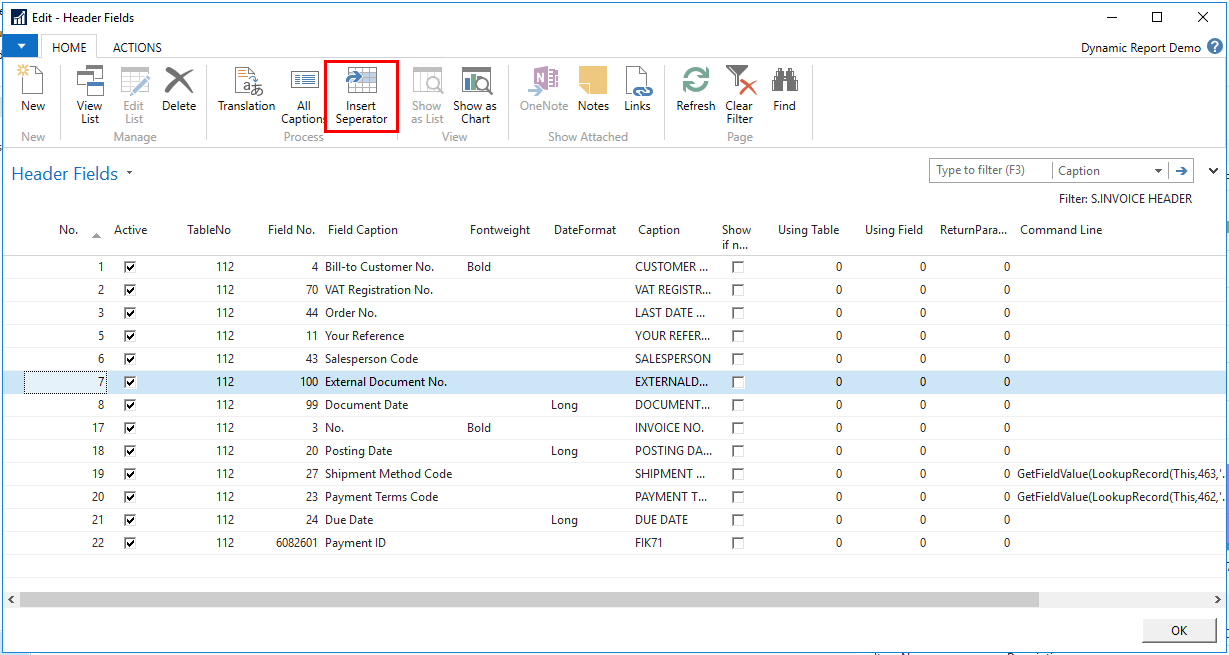
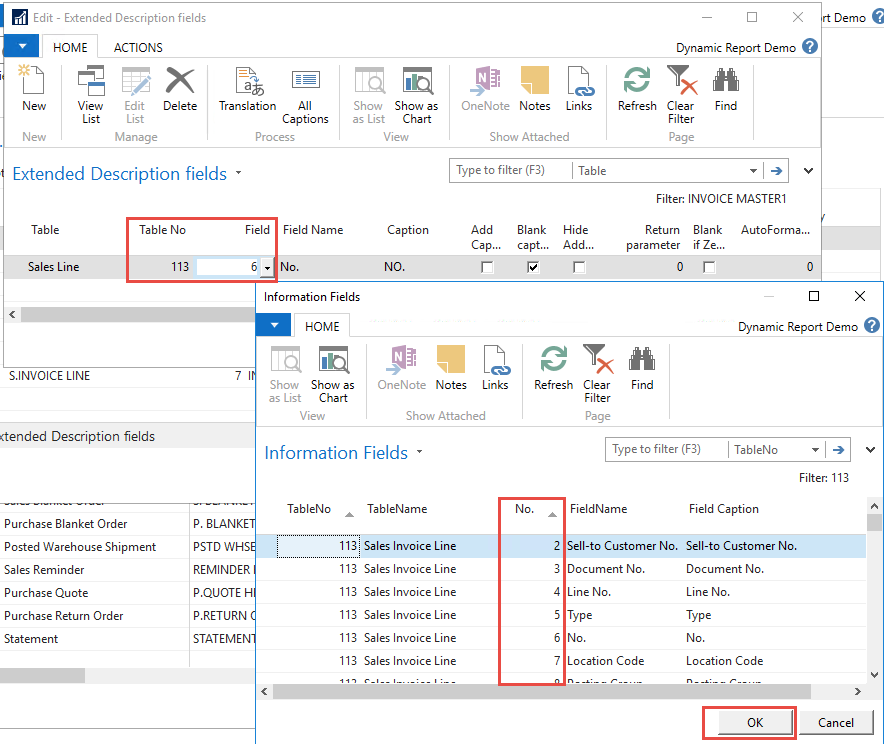
5. The context of the lines is determined by the Table No. and Field No.
6. Either you can decide to modify the existing header fields or you can delete them and create new ones.
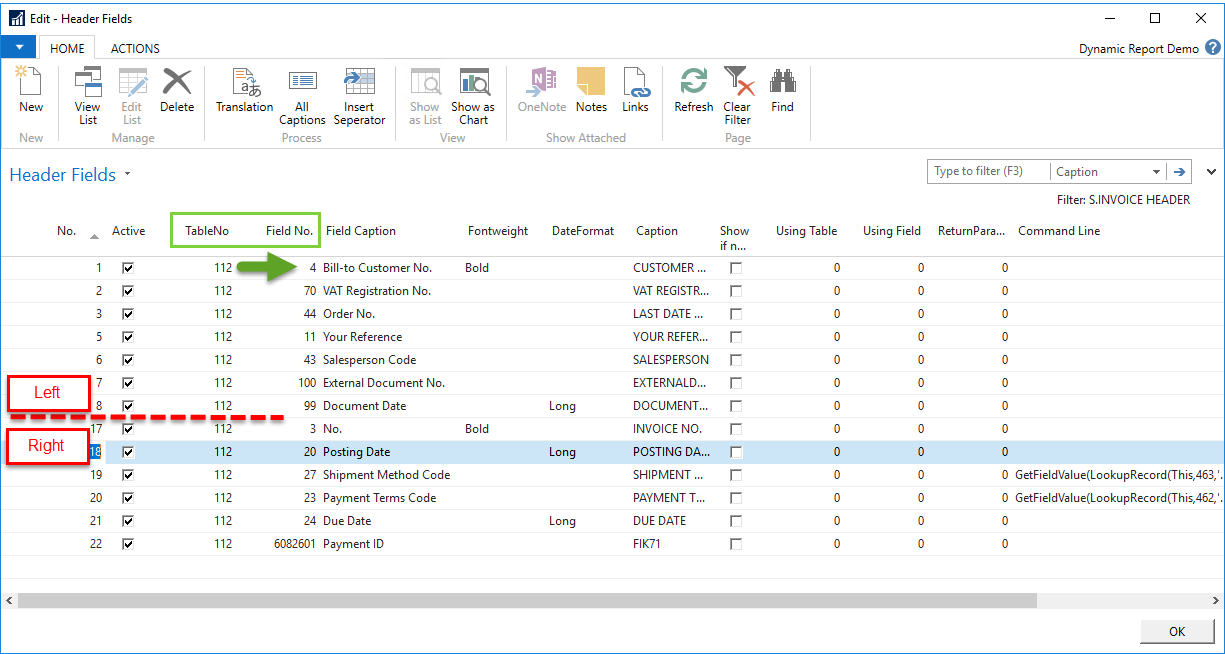
If you would like to add a field somewhere in between other fields use the ‘Insert Separator’ function which will automatically adjust the order of the fields.
7. If you want to add a new line to the bottom just click one the empty line. Assign the new field a number. Remember that the number determines the position of the field in the header
Select the table and then press on the Field No. to pick the desired information
Return parameters are parameters code on the report, that you want to print out on the report with a given caption. This is used eg. On the statement, where the date range is set in rune time, and therefore is not a field we can fetch on a table or in a field.
The DateFormat field has two options; short and long format, which relates to the date fields. “13 august 2014” is a long format. As an alternative a short format, that corresponds to the current language local setting of the system, can be used. For example it will be “13-08-14” for Danish language.
7.6.1 Captions
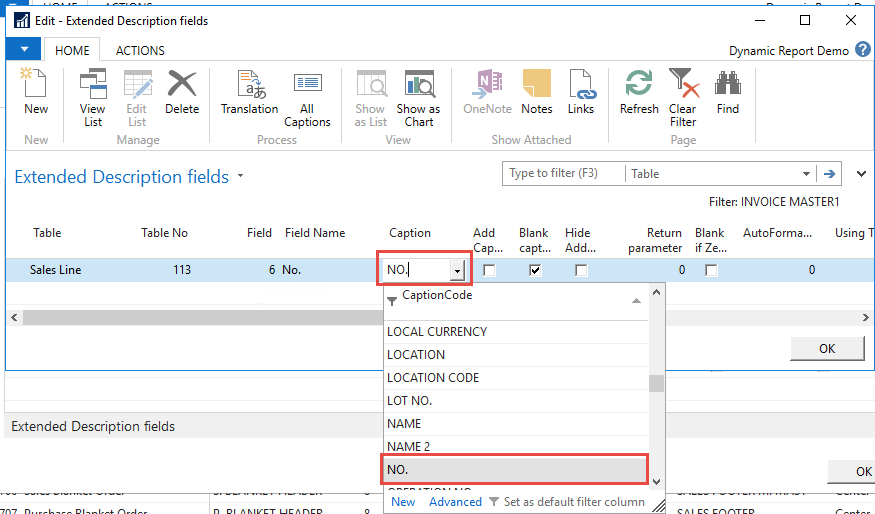
You can adjust the fields even further by customizing the fontweight and the caption.
2. To customize the caption text, the text that describes the information, open “Translation”
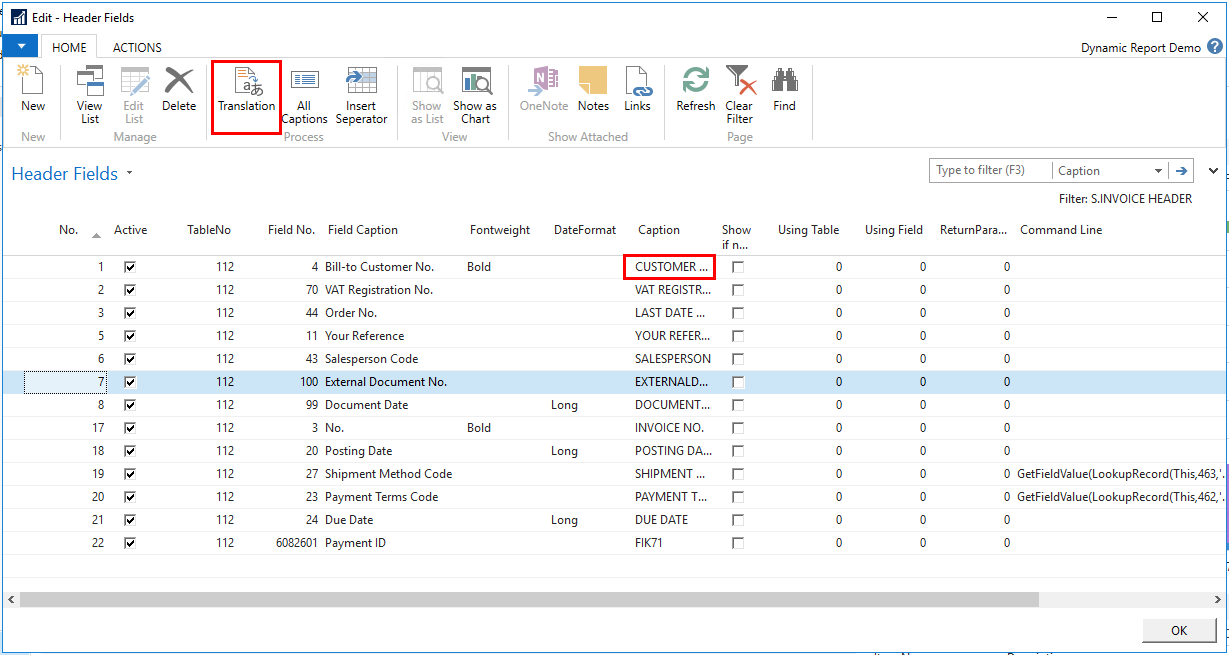
3. Here you can customize the caption that will appear on the report and define the caption in different languages. Please note that these captions are used across the reports. So if the text is changed, it will be changed everywhere that the caption is used. You might be better of creating a new caption to your needs.
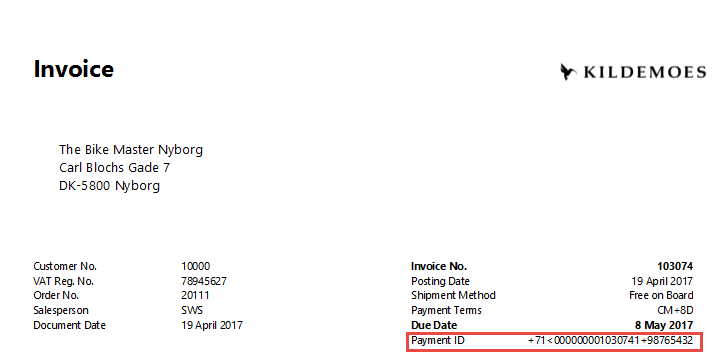
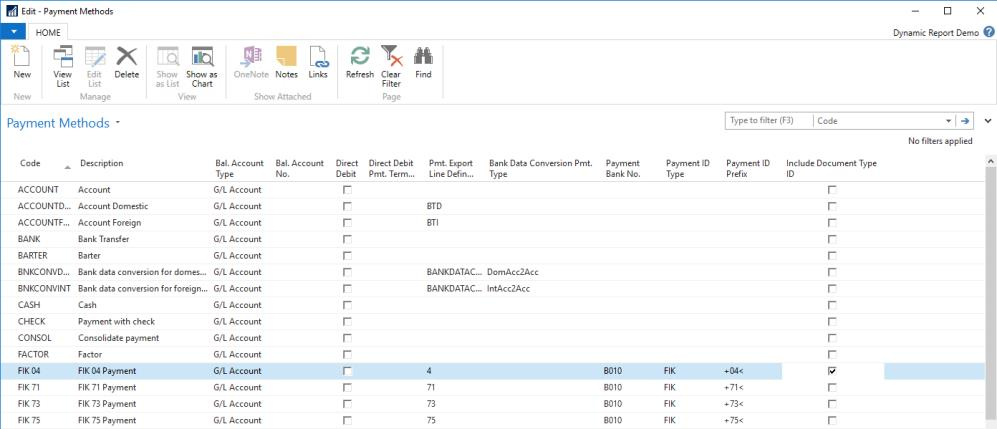
7.6.2 Payment Identification (FIK code)
For the field to appear on the document, it must be specified, where to show the Payment ID eg. FIK-code. Often this will be in the header template. Make sure that this field is choosen in the template. If your document number contains alphabetic letter- the system can’t generate the code
Choose the field 6082601 “Payment ID”
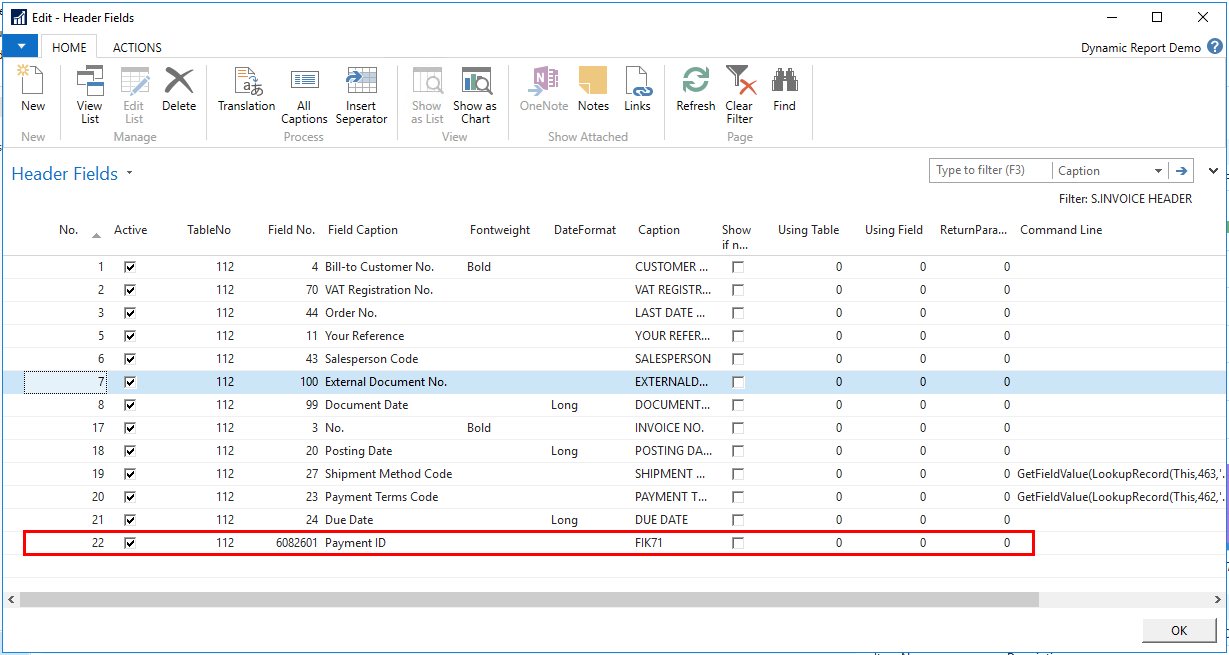
Here the field is shown in the header
7.6.2.1 Setting up Payment Identification
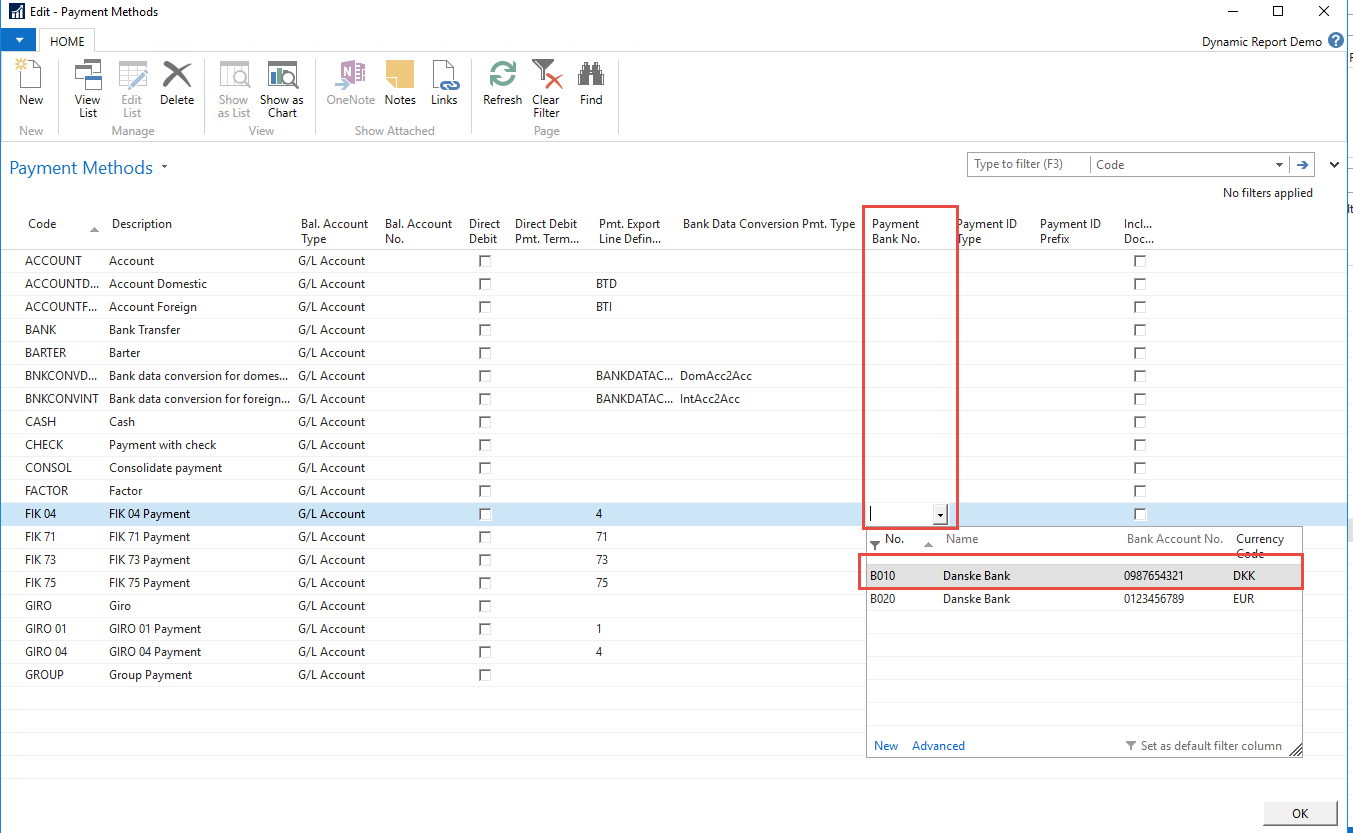
The setting up of Payment Identification is not a part of Document Customizer, but here is a short introduction to how it is set up.
In the Payment Method list, add information in “Payment Bank No.”, “Payment ID type”, “Payment ID Prefix” and optional “Include Document type ID”.
In “Payment Bank No.” choose the bank that the code should refer to. Please remember to as “Bank Creditor No.” on the bank card, for the code to be generated.
3. In “Payment ID Type” choose the type if the Payment ID
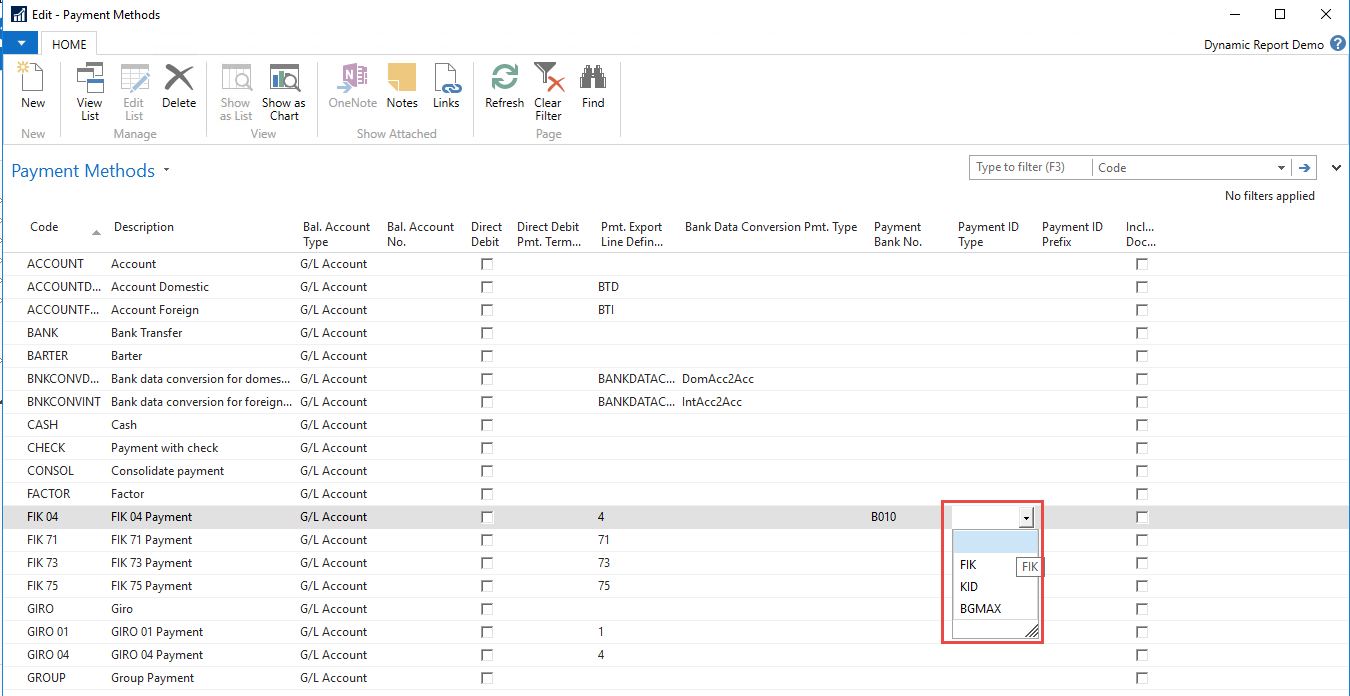
31
4. In “Payment ID Prefix” choose the code that should be stated in the beginning of the code.
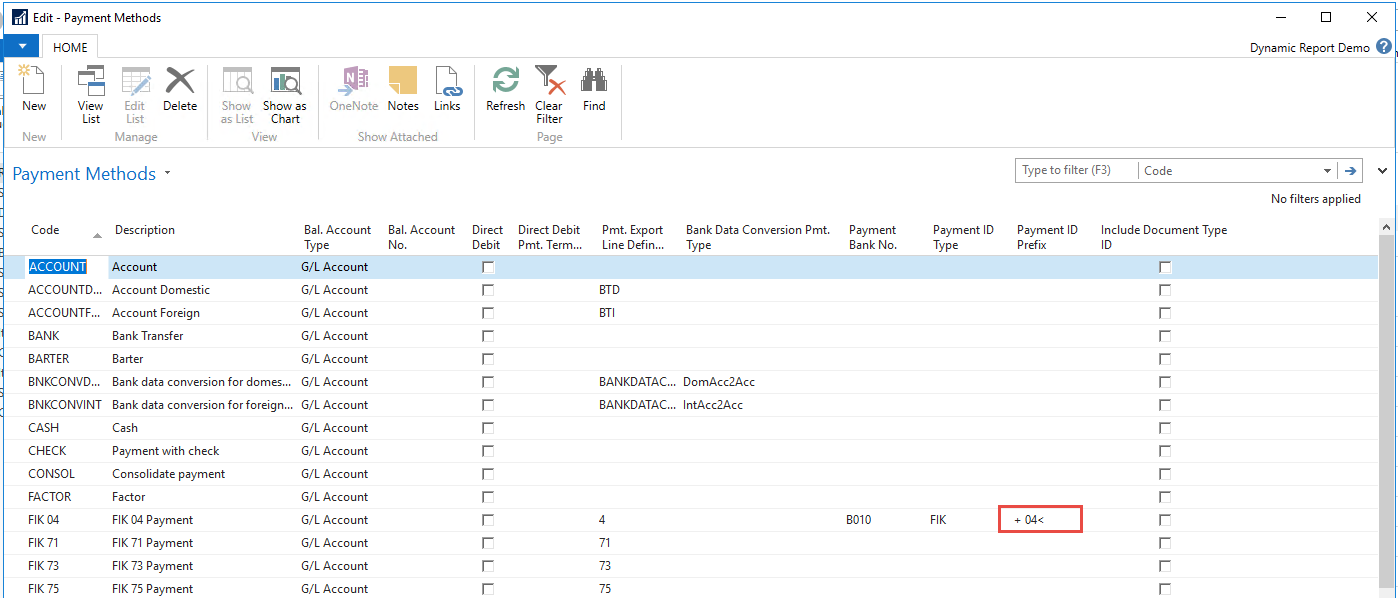
5. If the code should contain a Document Type ID, mark the check box of “Include Document Type ID”
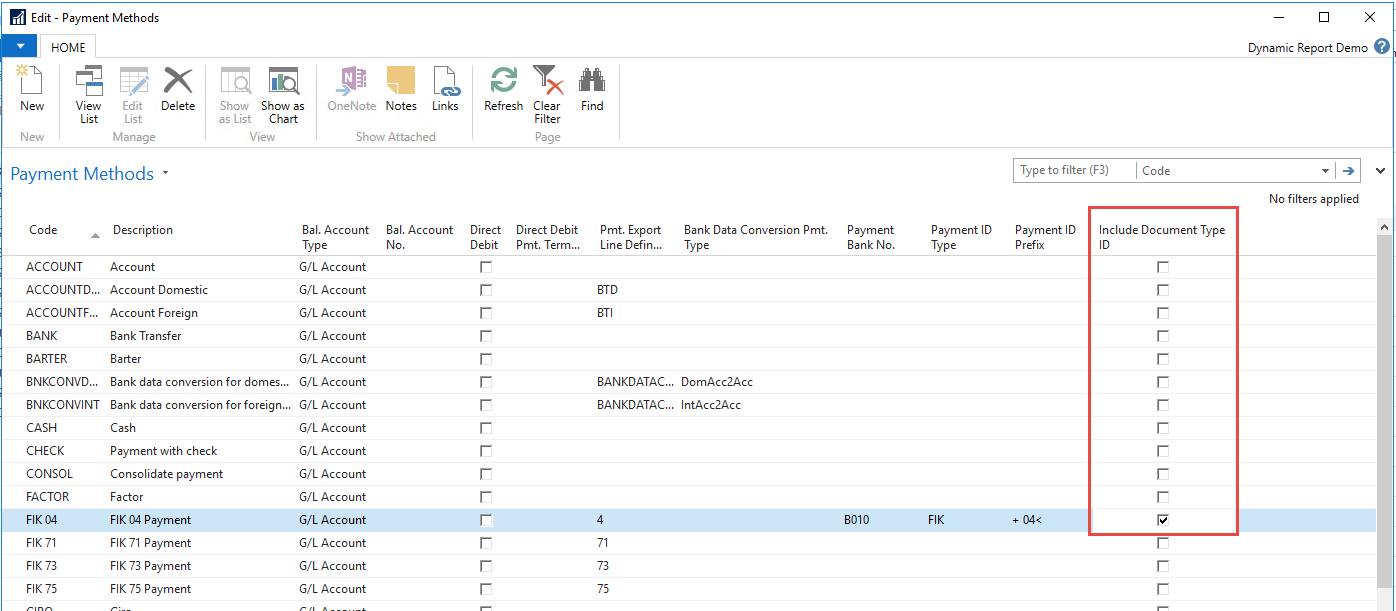
6. Make all the codes that you want and for more than one bank.
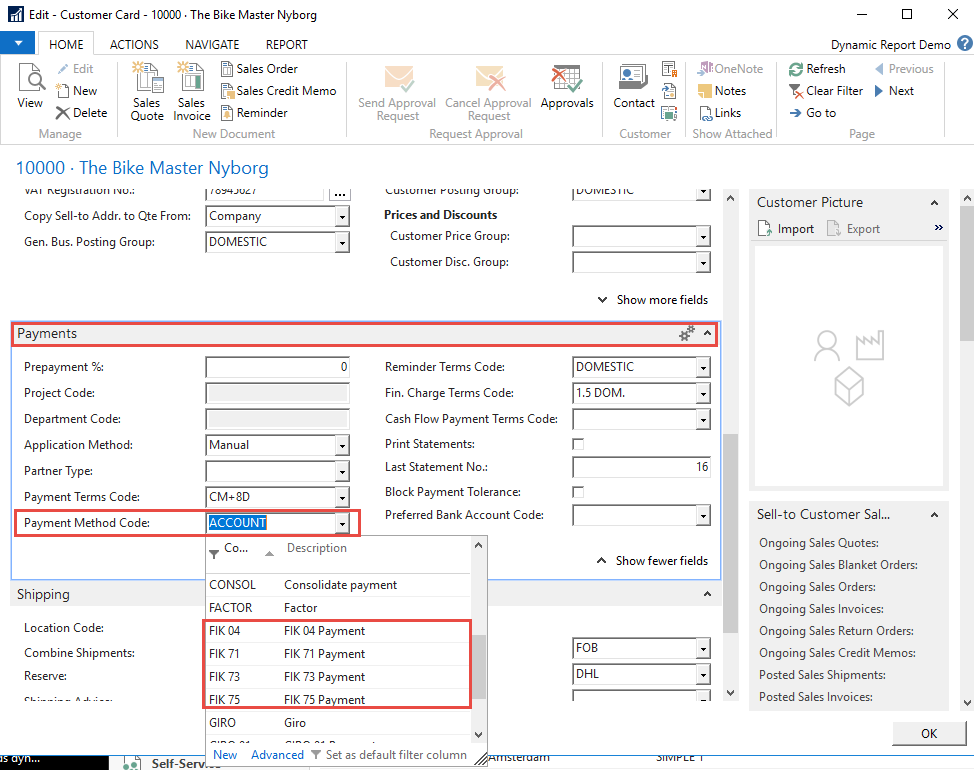
7.6.2.2 Setting up Payment Methods on a Customer
On the Customer card set a “Payment Method Code” from the list, that contains a Payment ID setup. The setup is found in the tab: “Payments” and you might have to show more fields, for it to be shown on the list. This is transferred to documents, but can be changed on the documents.
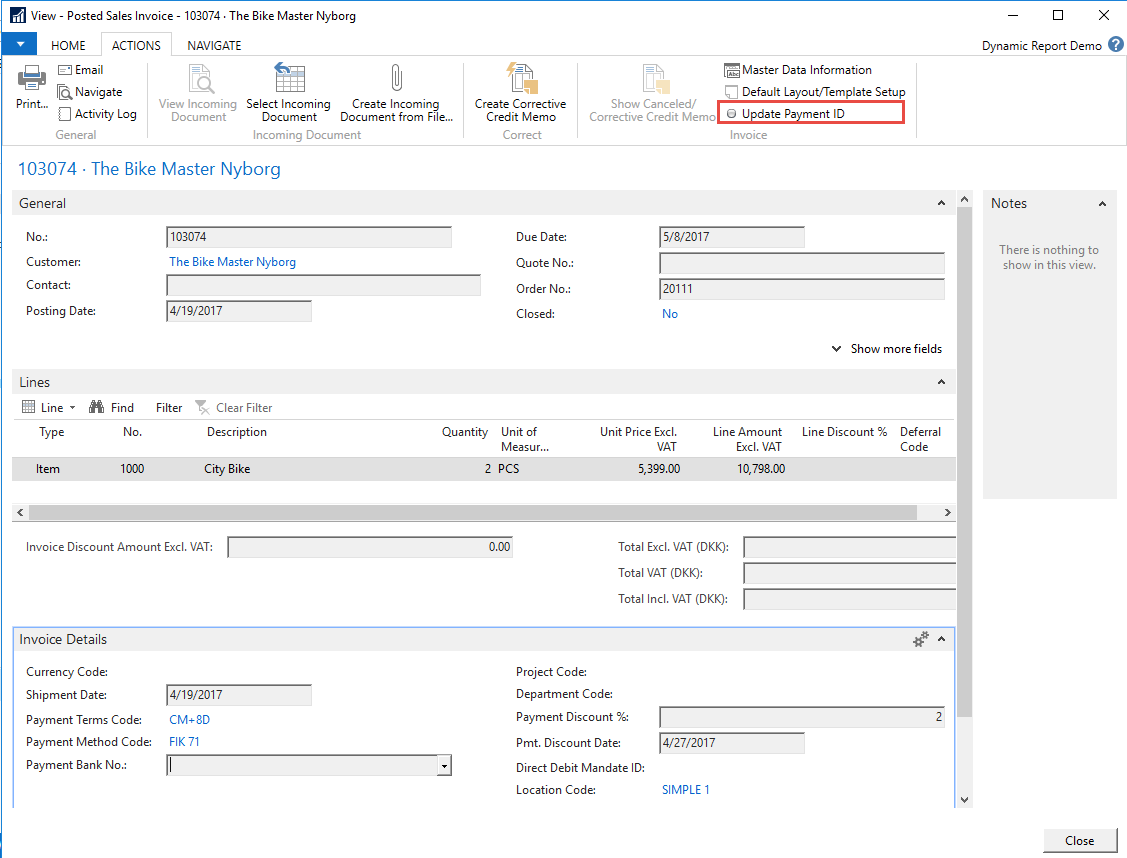
7.6.2.3 Updating Payment ID on posted documents
If you change bank or for some other reason would like to change the Payment ID on already posted documents, it is possible with the function, Update Payment ID
33
7.7 Managing Columns
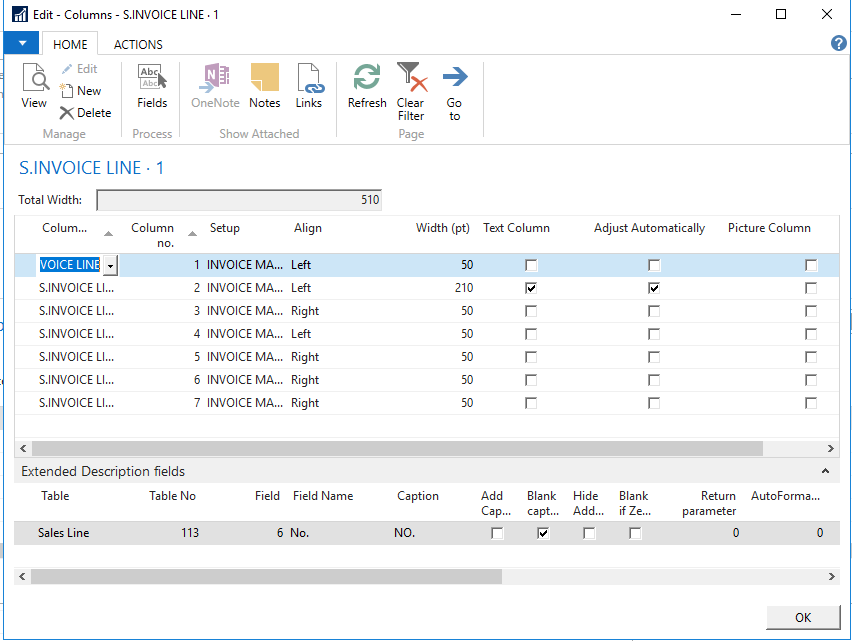
To manage a specific column, mark the line you want to edit and press “Columns”
Here you can adjust the number of columns to match the amount you have just chosen. Just delete some of them or create a new one until the number of columns is as desired. Be aware that the total width always has to be 510. Therefore, it is necessary to adjust the width when adding or deleting columns. If one columns should adjust automatically, you can mark it in the last column, and it will always adjust to 510. You can control the different columns width in the “Width (pt)” column. If you set a column to include a picture, you need to mark this with “Picture Column” on this page ( the width of a picture column should be set to 75 pt, for optimal fit).
Mark the column number you want to edit, and press ‘Fields’ to see the column field and adjust the content. You can on the bottom see which field the column contains, but you need to edit by marking the line and press fields.
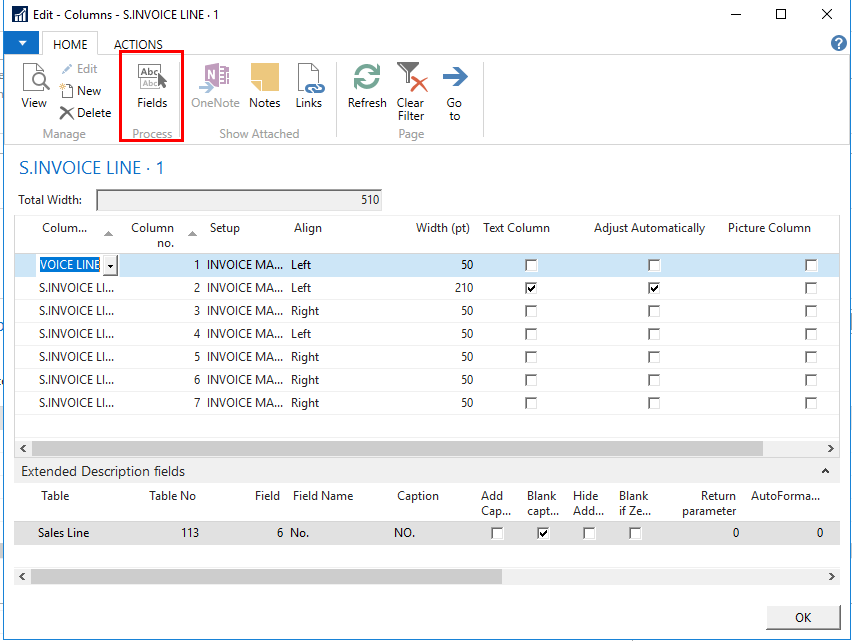
4. You adjust the content by selecting the table no. and field.
5. In caption select the caption that describes the information. It is also possible to make a new Caption if none covers the need- remember to add translations on the caption.
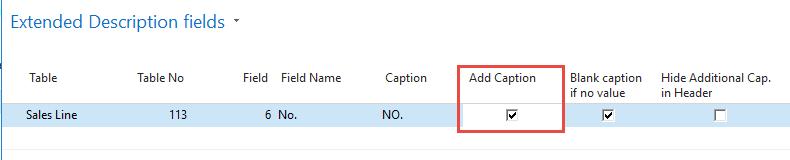
Mark “Add caption” if you want the caption to visible on the line in front of the value.
Mark “Blank caption if no value” if you don’t want the caption to show if there are no values on any lines.

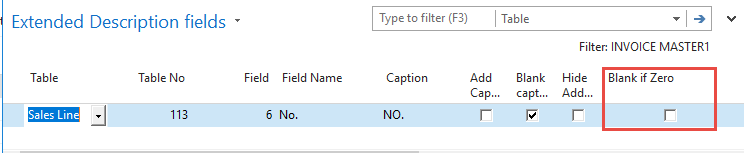
Mark “Blank if zero”, if you don’t want to show a “0” is this is the value that is otherwise shown.
The settings for Autoformat depend on the type of data. When setup is for amount, unit amount, and other types of sums, use.
Amount - AutoFormatType must be 1
Unit Price - AutoFormatType must be 2
Other - AutoFormatType must be 0
When setting up an date field
yyyy-MM-dd when 0 is written
dd-MM-yy (DK) when 1 is written – this format will follow the regional settings on the server pc. So in USA the format will e.g. be MM/dd/yy

10. If you want to make your own setup template, you can also do this, by giving it is own name.
7.7.1.1 Number of columns in the template
As a standard all column templates are set to allow 11 columns. If you want to change this you can do this. This is done in Columns “Advanced”.
“Edit List” and choose an “Template Number”. “Template number” + “Number of Columns” are as ground rule always 10. Template Number 1, have 9 columns and Template Number 2 have 8 columns etc. Template 11 has 11 columns and is default.
7.7.2 Add more than one field in same column.
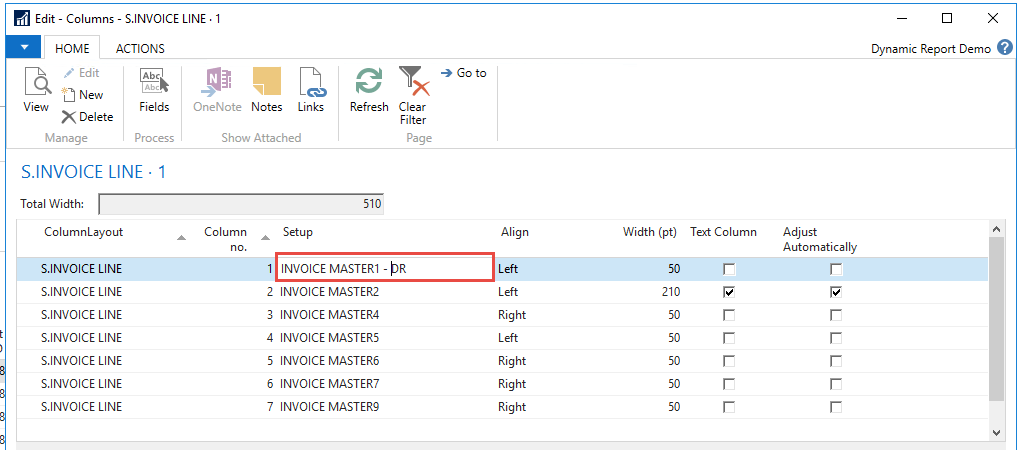
It is possible to have more fields shown in the same column, if needed. In this example, we want to print the Tariff No. Add an extra line in the column where the text should be. Please note the picture columns can only contain one line.
When using a field that is not in the Sales Line table, it is possible to refer to another table, using a field from the sales line as key. In this example, we use the field (Item) No. from the Sales Line table as a key. Using this, we find the related (Item) No. in the table 27 (Item table) and refer to the field we want to print, in this case the Tariff No.
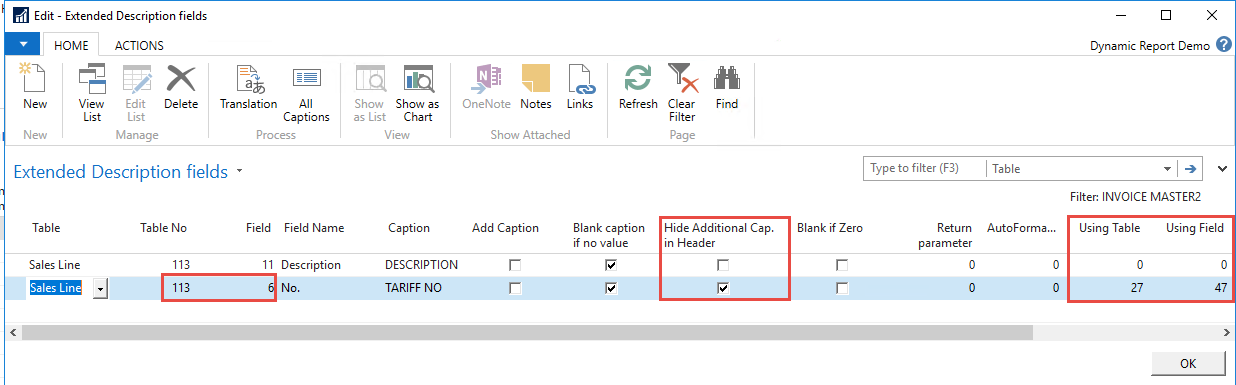
We “Hide the Additional Cap. In Header”, so that it will not appear in the header.

If Caption is wanted in front of the extra line, this can be set with tick in “Add Caption”.
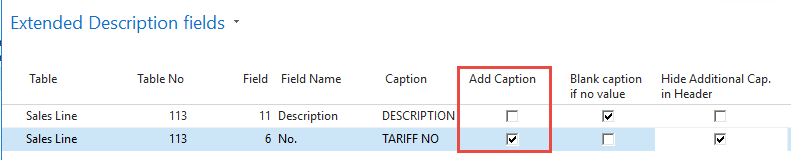
If we want the extra caption on the header we don’t mark “Hide Additional Cap. In Header”.

39
7.8 Linking to other tables
Sometimes it is necessary to link to data in other tables, this is possible by using the columns “Field”, “Using table” and “Using field”.
“Field” is the key that we want to use for linking to another table.
“Using table” is the table from where we want to fetch information.
“Using field” is the actual field that we want to show to come out on the report.
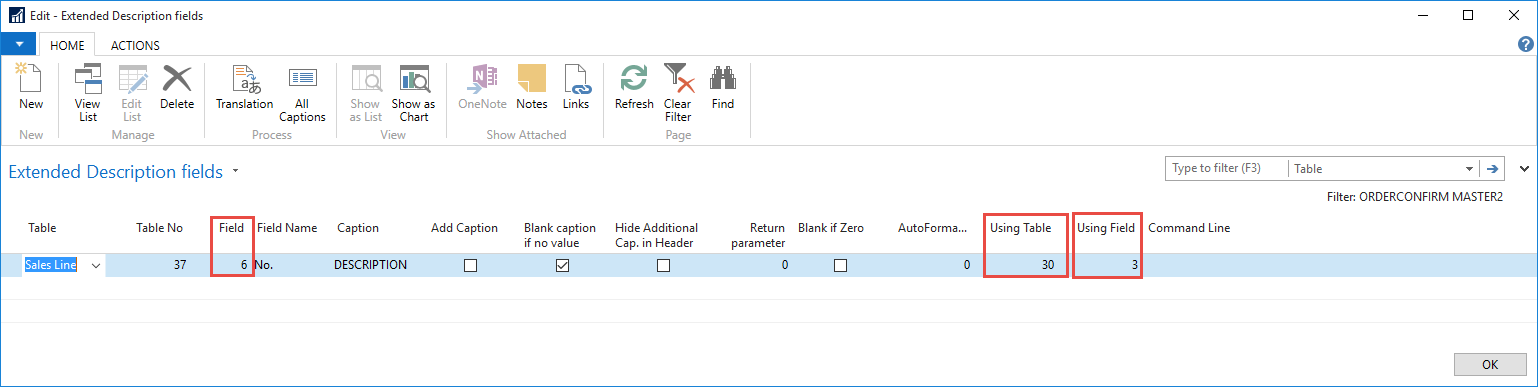
The report will in this example print out the translation of the item description. Please note that if there isn’t a value in the linked table the field will be blank. So if there are no Item translation on this item number, the description column will be blank.
If you want to be sure that the field is not empty if there are no translation, you can use the “Command Line” expression. Eg. for the item description, it will take the item translation if found and else the original text in the field.
7.8.1 Command line
The Command line can be used for printing out data that are not in the table. But unlike “Using table” Command Line can let the original text be on line of there are nothing found in the linking table. So if there aren’t an Item translation on a specific Item no., it will print out the description on the item. If you leave the field “Field” empty, then there will not be written anything if there is nothing in the field that Commandline look at.
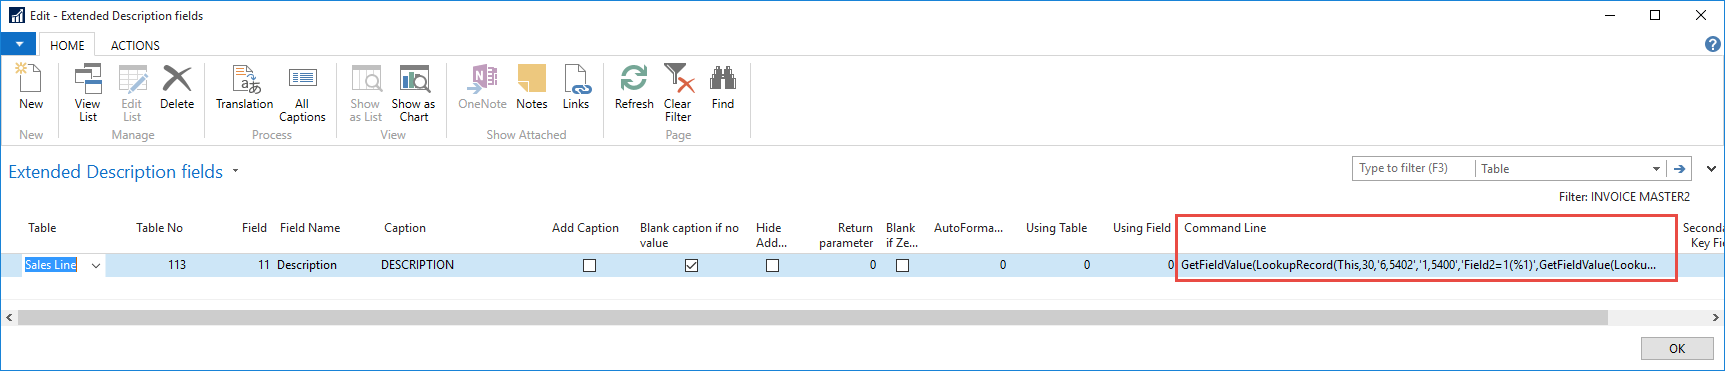
Command line can also be used when there is more than one key to link to the next table. This is the case when we want to link to “Payment terms” and “Shipment Method”, in the header.
In the standard setup, these are incorporated. If you need other command lines please contact Abakion for help.
7.9 Managing Grouping Lines
With line grouping set, it is possible to group some document lines together and not show all lines on the report. This can be set up in the “Line Grouping setup”. Please note that by using this functionality, some information is not possible to print on the lines.
There are four different forms of groupings:
A Sub-total for lines
One level grouping
Two level grouping
Manuel lines grouping
They are all setup in “Line Grouping Setup”, on a template. You can add as many as you want to.
41
7.9.1 Sub-total for lines
If you want to add a subtotal on the lines, for when a parameter is changing, you can use the setup for sub-total. E.g when the date changes.
Make a new Line Grouping Template
Fill out table no. – this you can find on your column setup template
Select the field on the document that you want to have a sub-total based on. Here “Shipment date” has been selected.
Choose the Column template that your report template is using.
In the rest of the columns, column numbers from the Column template are picked. This means that values printed out when using group are still setup in the Column template.If you want to have a text on your subtotal line, you pick the column of the text you want to print out. Here the shipment date is set up in the Column template as column 8, so this has been set.
Choose the column that have been set up for Quantity
Choose the column that have been set up for Amount
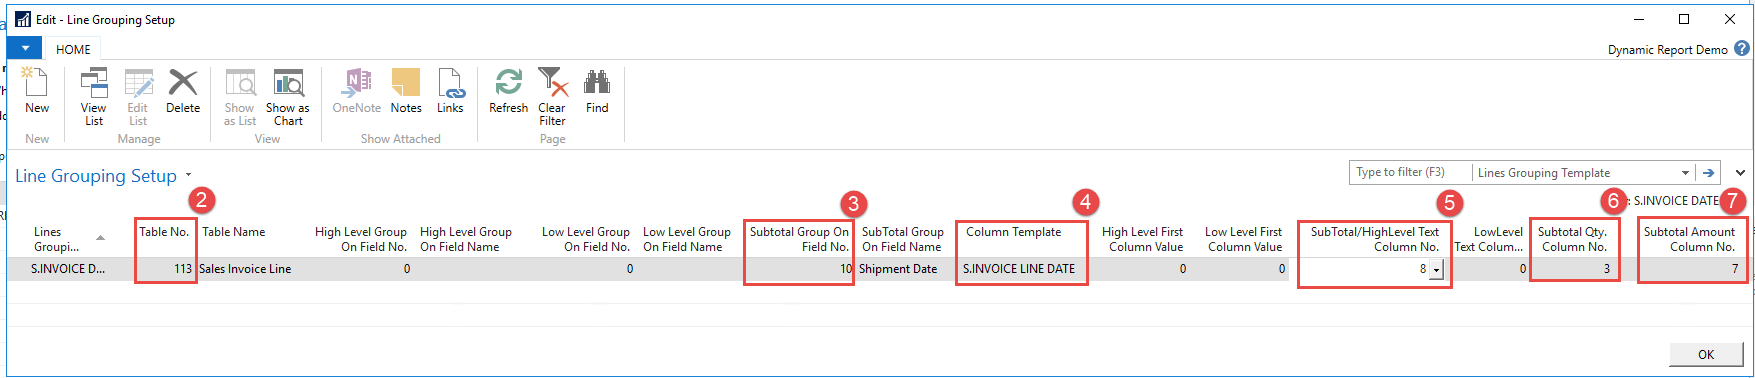
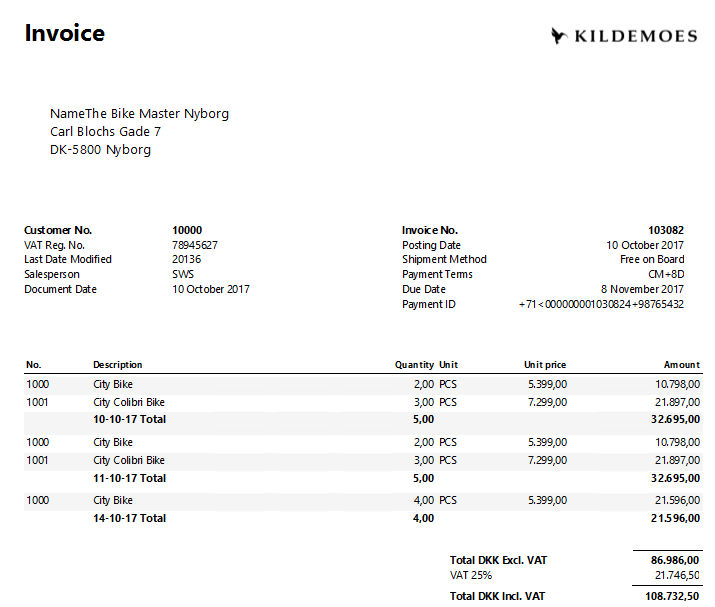
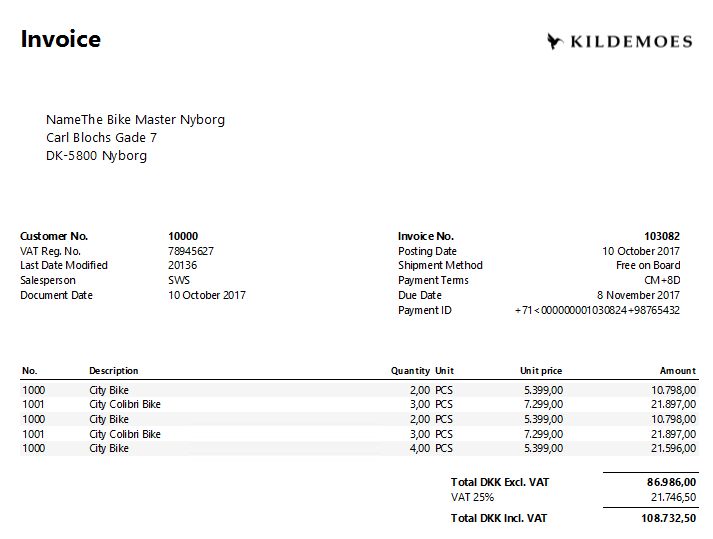
This is the result with and without the grouping set to sub-total on date.

7.9.2 One level grouping
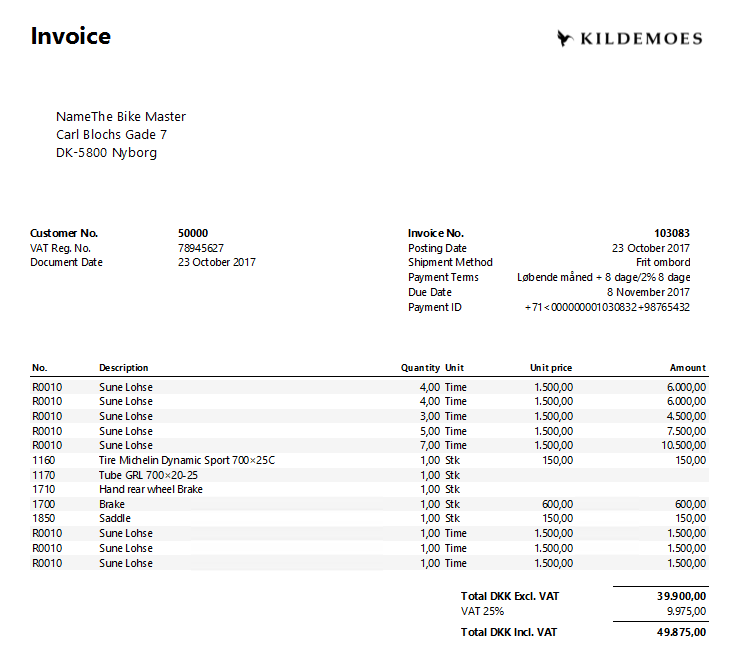
If we want to group lines based on one parameter in document, we can use one level grouping. Eg. If we want to group, all the same items into one line.
Make a new Line Grouping Template
Fill out table no. – this you can find on your column setup template
Select the field on the document that you want to have the lines grouped on. Here “No.” has been selected.
Choose the Column template that your report template is using.
In the rest of the columns, column numbers from the Column template are picked. This means that values printed out when using group are still setup in the Column template.
Select the column setup with value that you want to print out in the first column on the report.
Select the column setup with value that you want to print out in the column that has been marked as a text column in your column template.
Choose the column that have been set up for Quantity
Choose the column that have been set up for Amount

This is the result with and without the grouping on item.
[IMAGE PLACEHOLDER: Two invoice examples side-by-side — left invoice showing lines without grouping, right invoice showing lines grouped into one line per item; both display invoice header, customer details and totals]
|
|
|---|
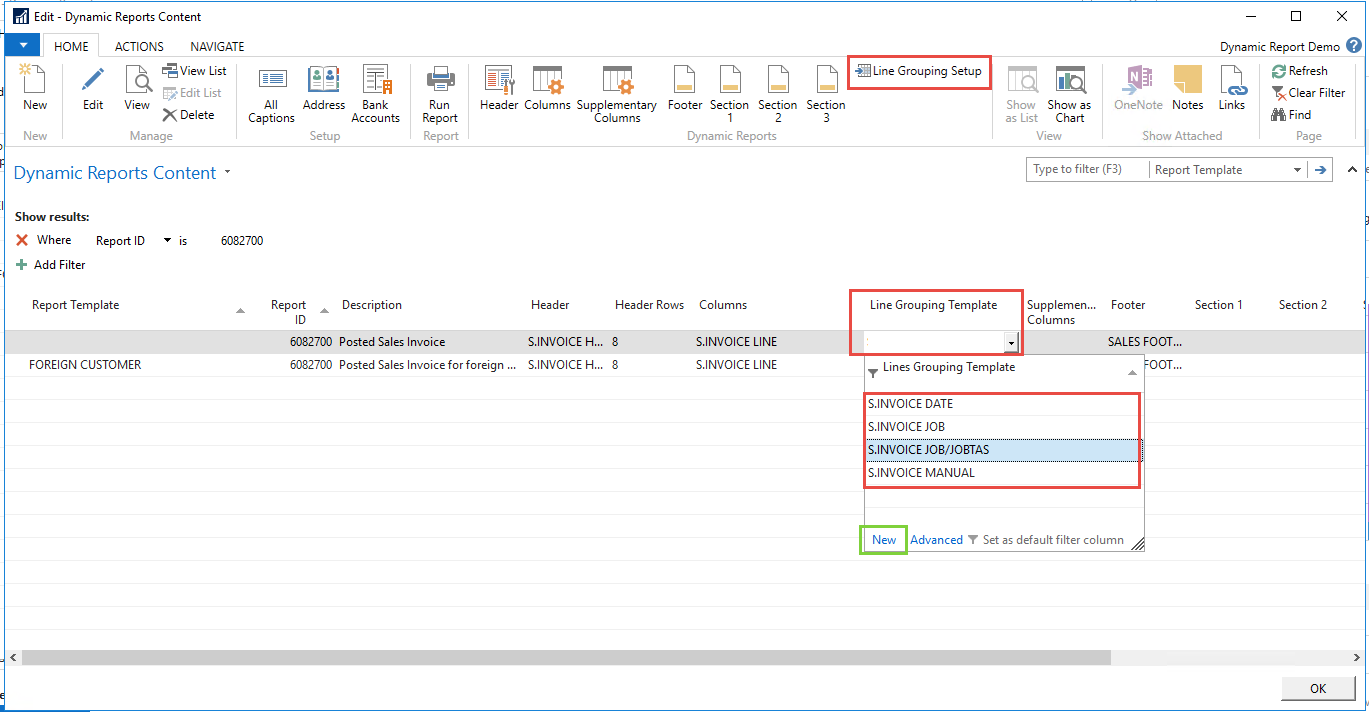
7.9.3 Two level grouping
If we want to group lines based on two parameters in document, to give us a high and low level grouping, with a sub total for the high level grouping. Eg. If we want to group all lines on a Job, but also group on Job-tasks. Giving us a High level grouping on "task", and a low level grouping on "Job task"
Make a new Line Grouping Template
Fill out table no. – this you can find on your column setup template
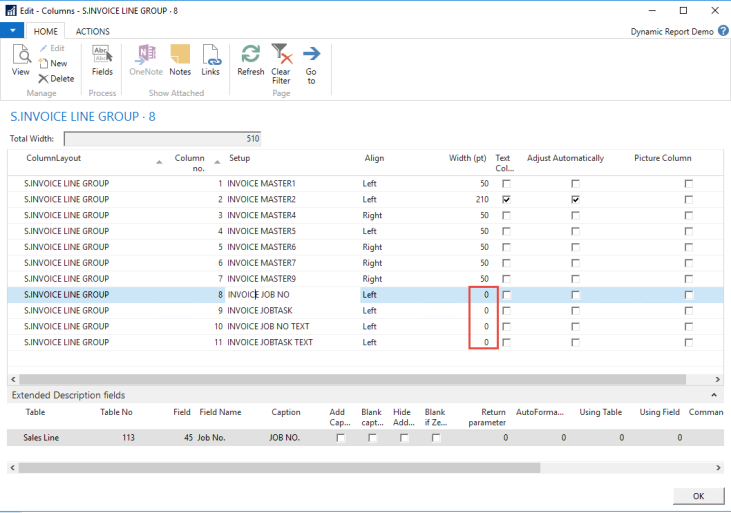
Select the field on the document that you want to have the lines grouped on for the high level. Here "Job No." has been selected.
Select the field on the document that you want to have the lines grouped on for thelow level. Here "Job Task No." has been selected.
Select the field on the document that you want to have a sub-total based on. Here "Job no" has been selected. It will always be the same as your high level group field no.
Choose the Column template that your report template is using.
In the rest of the columns, column numbers from the Column template are picked. This means that values printed out when using group are still setup in the Column template.
Select the column setup with value that you want to print out in the first column on the report, for your high level field.
Select the column setup with value that you want to print out in the first column on the report, for your low level field.
Select the column setup with value that you want to print out in the column that has been marked as a text column in your column template, for your high level field.
Select the column setup with value that you want to print out in the column that has been marked as a text column in your column template, for your low level field.
Choose the column that have been set up for Quantity
Choose the column that have been set up for Amount

This is the result with and without the grouping on low and high level.
In this example, not only have we grouped on a field, but we also have chosen to print out another text, than that on the actual document.
Because here we are not interested in printing “No.” on the document line, but the “No.” of the “Job/Joab task” and the same with description, here is shown the “Description” of the “Job/job task”.
This is done adding columns to the column template, and then choosing these columns in the Grouping setup for values and text. ( Point 7-10 in the above setup).
Remember to give these columns the width of “0” else they will appear as normal columns in your report (for not grouped lines)
7.9.4 Manuel Lines grouping
It also possible to group lines base on a setting on the actual document. This can be usefully, if you want to manually say which lines should be grouped together.
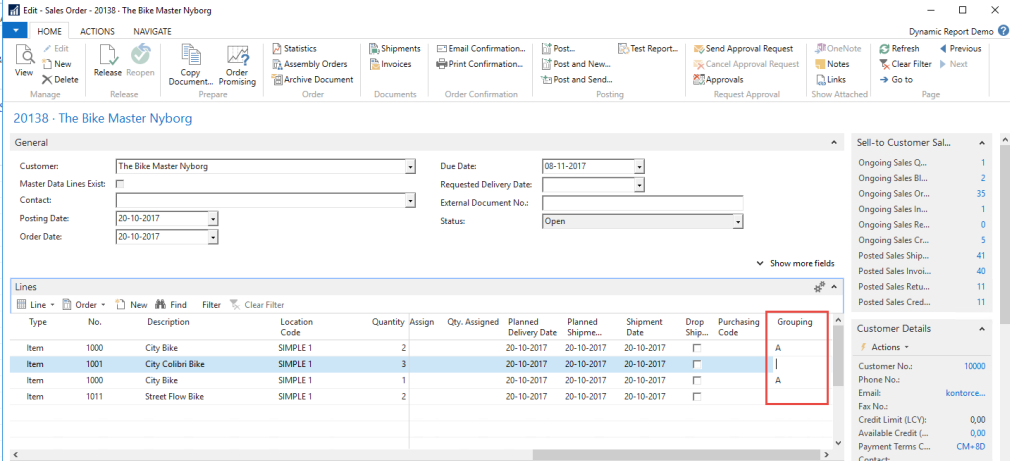
The template is built as a sub total or one level template, but on the field “Grouping” (Field 6082610).
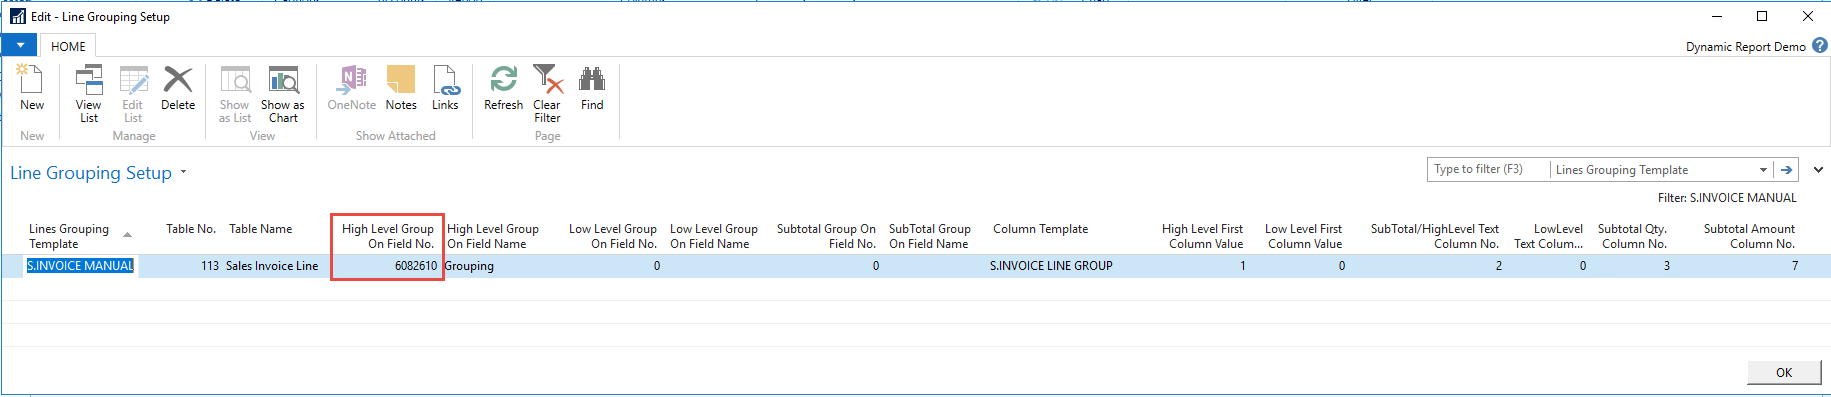
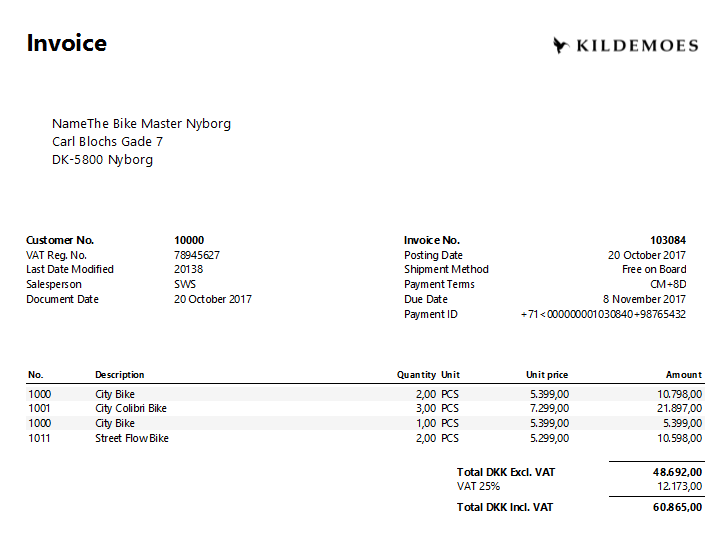
On your Sales Order, Sales Invoice or Sales Credit Memo, fill out a variable for the lines you want to group in the column grouping. It does not matter what you write, just it is the same for the lines that should be grouped. You can control the order of the grouped line, by the grouping value given if using numbers or letters. If the column is not shown you need to add it, in choose columns. Please note that this is use on the Posted Sales Invoice and Posted Credit Memo. (Sales order confirmation, doesn’t support grouping, but can be set for use on the posted Invoice)
When you print your Posted Sales Invoice or Sales Credit Memo, this is the result with and without the manual grouping.
7.9.4.1 Edit a manual grouping value on posted documents
On the Posted Sales and Credit Memo, mark the line that you want to change the bundle value on.
Choose Lines, and Set Grouping
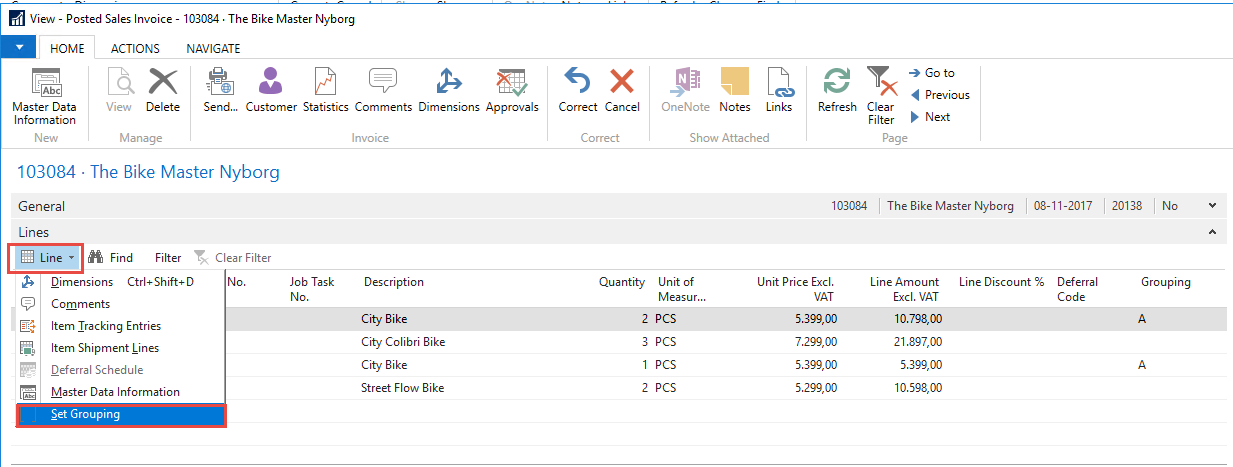
Edit or Delete the value, and press ok.
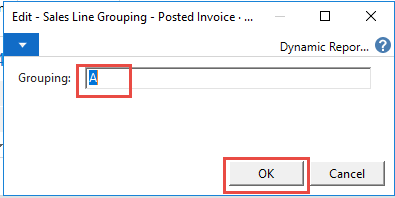
Now the first line will not be grouped on, as there is no grouping value on the line.
7.9.5 Lines without a grouping value, when using grouping templates
If you have set up, that your lines should be grouped on a value, and our lines does not contain a value, the line will be shown as normal lines, after your grouped lines.
The same goes for text lines, also text lines that where written under lines that have been bundled!
If you still want other lines to be grouped, you can use the setting “Group Empty Grouping Values” on the Content card of the Document Template. But this is not always advisable to do, as see below. Please note that the value in first column and in Description, is that of the first line in the document that does NOT contains a bundle value.
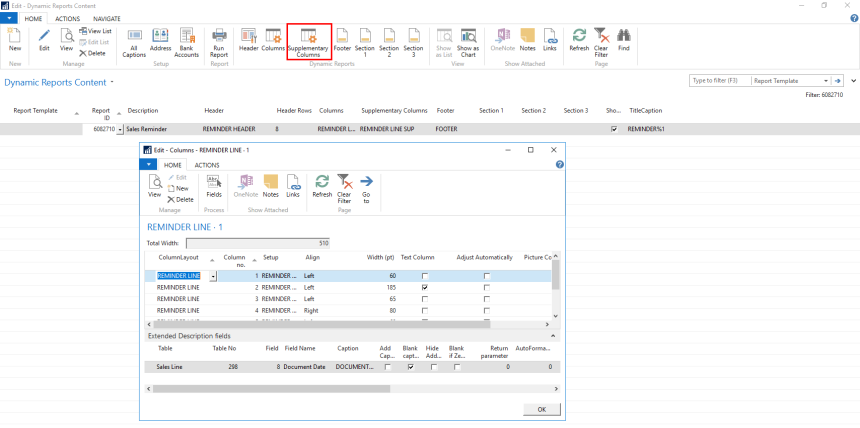
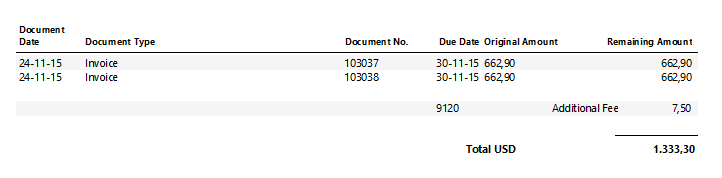
7.10 Managing Supplementary Columns
This is used for extra columns in Reminders, and for Routing on the Production order. The setup follows that described in columns.
Result on document
49
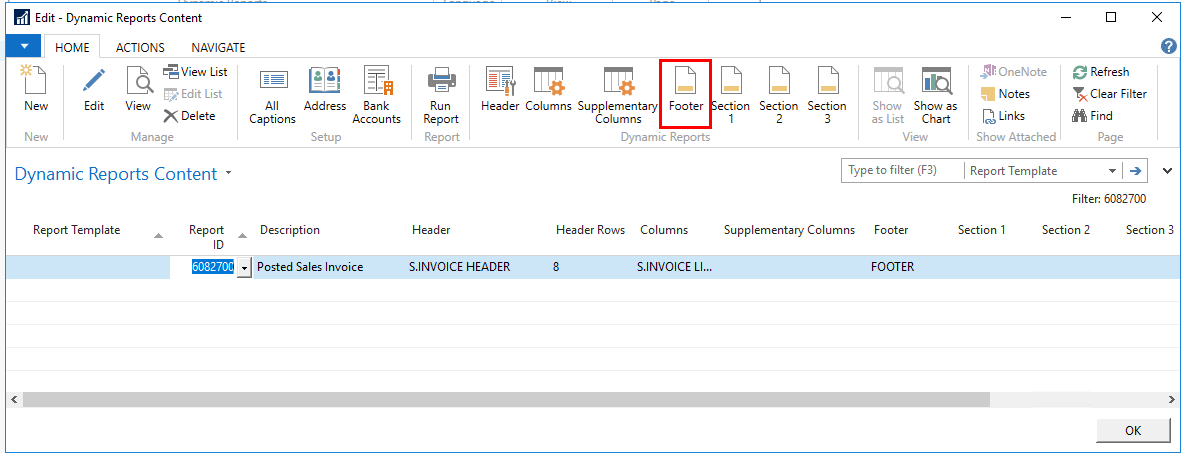
7.11 Managing Footer and Sections
50
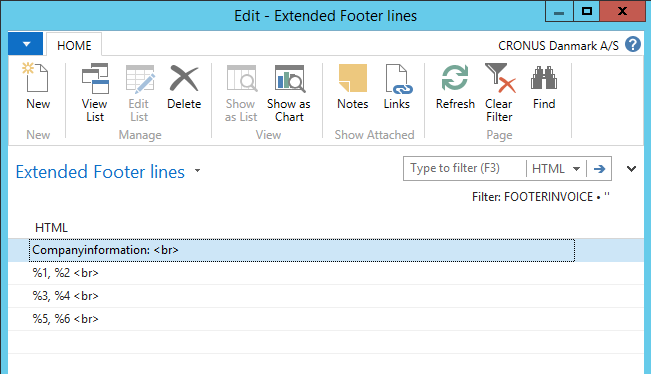
Footer and sections are constructed using HTML texts, and parameters. It is therefore possible to set parameters with data from NAV tables, or you can just write a fixed text in these areas. Managing footer and section 1-3 is identical. The following example is a footer but could just as well have been one of the sections.
Mark the line and press “Footer” to manage the footer
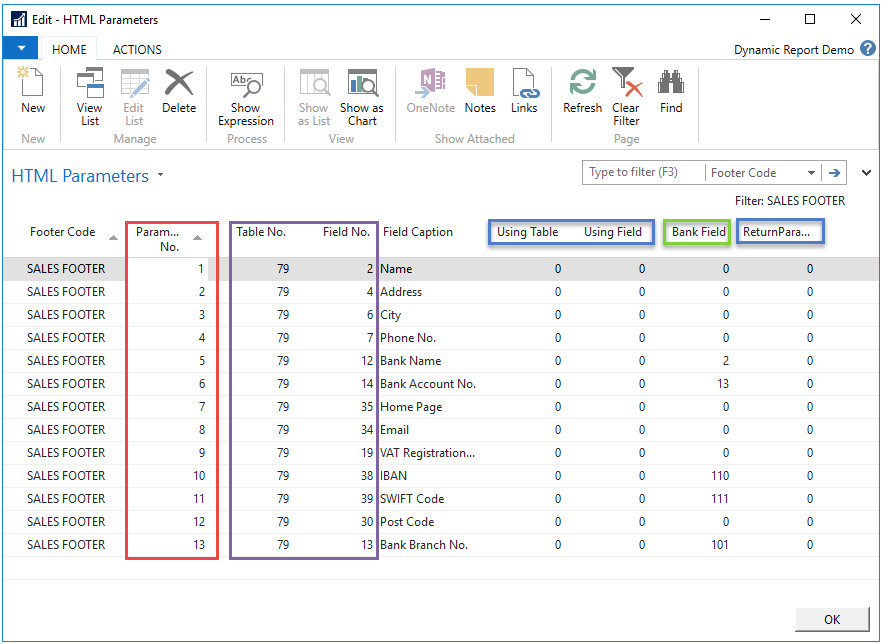
First, you must manage the HTML Parameters. These are the field you want to show on the report. Open “Parameters”
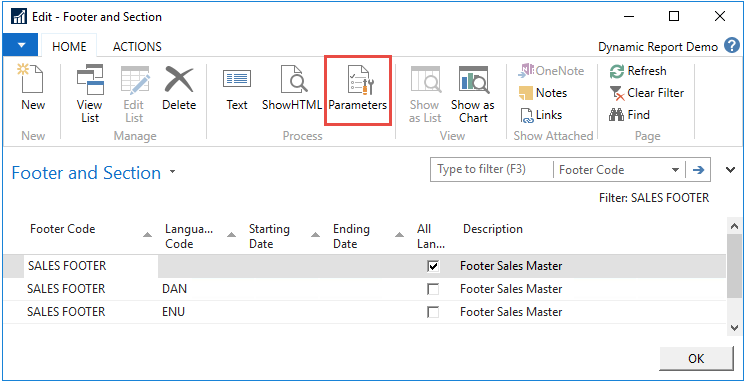
3. Add the desired parameters. The parameters only appear if you activate them through the HTML text later in the process. Therefore, it is important to set all needed parameters. If you make more parameters than you use, it will not affect anything, so do not worry about a few extra. First, give the parameter a number, and then the Table No. and Field No. The fields Using Table, Using Field and Return Parameters are only used when making advanced parameters. Bank field is used then referring to information in a bank account.
Field caption, is showing the name of the field, so it easier to recognize.
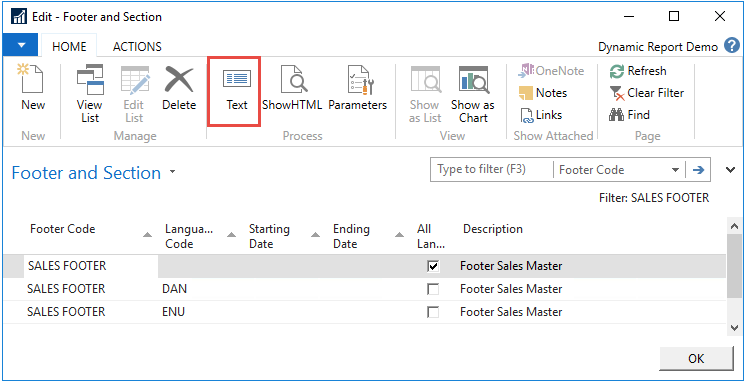
4. After setting all the parameters, you must now write the HTML text. Open "Text".
5. You can write everything you want in the HTML text. However, be aware that only simple HTML codes can be used in Document Customizer. In order to use the parameters within the text write '%X', with X being the number of the parameter. At the bottom of the window it is possible to see the parameters and their caption, for easier to identify which caption is wanted where.
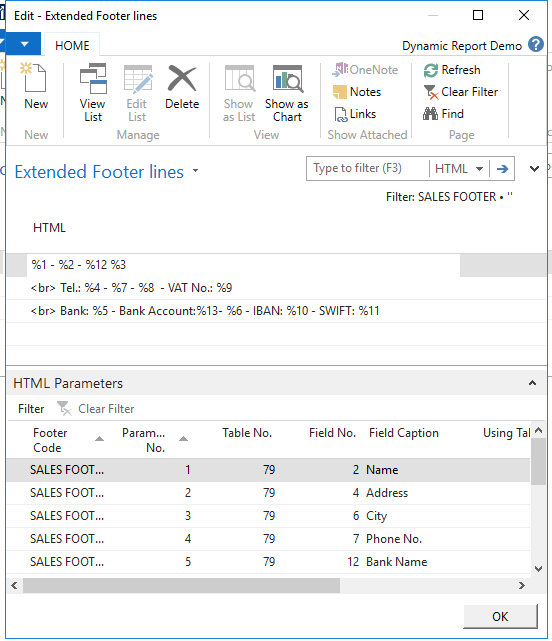
6. The most common HTML codes used in this context is '<br>', which is a break in the text that will make the text drop to the next line. Another code that is useful is '<b> .... </b>', which makes the text in the middle bold. See 7.11.2 Use of HTML-tags in footer and sections for more help on HTML formats
7. Another example could be the following, where the information is not in a straight line but on top of each other.
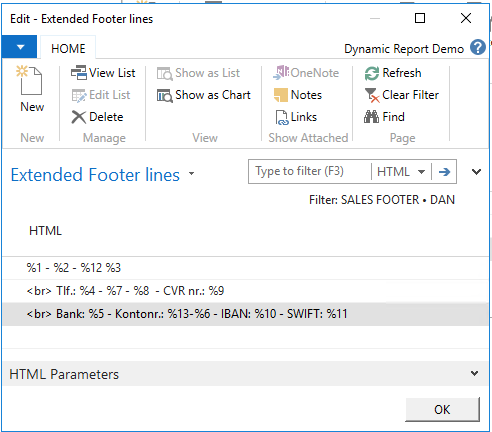
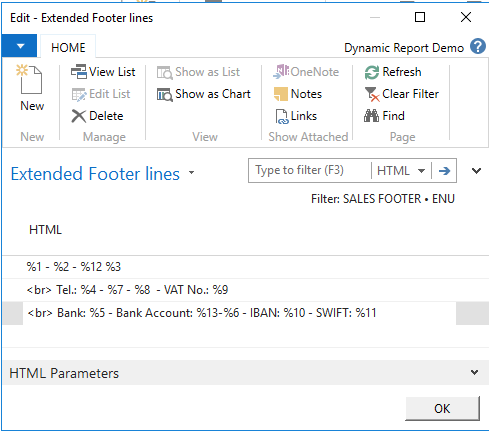
7.11.1 Managing different languages in footer and sections
When working with sections, captions do not apply. Instead, you are hardcoding text with HTML, which means that the text doesn´t translate automatically. Therefore, if you need the text in the sections to be different depending on the language, you can link the sections to language codes and by that, control which text is shown in which language:

For example in the footer, you would like to have the same information and same hardcoded text, just in different languages – Danish and English – as shown above. Then set up the same parameters and write the same text just in different languages:
Danish
English
54
7.11.2 Use of HTML-tags in footer and sections
In the footer and sections, it is possible to use HTML code on texts.
Here is a list of the most basic HTML-tags for text:
There are many different opportunities for customizing the sections and footers with HTML. One of the most common things to do is changing the size or the color of the text. This can be done in the sections and footer using these two HTML-tags:
Size: <font size="?">…</font>
Color: <font color="?">…</font>
It is possible to combine these to tags in order to both customize size and color at the same time:
<font size="?" color="?">…</font>
The text that should be affected by the tags must be written in "…".
Color can be stated using the English word or using the most common color # codes.
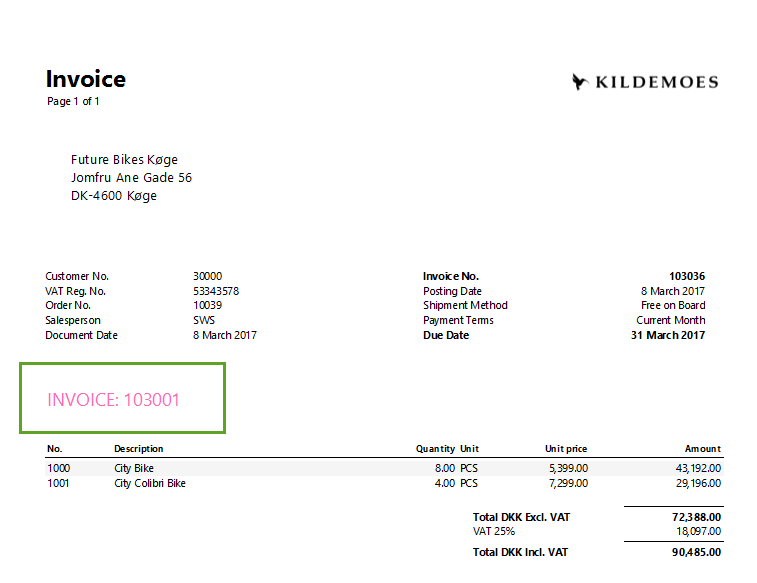
In the following example, the invoice no. is written in sections 1 and made bigger and the color hot pink by first setting up parameter 1 to invoice no. and then using the HTML-tags like this:
<font size="4" color="hotpink">INVOICE: %1</font>
The red text is the text written instead of the "?" and "…" in the commando above.
7.12 Show/hide extra information
In the edit card of the Report Template, it is possible to specify further if extra information should be printed out on the document. Please be aware that some of these extra information is Report dependent, and does not apply to all documents.
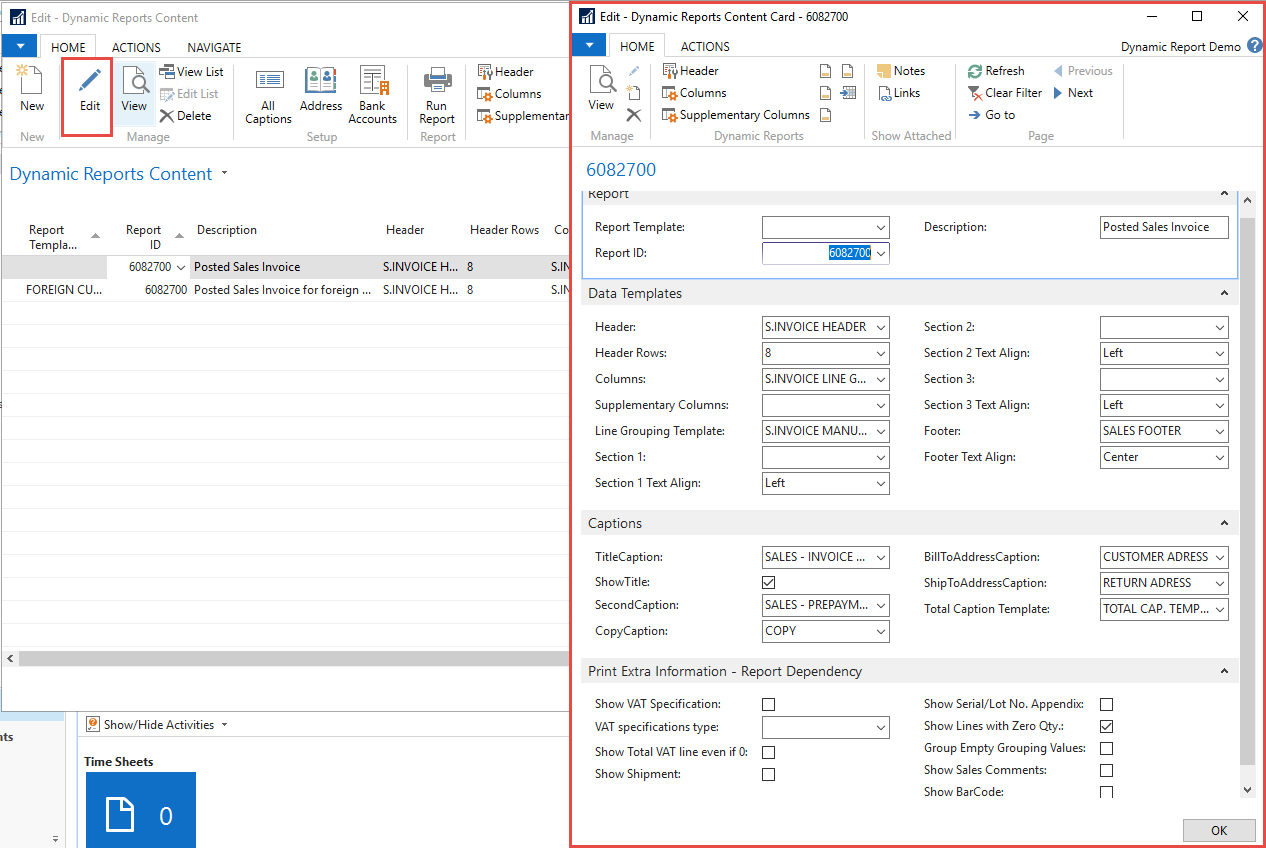
7.12.1 Managing VAT Sections
For a list of reports it is possible to add a VAT section, by marking the "Show VAT Specification". VAT Specification will only be shown if the usual criteria are met (in other words, that there actually IS VAT on the document)
Reports with VAT sections included:
Sales Order Confirmation
Sales Invoice
Sales Credit memo
Sales Quote
Sales Blanket Order
Purchase Return Order

You can further control which type of VAT section to show. This chosen in the column “VAT specification type”.
The “VAT specification type” options have the following effects:
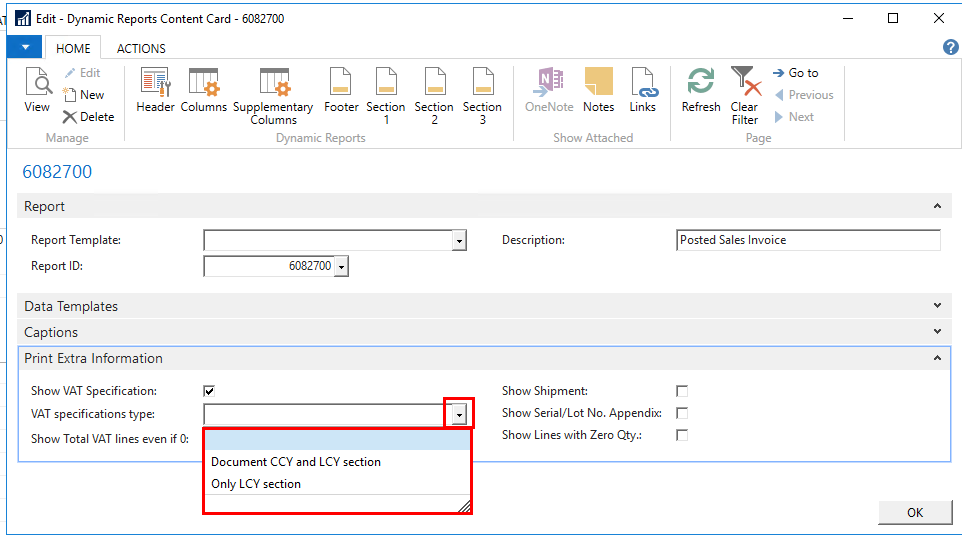
Blank; the standard VAT specifications will be shown. If the “Print VAT Specification in LCY” on General Ledger Setup is used, this will also be shown as per standard NAV.
“Document CCY and LCY section”; Both a Document Currency VAT Specification and Local Currency VAT Specification section will be shown, but only if LCY is different for CCY. Else only Document CCY VAT section will be shown.
“Only LCY section”; Only the Local Currency VAT Specification section is shown, if LCY is different from Document CCY. Else no VAT section will be shown.
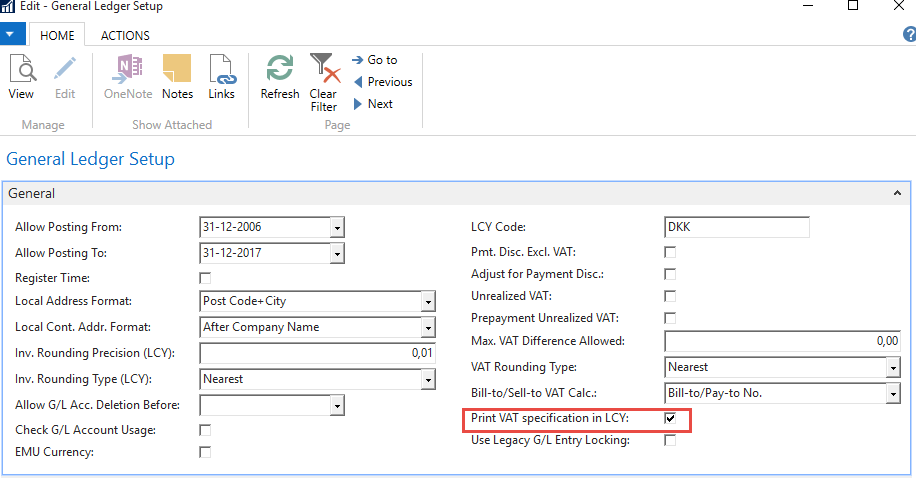
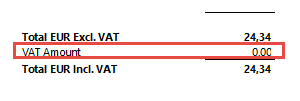
7.12.2 Show Total VAT line even if zero
On documents without VAT the total section will just print out the total.

If “Show total VAT line even if zero” marked an extra line in the total section will be added, with a VAT Amount set to 0.
Which will give this result:
7.12.3 Show Shipment
This is only relevant for the Posted Sales Invoice.
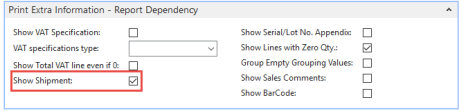
If the “Ship Shipment” is marked, the report (Posted Sales Invoice) will show shipment number, date and quantity under the sales lines. This requires warehouse setup.
7.12.4 Show Serial/Lot no. Appendix
This is only relevant for Posted Sales Shipment, Posted Sales Invoice and Posted Warehouse Shipment.
If marked, the Serial/Lot no. Appendix will be printed out on the document.
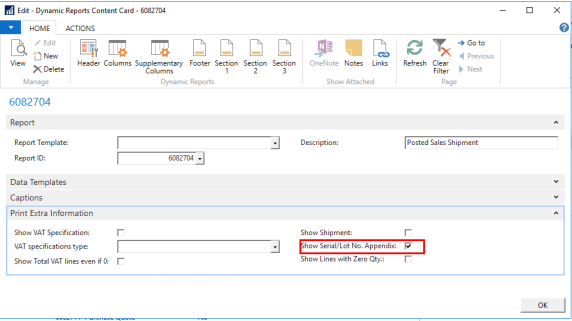
This contains the columns, Serial no., Lot number and Expiration date. If there are no data in the columns, the captions will not be printed out.
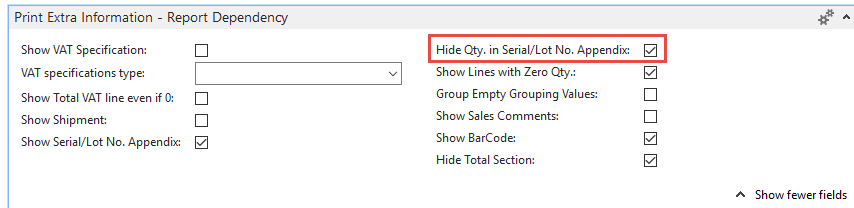
7.12.5 Hide QTY in Serial/Lot no. Appendix
This is only relevant for Posted Sales Shipment, Posted Sales Invoice and Posted Warehouse Shipment, and require that Show Serial/Lot no. Appendix also is activated.
If marked, Hide Qty. in Serial/Lot no. Appendix, is marked, the Qty column and the Qty column is not shown in the Serial/Lot no. Appendix.
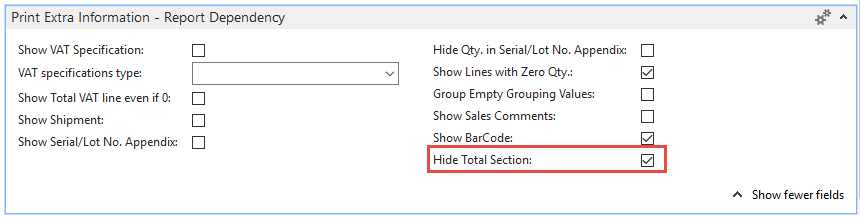
7.12.6 Hide the total section
This is only relevant for the Sales Order
If marked, the total section will not be shown. Making it possible to print out a document without amounts on the document.
7.12.7 Show lines with Zero Quantity
It is possible to control if lines, using the column setup, that have zero quantity should be shown on the document or not.

7.12.8 Use Column Setup For Lines With Blank Type (Texts)
It is possibly to choose if line without type (text lines) should as a default just shown the value in the Description field, or if all columns should show according to the setup in the Columns setup. The description field will as a default be shown in the column, that in the column is marked as being a text column.
If you want your text lines to show, remember to mark “Show lines with Zero Qty”, else will they not show at all.
On document in the system

If no mark has been set, then the line would look like this:
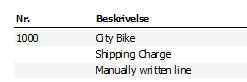
If the mark is, set that setup should be used, then it looks like this (according to the setup in my demo)
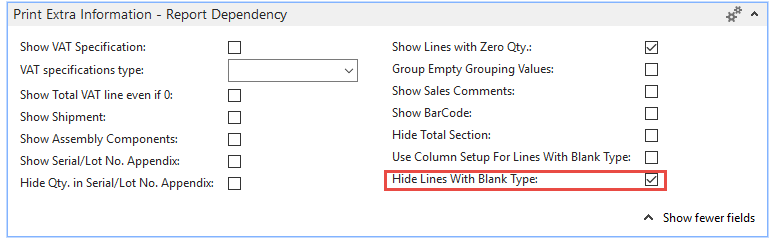
7.12.9 Hide Lines With Blank Type (Texts)
It possibly to hide “Lines with blank type”, so that they don’t show on the document at all.
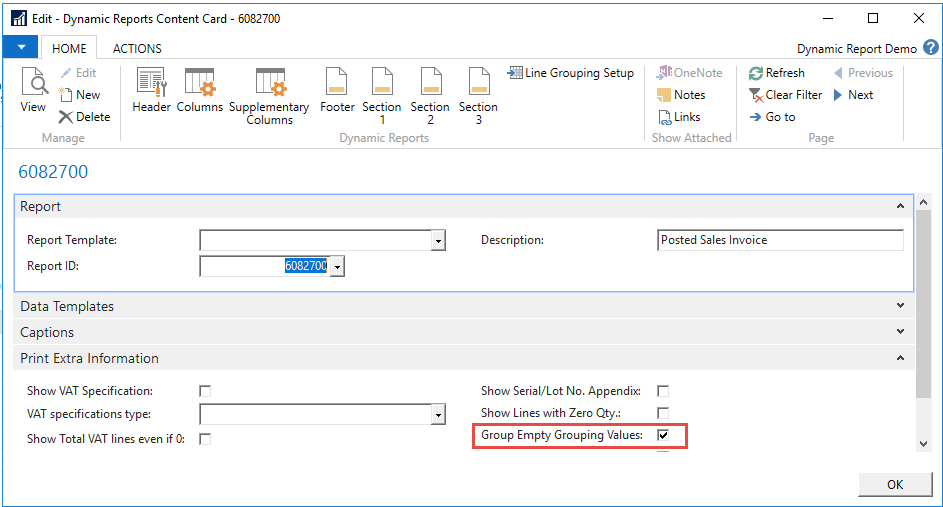
7.12.10 Group Empty Grouping Values

When using the bundle functionality, it is possible to group lines that does group, based on the grouping template, into one. This is done by this mark.
Only apply to documents supporting grouping functionality.
7.12.11 Show sales comments
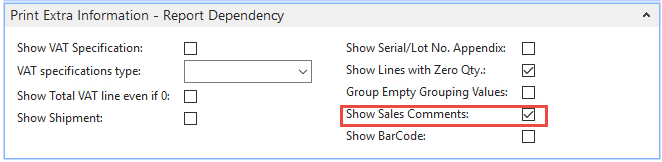
On the Warehouse Picklist, it is possible to get comments from the sales order shown on a hand scanner, if this is marked. It requires Warehouse setup.
7.12.12 Show barcodes
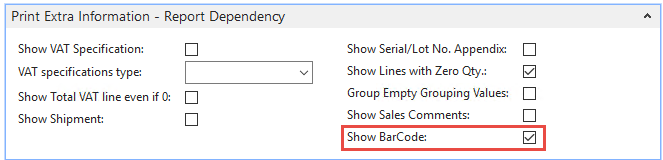
On the Production order and Warehouse Picklist it is possible to print out barcodes on the documents. This is set by this mark.
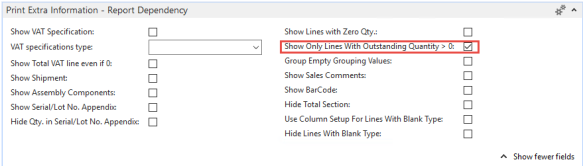
7.12.13 Show only lines with outstanding QTY > 0 (Backorder)
On the Sales and Purchase order, it is possible to show only those lines which have an outstanding QTY over 0 on them. The total section will automatically recalculate the remaining amount on the order.
7.13 Linking bank accounts to all reports
It is possible when using Document Customizer to link currencies with specific bank accounts information. If this is not setup, Document Customizer will use the information provided in the “Company Information Setup”. But the functionality makes it possible to have one bank account number written on the report when the currency is e.g. EUR and another bank account number when the currency is DKK. Remember to set this table up in each company that you use in NAV, for this bank linking to work in all your companies.
Open ‘Bank Accounts’
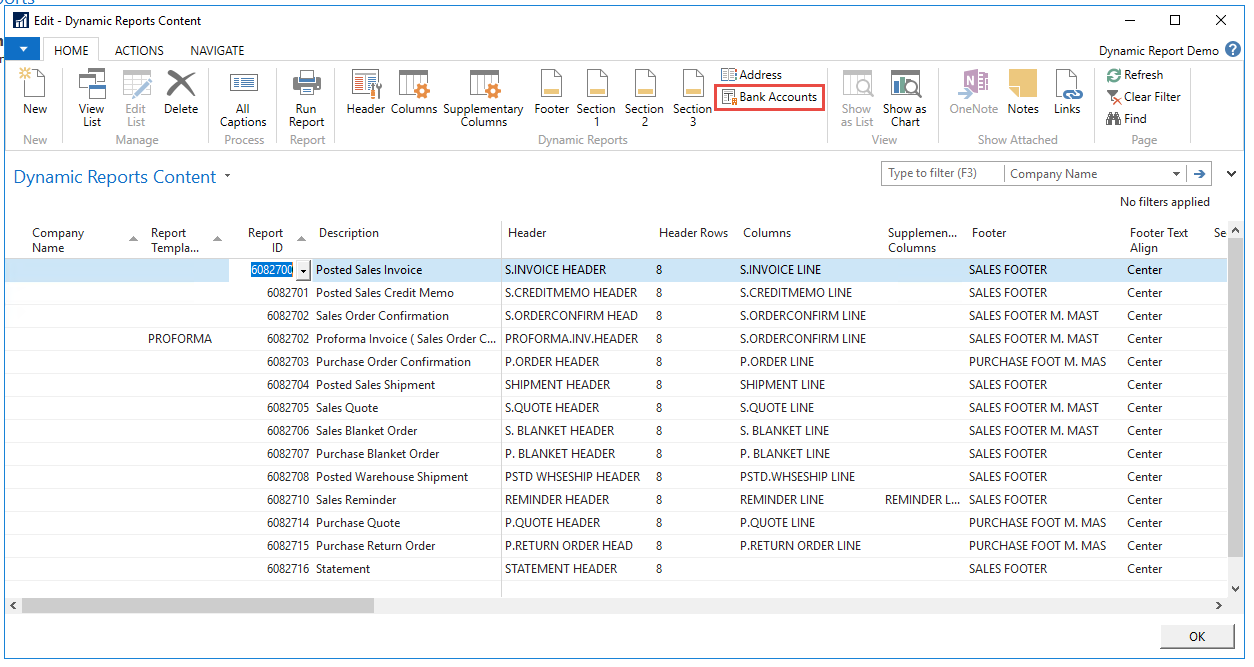
Select the currency that the bank account should be linked to. It is only possible to have one bank account per currency.
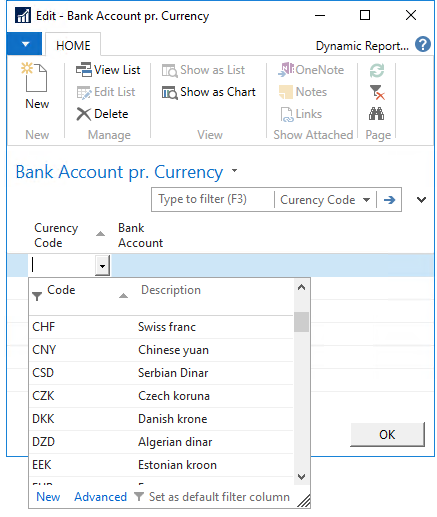
3. Now select the bank account
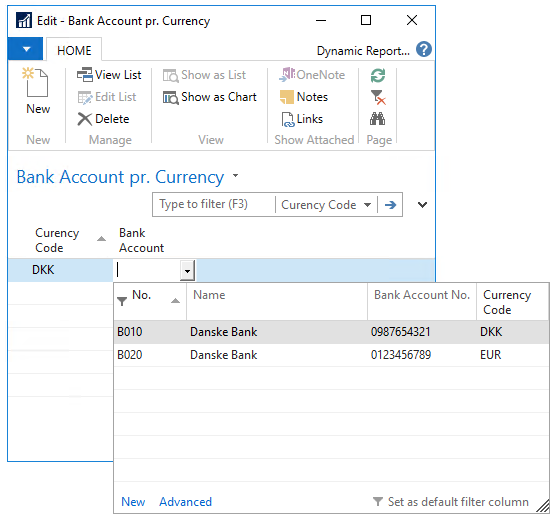
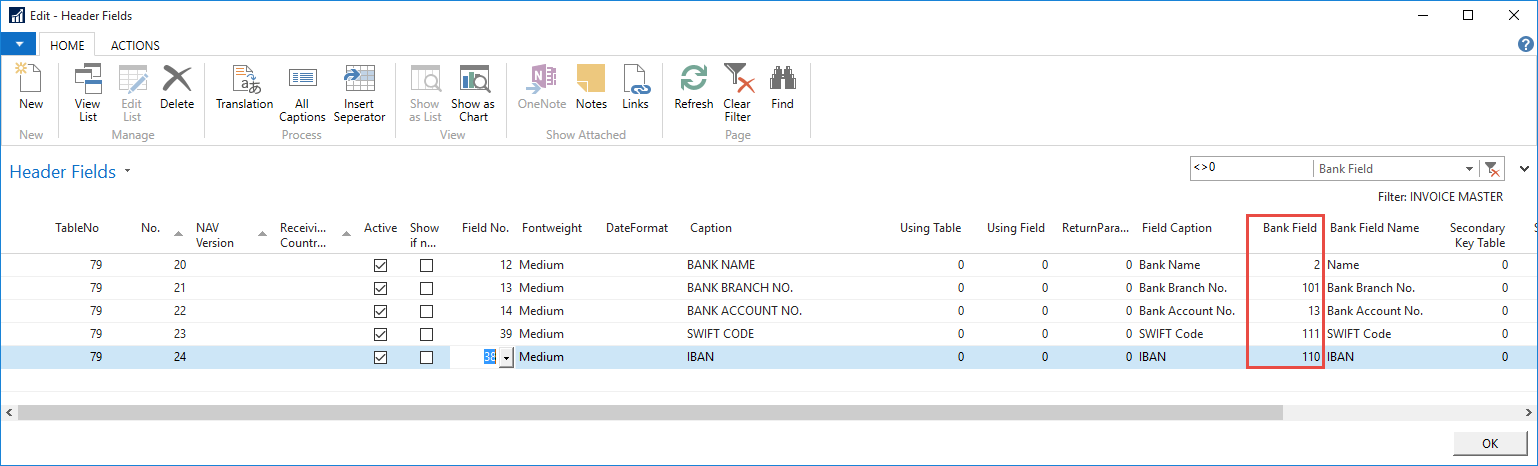
4. Then make sure that the “Bank Field” columns, on the templates, are filled out with the field from the Bank account table that you want to print out.
7.13.1 More than one bank account for each currency
If more than one bank account is used for the same currency, it is also possible to control the bank information on the reports, with defined value on the Sales order.
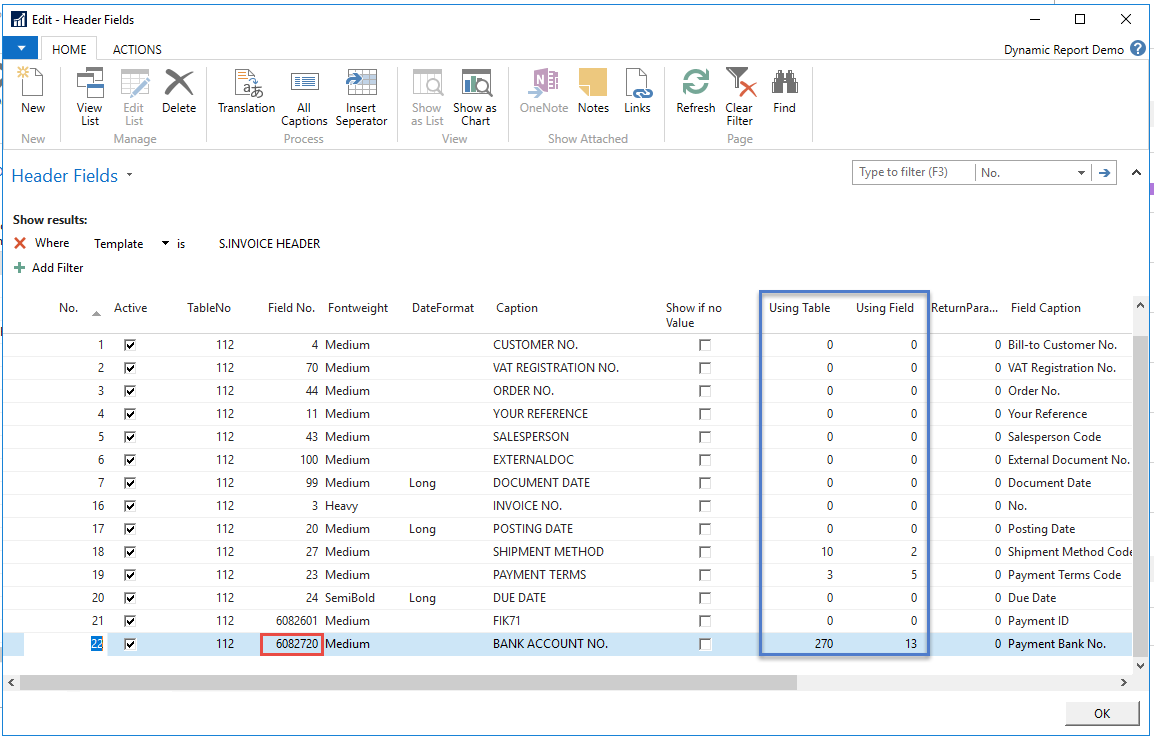
On the Sales Order/Sales Invoice, fill out the field “Payment Bank No.” field (6082720) on the “Invoice Details” Fast Tab. This field can be used in the report setup and linking it in the report setup to the bank account table.
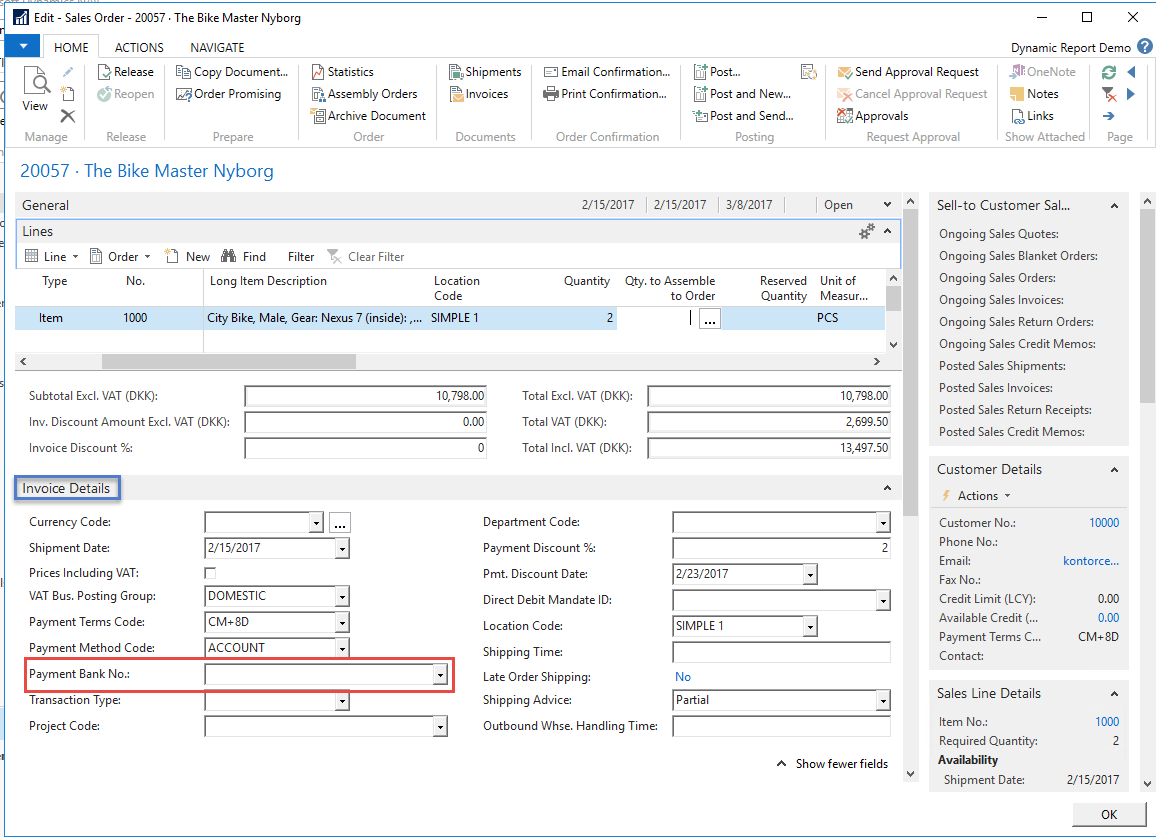
In the report setup the “Payment Bank no.” will need to be added, and the actual data presented should be linked through “Using table” and “Using Field”. Bank accounts is table 270
7.14 Managing the address field
It is possible to modify the information placed in the two address areas, “Bill-to adress” and “Ship-to adress”.
Open ‘Address’ in “Document Customizer Content”.
Address’ are defined on for each table, that the reports run on, in the “Table no.”
“No.” determines the order of appearance.
“Type” determines the section of the report (Bill-to, Ship-to or Customer)
“Field No.” determined the content of the field
The function ‘New line’ determines whether the field should be printed on a new line or continue on the same line as the previous field.
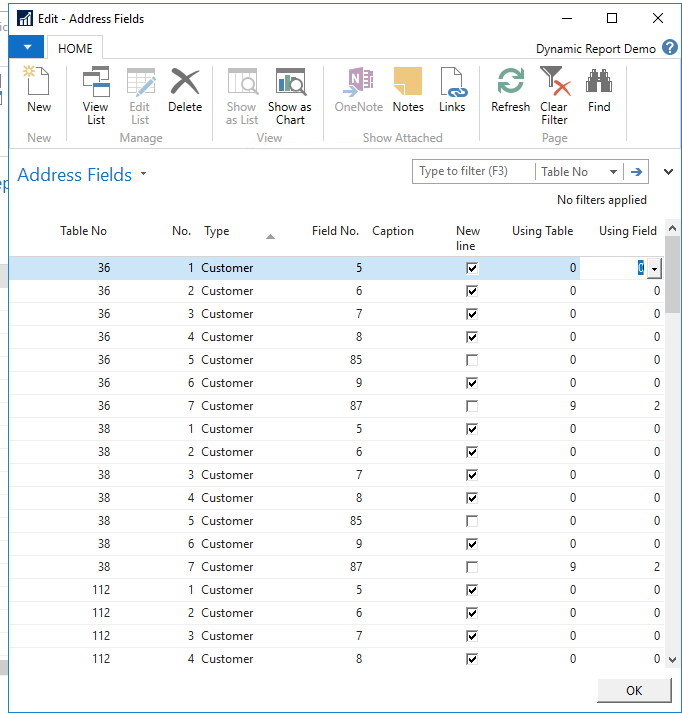
As there two areas of adresses there will be two sets of informations sets for most tables, these have the same "No." but have different "Type"
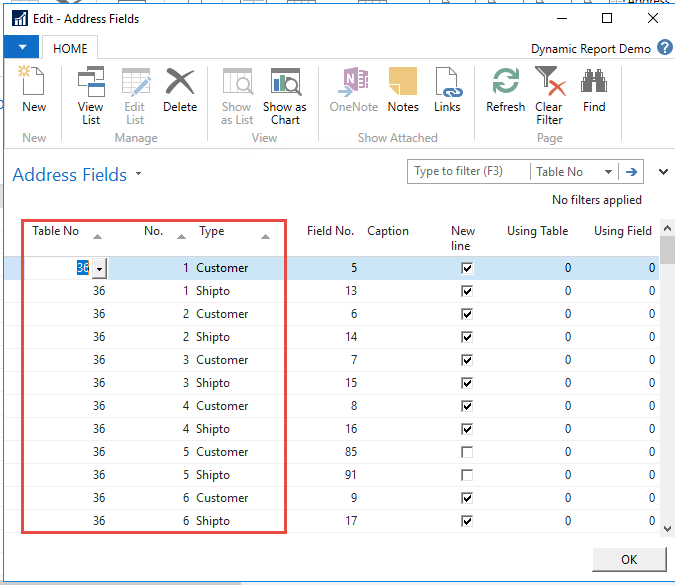
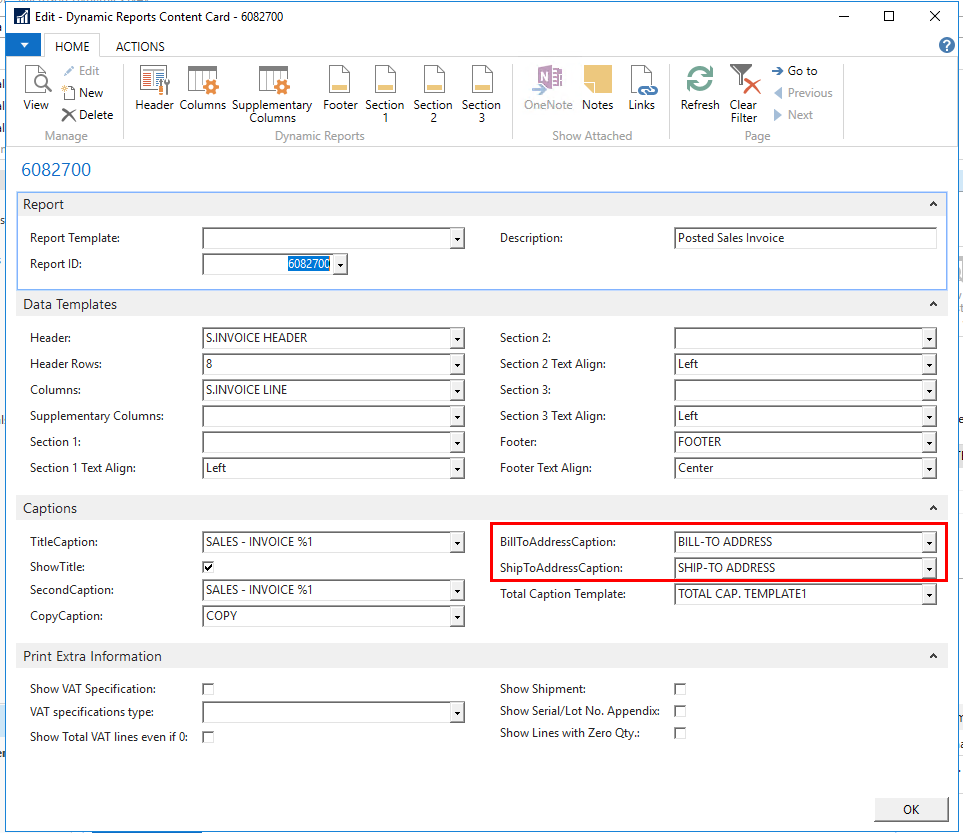
If both addresses appears on the report, they will be given a caption, so it is possible to se what the adress is. This caption is managed by the two columns "BillTo AdressCaption" and "ShipToAdressCaption".
7.15 Managing Total Caption

68
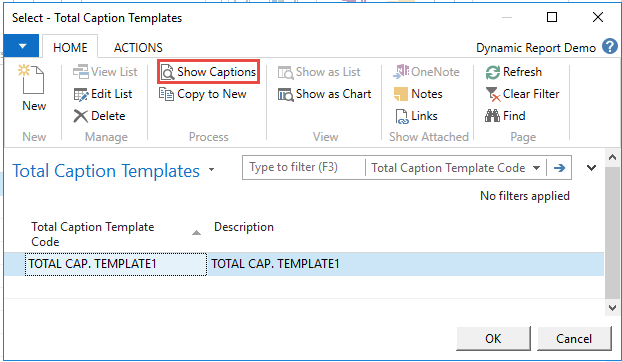
1. In the “Document Customizer Content” there is a “Total Captions Template” column. Open ‘Advanced’
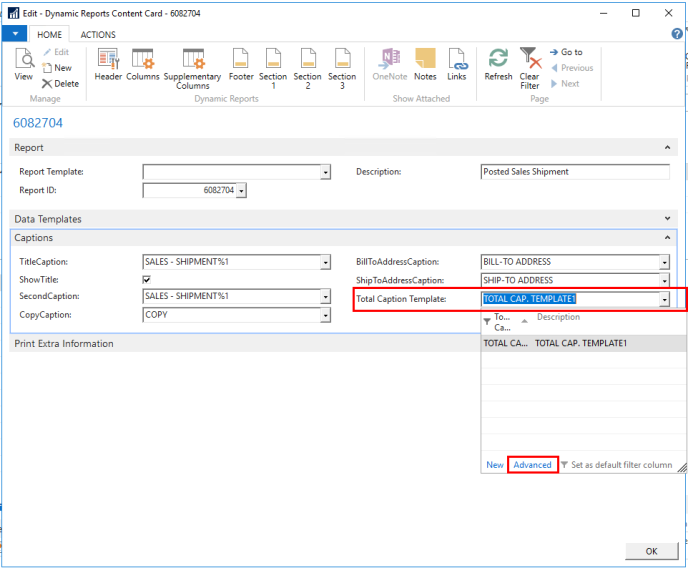
2. Here is shown the Total Caption Templates codes. Here you can make a “New” or “Copy to a new”.
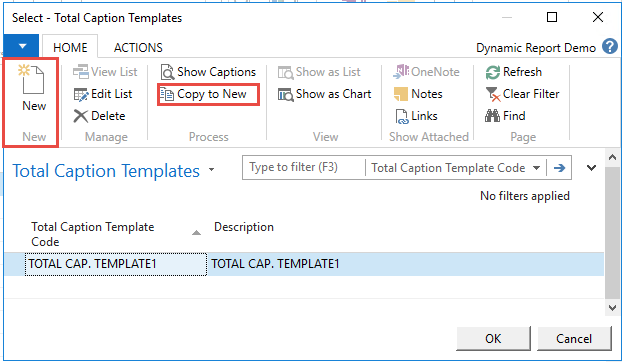
3. To edit the caption press “Show Caption”
4. Here it is possible to specify the Captions for the Total captions area. Please note that it is only possible to change the caption (the actual text) not the number it presents- this is not an option.
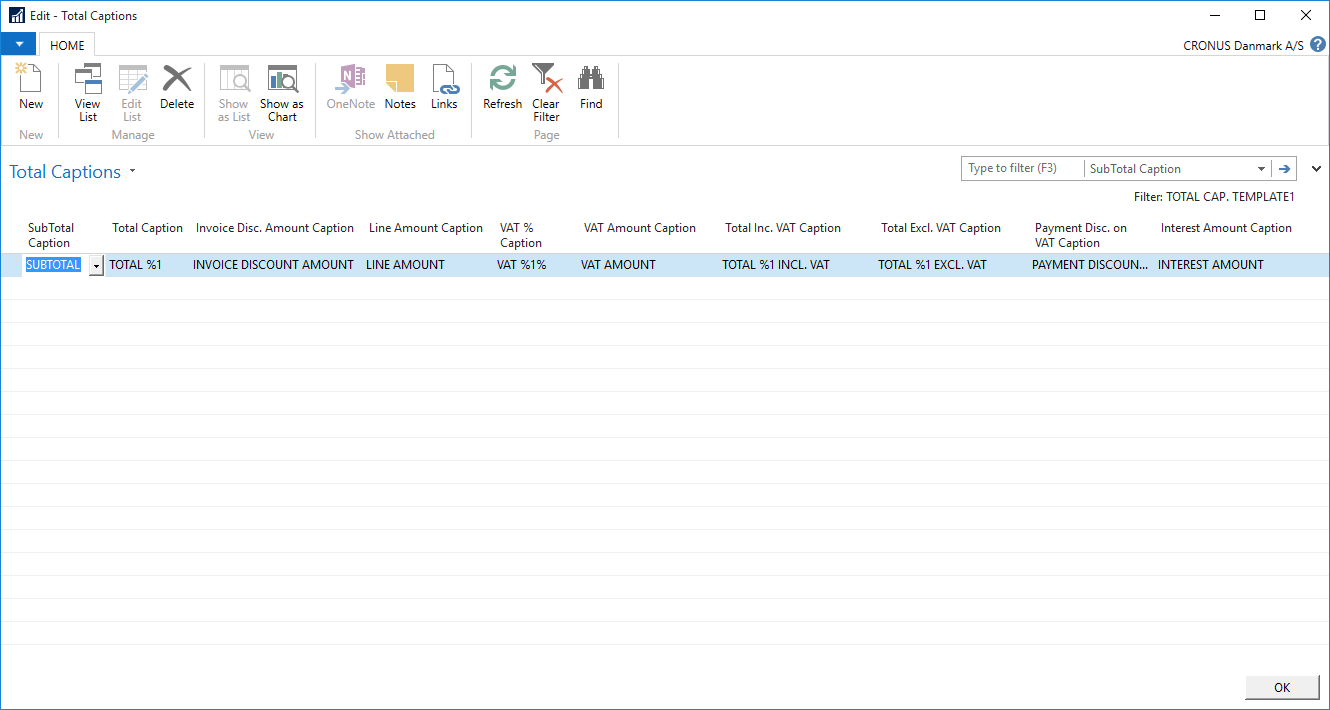
Subtotal
Total (currency), when no VAT, e.g. in EUR
Invoice discount amount
Line amount caption – present Payment discount on VAT
VAT and actual VAT percentage (if all lines have the same VAT rate)
VAT amount (if all lines doesn’t have the same VAT rate)
Total (currency) including VAT
Total (currency) excluding VAT
Payment discount – caption for total VAT discount amount
Interest amount – present on Reminders
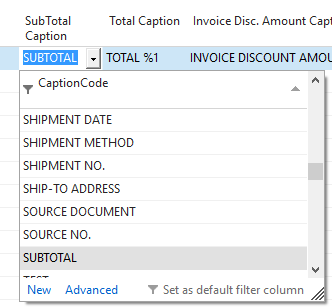
5. Choose the caption in the list. In ‘Advanced’ it is possible to change to parameters for the caption and the language.
70
8. Printing the report
Printing the reports with setup in Layout code and Template code, can now be controlled when printing. This can be defined on the costumer card, on the document or in the moment of printing.
If using a setup on the costumer this will be transferred to the document (only some documents), but it is possible to change this on the document. This will then be the new choice for the document. If it is chosen to change the layout/template or language in the print moment, this will not be saved for next printing.
8.1 Setting default Layout code and Template code on Costumer
It is possible to set the choice on the costumer card.
Please note! It only transfers to the documents for the following reports.
6082700 Posted sales Invoice
6082701 Posted Credit Memo
6082702 Sales order Confirmation
6082703 Purchase Order
6082704 Posted Sales Shipment
6082705 Sales Quote
6082706 Sales Blanket Order
6082707 Purchase Blanket Order
6082710 Reminder
6082714 Purchase Quote
6082715 Purchase return Order
6082720 Pick Instruction
Find “Navigate” in the tab and the “Default Layout/Template Setup”.
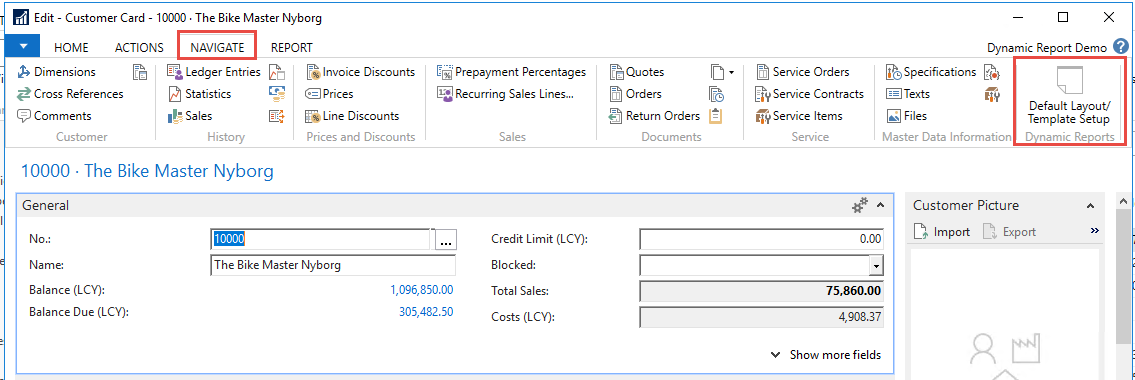
71
2. In this table set the report number in the first column and the “Layout” and “Report Template” code in the respective columns.

3. New setup can be added by standing on a new line and use the lookup, and select the report in question.
4. Do the same for the “Layout Code” and “Report Template Code”. It is not necessary to fill out all columns or even have any.
8.1.1 Statement
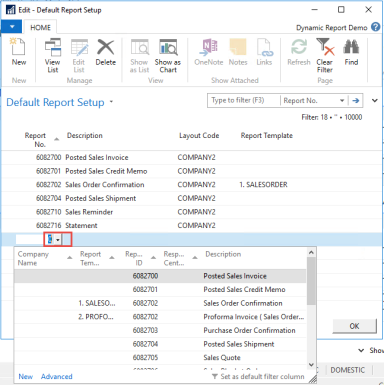
Statement doesn’t support this functionality. It is ALWAYS necessary to set the wanted layout or report template at the point of running a statement report. If nothing is actively chosen when printing the system will take the system default Layout Code or Report Template Code
8.2 Layout code and Template code on a document
The choice can also be made on the documents.
Please note! It only transfers to the documents for the following documents.
Sales order
Sales Quote
Sales Blanket Order
Sales invoice
Posted sales invoice
Posted Sales Shipment
Sales credit memo
Posted Sales credit memo
Reminder
Issued reminder
Purchase Order
Purchase Blanket Order
Purchase Quote
Purchase return Order
Pick Instruction
The selection is done through the tab “Navigate” and “Default Layout/Template setup”.

If the information is set on the costumer, this will be put on the document automatic (if is one of the documents mentioned in the above section “Setting default Layout code and Template code on Costumer.
It is possible to change this, and will be the setting for this document in question, and will be saved on the document for further use.
If this is not set automatic, this should be set for all the documents that are relevant. If we on a sales order also put the code for the Posted invoice document and posted sales shipment, this choice will be transferred to these documents as well. And the y will be printed with the right code.
8.3 Choose Layout code and Template code when printing
In the print moment it is also possible to print with a different setup.
As a default it will take the information on the document in the “Default Layout/Template setup” table. This is done behind the print pop-up. So it will not show the settings on the print page.
If there are no setup on the document, layout code and template code will be taken from the Document Customizer setup, and take the first relevant code for the document.
If you in the print moment want to overrule the setting on the document or the default, you can choose a code from the two dropdowns.
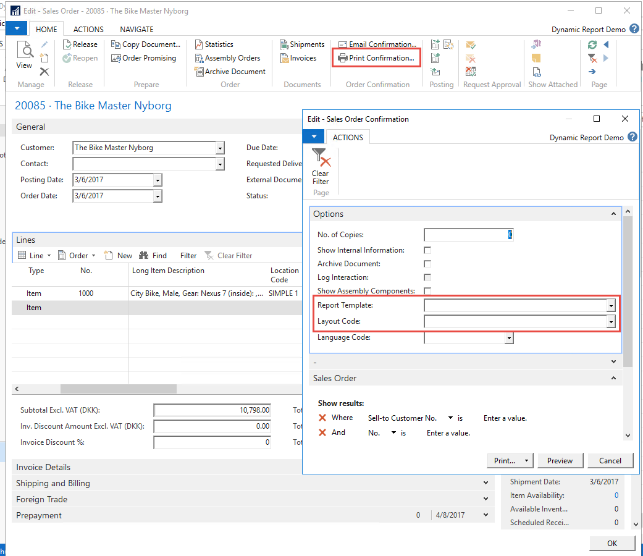
If you want to print out with the blank code, you will need to write ‘’ in the box for selecting the blank code. It is two signs, which can be found here:
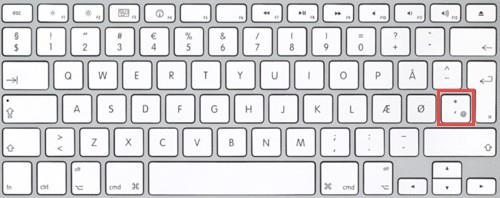
Danish
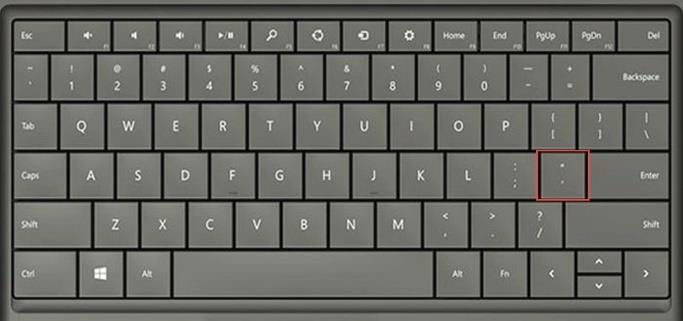
English
74
8.4 Choose language when printing
The document will as a default be printed out in the language set on the document. But it is possible to print out in another language when printing. Please not that it is only captions and translations set-up with command lines that are translated when using this function.
In the Language Code, chose the language that you want to print in. Be aware that translations needs to be present in “All captions” if these doesn’t exist these will be shown as the default caption.
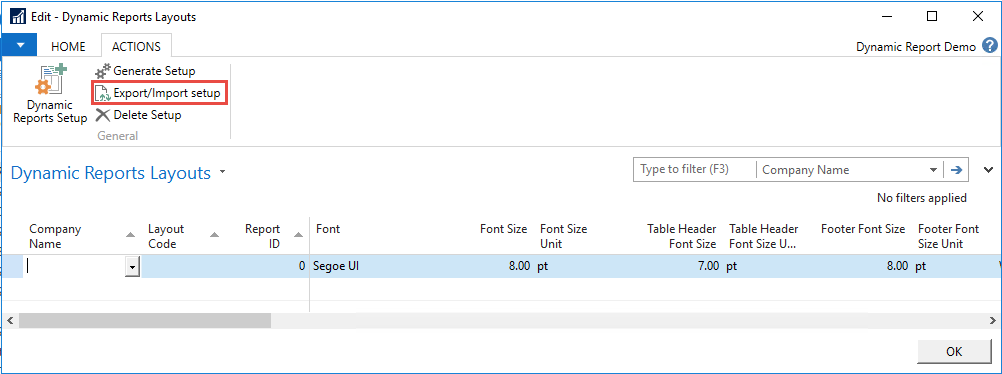
9. Export/Import setup
It is possible to export the setup in Document Customizer and import in another Database located on another server. This is relevant for Companies that both have a “production” and a “test/development” system.
9.1 All setup
In the “Document Customizer Layouts” in the Actions tab, choose Export/Import setup.
75
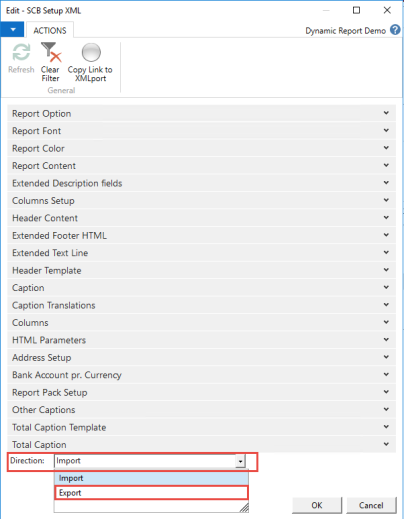
In the direction choose “Export”, and choose ok. Save the File.
Do the same in the other database’s setup, and choose “Import” in the direction field.
It is also possible to filter in data that we are exporting, but as a default it will take everything out.
9.2 Export/Import Specific Content Setup
It is possible to export the setup for a specific report, one at the time.
In the “Document Customizer Content” mark the line, you would like to export, and choose “export/Import Specific Setup” in the “Actions tab”.

The export will be filtered to only exporting data that are included in the report.
Do the same in the other database’s setup, and choose “Import” in the direction field.
A pop-up will tell if any new data have been added.
New caption will be added, but if a caption has been changed in the Caption Translation, this will not be updated. This is also why it is a recommended that you don’t change the text in captions, but make a new caption with the wanted text.
9.3 Export/Import Specific Layout Setup
In the “Document Customizer Layout” mark the line, you would like to export, and choose “export/Import Specific Setup” in the “Actions tab”.
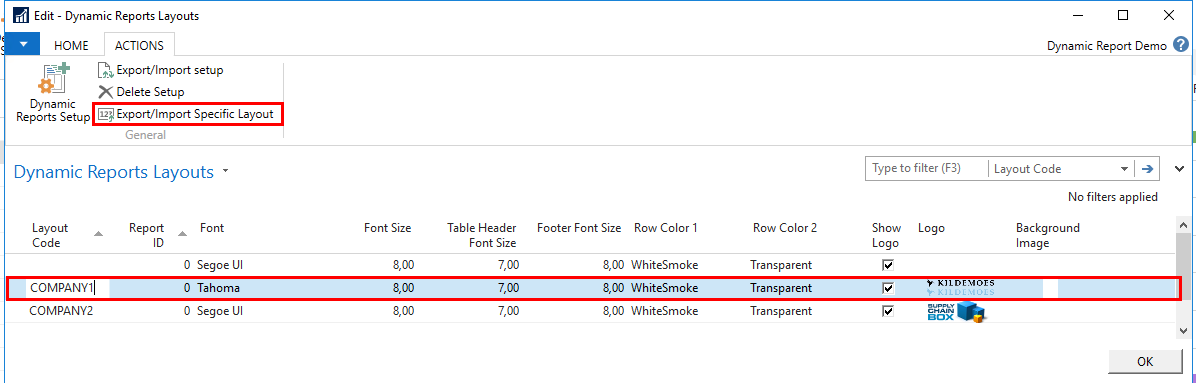
The export will be filtered to only exporting data that are included in the line. Please note that picture will not be transferred.
Do the same in the other database’s setup, and choose “Import” in the direction field.
A pop‑up will tell if any new data have been added.
New caption will be added, but if a caption has been changed in the Caption Translation, this will not be updated. This is also why it is a recommended that you don’t change the text in captions, but make a new caption with the wanted text.
10. Special Report notes
For some reports there are some options and things you should be aware of.
10.1 Statement
The statement document, does not have a column setup as this part I predefined, and can’t be changed, like on the other documents.
The captions used on the report, are in the list of ALL captions, and the report is predefined to look in this translation for the caption to appear on the statement. So when translated, the translation also appears on the statement.
10.1.1 Layout code and Report Template code
Statement doesn’t support the functionality of taking the code from the costumer card. It is ALWAYS necessary to set the wanted layout or report template at the point of running a statement report. If nothing is actively chosen when printing the system will take the system default Layout Code or Report Template Code.
11. Finding table and field number
When editing the reports, it can be beneficially to know the table and field numbers related to a document. These can both be found the same place for all pages.
In the top of the screen, press the triangle, and “Help” and “About This Page”. It is also possible to use the shortcut keys Ctrl+Alt+F1
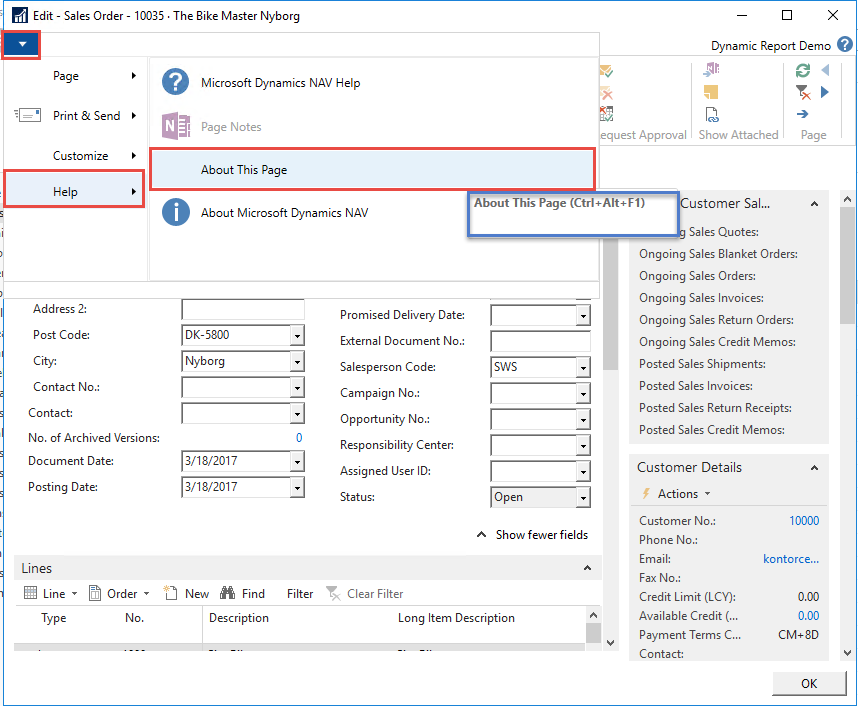
In the “Page Information” Tab it is possible to see the Source table of the documents in “SourceTable”.
In the “Table field” tab, all fields in this table are listed. It is the number that is relevant.
It is also possible to see the value of the field for this specific document.
Please note that when you have the curser in the header of the document, it will show the information for the header. If you set the curser on a line, the table and fields for the lines will be shown