Overview
Applies To: Abakion Subscription Management version 27.1 and later
The Job Queue feature automates the creation of subscription invoices on a scheduled basis. Instead of manually running the invoice creation report, Business Central will automatically generate invoices according to your configured schedule.
Benefits
Save Time: Invoices are created automatically without manual intervention
Consistency: Invoices are created at the same time and with the same settings every run
Reliability: Runs even when users are not logged in
Visibility: Track execution history and monitor success/failure
How It Works
You configure when and how invoices should be created
Business Central's Job Queue service runs on your schedule
The system automatically creates subscription invoices based on your date formulas
You receive notification of success or errors
Created invoices are ready for review and posting
Prerequisites
Before setting up automated invoice creation:
You have subscription orders configured in Business Central
You have the necessary permissions to configure Job Queue
You understand your company's invoicing schedule (e.g., monthly on the 1st)
Your BC environment has the Job Queue service running (cloud environments have this by default)
Setup Guide
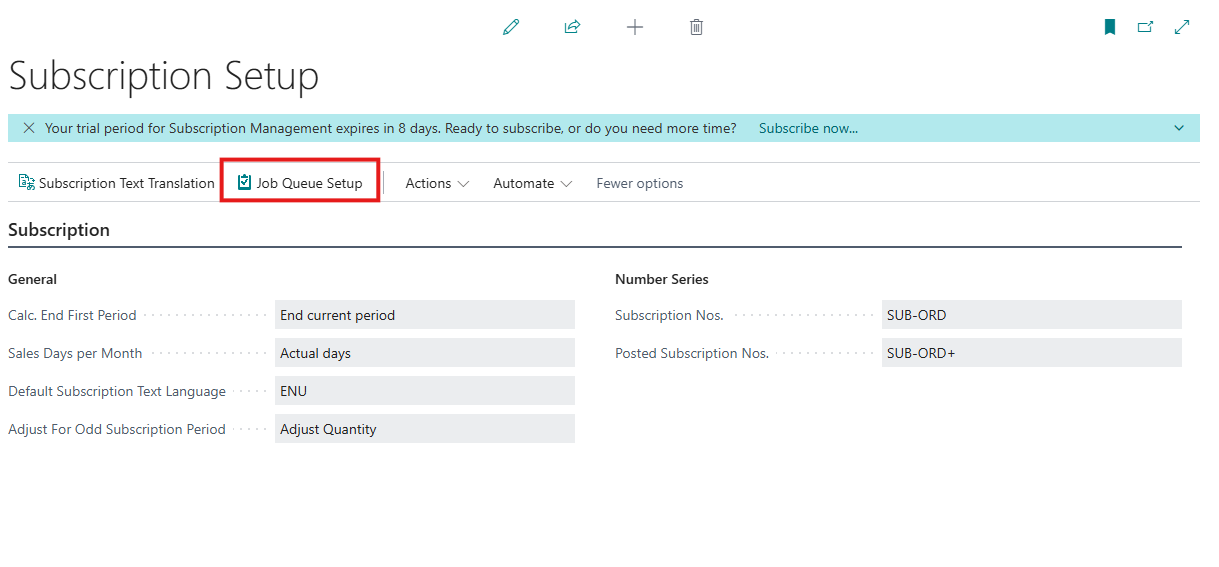
Step 1: Open Job Queue Setup
Search for "Subscription Setup" in Business Central
Click on "Job Queue Setup" in the actions menu
Step 2: Configure Date Formulas
Date formulas determine which subscriptions to process and what dates to use on created invoices.
Include Up To Date Formula
What it does: Determines which subscription lines to include based on their "Next Invoicing Date"
Default: <1M+CM> (end of next month)
Common scenarios:
<1M+CM>- Create invoices for subscriptions due through the end of next month<CM>- Create invoices for subscriptions due through the end of this month<1M>- Create invoices for subscriptions due in the next 30 days
[Screenshot: Include Up To Date Formula field with example date]
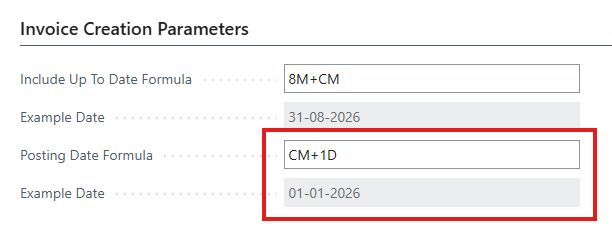
Posting Date Formula
What it does: Sets the "Posting Date" on all created invoices
Default: <CM+1D> (first day of next month)
Common scenarios:
<CM+1D>- Post on the first day of next month<1D>- Post tomorrow<1W>- Post one week from today<0D>- Post today
Document Date Formula
What it does: Sets the "Document Date" on all created invoices
Default: <0D> (today)
Common scenarios:
<0D>- Use today's date<CM+1D>- Use first day of next month

💡 Tip: Each formula field shows an "Example Date" below it. This shows what date will be calculated when the job runs today, helping you verify your formula is correct.
Step 3: Configure Schedule
Earliest Start Time
The earliest time of day the job can run.
Example: Set to 06:00 to start generating invoices at 6:00 AM
💡 Tip: Leave blank to allow the job to start immediately when enabled.

No. of Minutes between Runs
How often the job should run.
Default: 1440 (once per day)
Common scenarios:
1440- Once per day (24 hours)10080- Once per week (7 days)43200- Once per month (30 days)

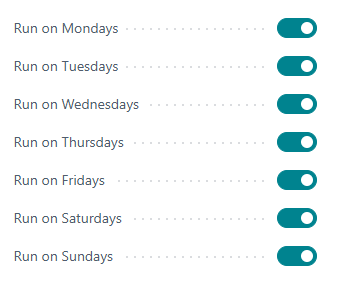
Run on Days
Select which days of the week the job can run.
Default: Monday through Friday enabled
💡 Tip: For monthly invoicing, you might only enable Monday and set the schedule to run every 43200 minutes (30 days).
Step 4: Configure Invoice Options
Invoice Per
How to group subscription lines on invoices:
Customer (recommended): One invoice per customer (combines all subscriptions)
Subscription: One invoice per subscription order
Line: One invoice per subscription line
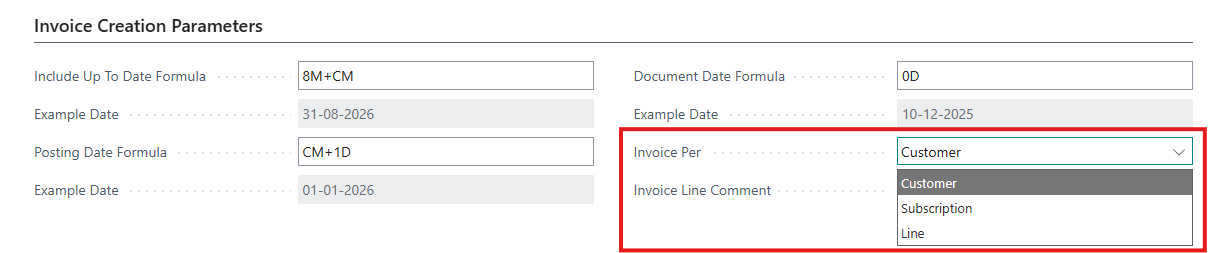
Invoice Line Comment
Optional text to add as a comment line at the top of each invoice.
Example: "Monthly Subscription Charges"

Step 5: Create the Job Queue Entry
Check the "Configure Job Queue" checkbox
Click "Create/Update Job Queue Parameters" button
You'll see a confirmation message

⚠️ Important - The job queue entry is created with status "On Hold"
Step 6: Enable the Job Queue
To start automatic execution:
Click "Open Job Queue Entry" button
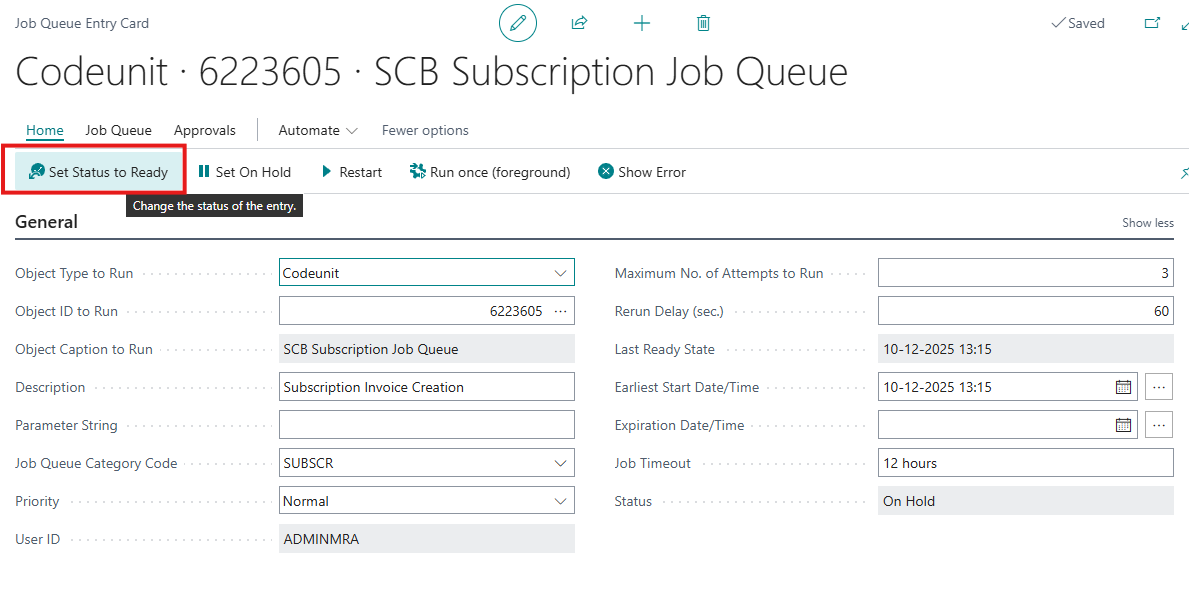
On the Job Queue Entry Card, change Status from "On Hold" to "Ready"
Close the card
✅ What happens now:
The job will run according to your configured schedule
You can monitor execution on the Job Queue Setup page
Log entries are preserved when updating parameters
Testing Your Configuration
Before relying on automatic execution, test your configuration:
Option 1: Run Now (Recommended)
Before enabling automatic execution, test your configuration:
Make sure "Configure Job Queue" is checked
Click "Run Now" button
Wait for completion message
Check "Last Run Status" fields to verify success
Review created invoices in the sales invoice list
[Screenshot: Run Now button and Last Run Status fields]
Note: You can test with "Run Now" without setting the job queue to "Ready" status.
Option 2: Check Example Dates
Review the "Example Date" shown below each date formula field
Verify these dates match your expectations
Adjust formulas if needed
[Screenshot: Example date fields showing calculated dates]
Monitoring Job Queue Execution
Last Run Information
The setup page shows details about the most recent execution:
Last Run Date Time: When the job last ran
Last Run Status: Success or Error
Invoices Created Last Run: Count of invoices created
Last Run Error: Error message if failed
[Screenshot: Last Run Information group with sample data]
Job Queue Status
The "Job Queue Status" field shows the current state:
Ready: Job is scheduled and waiting to run
In Process: Job is currently running
Error: Job encountered an error
On Hold: Job is paused
[Screenshot: Job Queue Status field]
Activity Log
View complete execution history:
Click "View Activity Log" button
Review all past executions with timestamps
See detailed messages for each run
[Screenshot: Activity Log page with multiple entries]
Common Date Formula Examples
Scenario: Monthly Invoicing on First Day of Month
Business Requirement: Create invoices on the 1st of each month for the upcoming month
Configuration:
Include Up To Date Formula:
<1M+CM>Posting Date Formula:
<CM+1D>Document Date Formula:
<CM+1D>Schedule: Run daily (1440 minutes), Monday-Friday
How it works:
On January 15: Creates invoices for subscriptions through Feb 28, dated Feb 1
On February 20: Creates invoices for subscriptions through Mar 31, dated Mar 1
Scenario: Weekly Invoicing
Business Requirement: Create invoices every Monday for the current week
Configuration:
Include Up To Date Formula:
<1W>Posting Date Formula:
<0D>Document Date Formula:
<0D>Schedule: Run once per week (10080 minutes), Monday only
How it works:
Every Monday: Creates invoices for subscriptions due in next 7 days, dated today
Scenario: End-of-Month Invoicing
Business Requirement: Create invoices on the last day of each month for that month
Configuration:
Include Up To Date Formula:
<CM>Posting Date Formula:
<CM>Document Date Formula:
<CM>Schedule: Run daily (1440 minutes), Monday-Friday
How it works:
On Jan 31: Creates invoices for subscriptions through Jan 31, dated Jan 31
On Feb 28: Creates invoices for subscriptions through Feb 28, dated Feb 28
Troubleshooting
Job Queue Status Shows "On Hold"
Problem: The job queue entry exists but is not running
Cause: This is expected behavior when first created. Job queue entries are created with "On Hold" status to prevent accidental automatic execution.
Solution:
Click "Open Job Queue Entry" button
Change Status from "On Hold" to "Ready"
Close the Job Queue Entry Card
The job will now run according to your schedule
No Invoices Created (Status: Success)
Problem: Job runs successfully but creates zero invoices
Possible causes:
No subscriptions are due: Check your "Include Up To Date Formula"
The example date shows what cutoff date is being used
Ensure some subscriptions have "Next Invoicing Date" before this date
Wrong day of week: Check "Run on Days" settings
Job won't run on days not checked
Today might not be an enabled day
Subscriptions already processed: Check subscription line "Next Invoicing Date"
Date might have been updated by a previous run
Look for recently created invoices
Last Run Status Shows "Error"
Problem: Job failed with an error message
Solution:
Read the "Last Run Error" message carefully
Common errors:
"Posting Date must be applied": Your posting date formula is invalid
"Mandatory field missing": Check all date formulas are configured
"No subscription orders found": No subscriptions match your criteria
Fix the issue and click "Run Now" to test
Job Never Runs Automatically
Problem: Manual "Run Now" works, but scheduled execution doesn't happen
Solution:
Verify "Configure Job Queue" is checked
Check "Job Queue Status" field:
Must show "Ready" (not "On Hold")
If "On Hold", click "Open Job Queue Entry" and set Status to "Ready"
Check "Earliest Start Time":
If set, job won't run until that time
Try leaving blank to remove time restriction
Verify "Run on Days" - today must be an enabled day
Contact your BC administrator to verify Job Queue service is running
Job Queue Runs Continuously / Creates Too Many Invoices
Problem: Job queue creates multiple invoices per subscription in one run and/or restarts immediately after completing
Possible causes:
Max Invoices Per Run is set to 0 or too high:
Check "Max Invoices Per Run" field in Job Queue Setup
Set to
1for scheduled execution to create one invoice per subscription per runValue of
0means unlimited and will create all pending invoices at once
Subscription has many periods due:
If a subscription hasn't been invoiced for several months, it may have multiple periods pending
With Max Invoices Per Run = 1, the job will create one invoice per run over multiple scheduled runs
This is expected behavior - the job will gradually catch up
Solution:
Set "Max Invoices Per Run" to
1in Job Queue SetupClick "Create/Update Job Queue Parameters" to apply the change
The job will now create one invoice per subscription per run
If subscriptions are behind, they will catch up gradually over multiple scheduled runs
Date Formula Errors
Problem: Error message about invalid date formula
Solution:
Date formulas must be enclosed in angle brackets:
<1M>Check syntax:
Numbers before letters:
<1M>not<M1>Valid units: D (day), W (week), M (month), Q (quarter), Y (year)
Valid modifiers: CM (current month), CW (current week), CY (current year)
Use the example date to verify calculation
See the Date Formula Guide for more examples
Understanding Date Formulas
Date formulas in Business Central use a special syntax to calculate dates dynamically. Here's a quick reference:
Basic Syntax
Format: <[+/-][number][unit][modifier]>
Examples:
<1M>- One month from today<-1W>- One week ago<0D>- Today
Units
D - Days
W - Weeks
M - Months
Q - Quarters
Y - Years
Modifiers
CM - Current Month end (goes to last day of month)
CW - Current Week end (goes to Sunday)
CQ - Current Quarter end
CY - Current Year end
Combining Formulas
You can add/subtract after a modifier:
<CM+1D>- Current month end + 1 day (= first day of next month)<1M+CM>- Go forward 1 month, then to end of that month<CW-1D>- Current week end - 1 day (= Saturday)
Testing Your Formulas
The "Example Date" fields on the setup page show you exactly what date will be calculated for each formula when you run the job today. Use these to verify your formulas are correct before enabling the job queue.
Updating Configuration
To Change Date Formulas or Schedule
Modify the fields you want to change on the Job Queue Setup page
Click "Create/Update Job Queue Parameters" button
The existing job queue entry is updated with new parameters
✅ Important Benefits:
Log entries are preserved when updating
Job queue status (Ready/On Hold) is not changed
Last run information remains intact
To Temporarily Pause
Click "Open Job Queue Entry" button
Change Status from "Ready" to "On Hold"
Close the card
To resume, set Status back to "Ready"
Alternative:
Uncheck "Configure Job Queue" checkbox
This automatically sets the job queue entry to "On Hold"
To Permanently Remove
Click "Open Job Queue Entry" button
Delete the job queue entry from the Job Queue Entry Card
Last run information in Job Queue Setup is preserved
Best Practices
✅ Do's
Test first: Use "Run Now" to test before setting status to "Ready"
Enable properly: Remember to set Job Queue Entry status to "Ready" after configuration
Monitor regularly: Check "Last Run Status" daily for the first week
Use Max Invoices Per Run = 1: Keep this at the default value of 1 for scheduled execution to prevent creating multiple months of invoices at once
Use realistic schedules: Don't run more frequently than needed
Document your formulas: Keep notes on why you chose specific date formulas
Review created invoices: Spot-check automatically created invoices initially
Preserve logs: Use "Create/Update Job Queue Parameters" to update settings without losing log history
❌ Don'ts
Don't skip testing: Always test with "Run Now" before setting to "Ready"
Don't forget to enable: Job won't run until you set Status to "Ready" in Job Queue Entry Card
Don't set Max Invoices Per Run to 0 for job queue: This creates all pending invoices at once, which can be overwhelming for subscriptions that are behind schedule
Don't use complex formulas: Keep formulas simple and understandable
Don't run too frequently: Running every few minutes wastes resources
Don't delete and recreate: Use "Create/Update" button to preserve log entries
Don't ignore errors: Address error messages promptly
Getting Help
Built-in Help
Tooltips: Hover over any field to see a description
Example Dates: Use these to verify your date formula calculations
Activity Log: Review detailed history of past executions
Contact Support
If you encounter issues not covered in this guide:
Note the exact error message from "Last Run Error"
Record your date formula configuration
Include "Last Run Date Time" and "Invoices Created Last Run"
Contact your Business Central administrator or support team