This guide describes how to deploy a default setup of BarTender on your on-premises print server, to use with Abakion Labels Mobile for Business Central Online.
It is expected that you have already installed Labels Mobile in your Business Central environment. You can find more info about Labels Mobile and install it from: https://abakion.com/dynamics-365/apps/labels-mobile/
System Requirements
Recommended system requirements for the print server:
| Requirement | Details |
|---|---|
| Operating System | Windows Server 2022, 2019, or 2016 |
| Memory | 8 GB |
| Disk Space | 20 GB free |
| Web Server | Internet Information Services (IIS) |
| Framework | .NET Framework 4.7.2 or later |
| Browser | Updated Edge or Chrome |
| License | BarTender 2022 Automation Edition |
Info: A 30-day trial license for BarTender can be acquired at Seagull's website.
Before You Start
Before following the steps in this guide, verify that all of the following prerequisites are in place. This is very important for a successful result.
- The server hardware and software align with the above-listed requirements.
- The firewall must allow traffic on port TCP/443 to the server from the internet.
- A public DNS record is set up to point at the server (e.g.
bartender.company.com). - An SSL certificate issued by a trusted provider, matching the DNS record, is installed on the server.
Info: If TCP/443 is already in use, you can use any unused TCP port above 1023.
Info: If you own a wildcard certificate for your domain, you can most likely reuse that.
Install BarTender
Download BarTender from: https://www.seagullscientific.com/support/downloads/
This guide is based on BarTender 2022. The same configuration might be possible with other versions, but the instructions in this guide may not match the software.
Run the downloaded installation program and follow these steps:
- Click the checkmark to accept the license agreement.
- Click the checkmark to specify advanced installation options.
- Select the BarTender with Print Portal install option.
- Ensure that the Add Microsoft SQL Server Express option is checked.
- Provide a complex password for the IIS_WEBPRINT service account.
Info: It is possible to use your own SQL Server, but it is not covered by this guide.
Info: It is recommended to provide a complex password and store it in a secure password vault.
The installation can take some time. After setup has completed, you must provide your License Key to activate BarTender.
Add the SSL Certificate to BarTender Print Portal
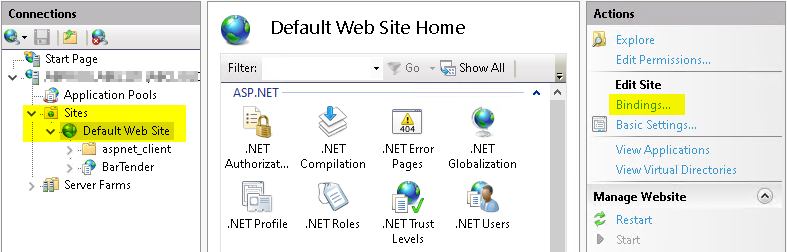
- Open Internet Information Services (IIS) Manager.
- Select the site that contains a BarTender subfolder and click Bindings.
In most cases this will be the site named Default Web Site.
- Click Add, select type
https, port443, and select your certificate installed as a prerequisite.
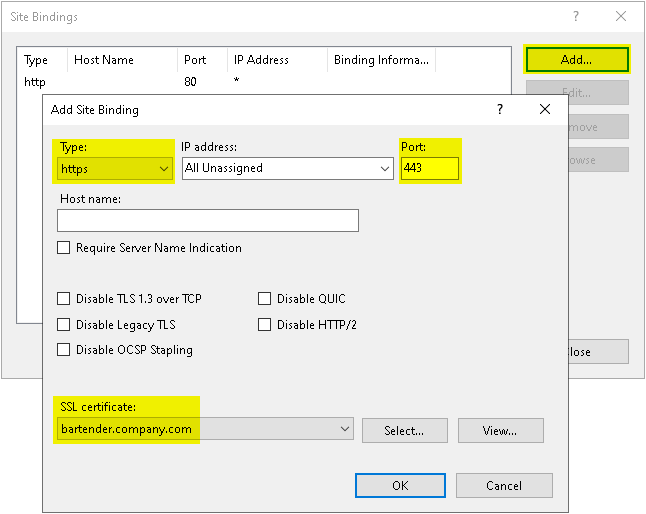
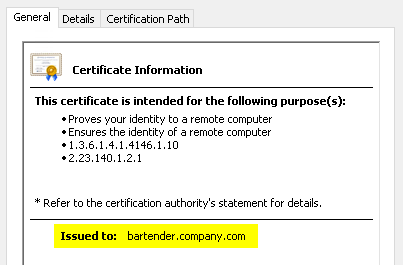
The certificate should match your own DNS record. If you click the View button, your DNS record (or a wildcard for your domain) should be shown after Issued to.
Activate Integration Passthrough for BarTender Print Portal
The BarTender Print Portal must be configured to pass through the incoming web service request to the integration service. The port number is changed to 8080 to avoid possible conflicts.
Info: If you decide to use another port number, you should also change it in the supplied integration file, but that is not covered by this guide.
-
Open Print Portal from the Start Menu, wait for the site to load, and close it again.
This ensures the default settings file is created. -
Open Notepad as Administrator from the Start Menu and open the file:
C:\inetpub\wwwroot\BarTender\settings.xml -
Find the
IntegrationPassthroughelement and make the following changes:- Change
Enabledfrom"false"to"true" - Change
PortNumberfrom"80"to"8080"
- Change
-
Close and save the file.

-
Open Services from the Start Menu and restart the BarTender System Service.
-
Open Command Prompt as Administrator from the Start Menu and execute:
IISRESET
Download Abakion's Example Files
Abakion has designed a set of label templates for educational purposes. When you are familiar with Labels Mobile and BarTender, you should produce your own templates.
Create the following folder structure on the print server:
C:\
└── Bartender\
    ├── Integrations\
    └── Templates\
Then download the example files from Business Central:
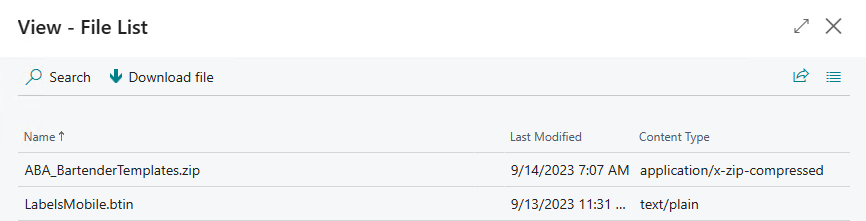
- Search for Labels Mobile Documents in Business Central and open the page.
- Navigate to Actions → Label → Select Files.
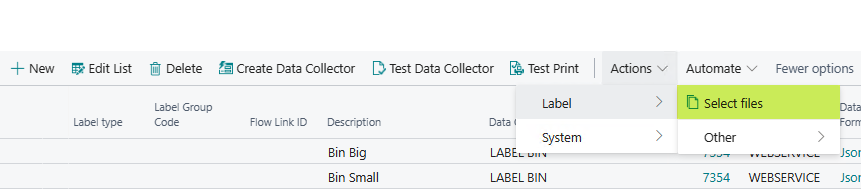
- Download ABA_BartenderTemplates.zip and extract the files to
C:\Bartender\Templates. - Download LabelsMobile.btin to
C:\Bartender\Integrations.
Set Up Label Printers in Labels Mobile
-
Search for Labels Mobile Printers in Business Central and open it.
-
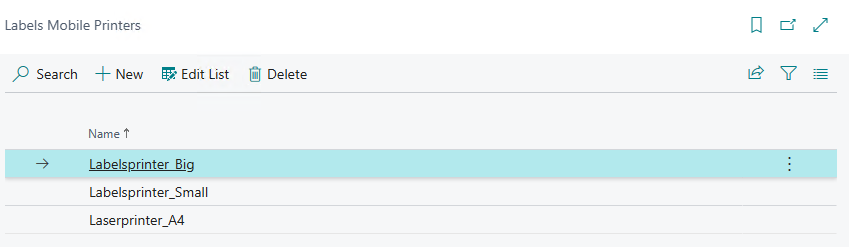
Add records using the printers' shared printer names (without any spaces).
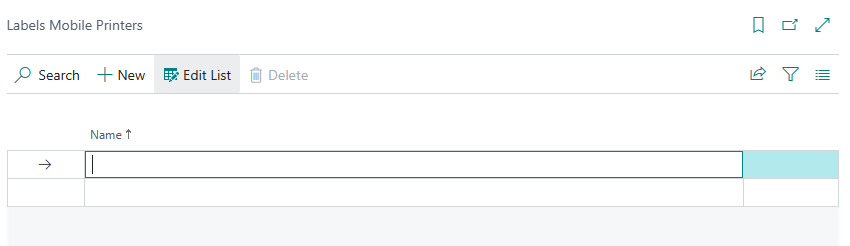
Example printers:Labelsprinter_BigLabelsprinter_SmallLaserprinter_A4
-
Search for and open Labels Mobile Documents, click Edit List, and select printers for the different labels by clicking on the empty field in the Printer Name column.
-
Select one of the printers created under Labels Mobile Printers for the label with Label Code ITEM BIG.
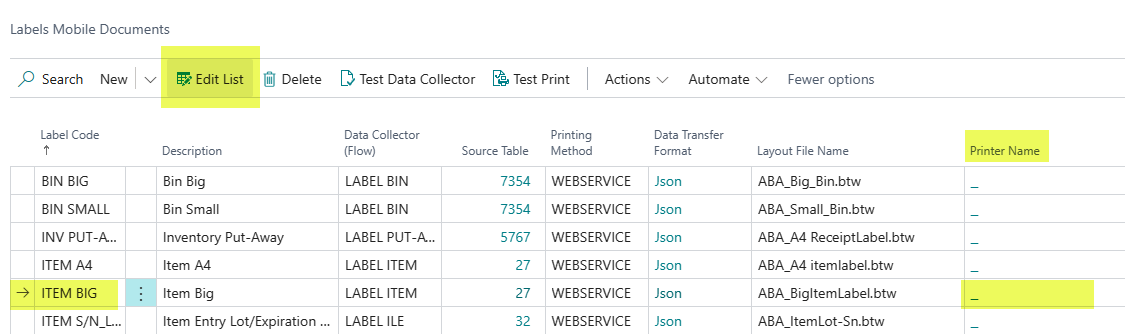

Note: You must press Edit List before you can edit the Printer Name column.
Configure URL for BarTender Print Portal in Business Central
-
Log into Business Central and search for the Labels Mobile Printing Methods page.
-
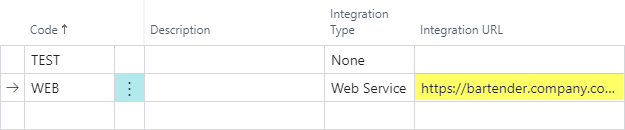
Insert the URL below as the Integration URL for the method line with Code
WEB.
Replacebartender.company.comwith your own DNS record.https://bartender.company.com/BarTender/API/IntegrationServicePassthrough?targetURL=/Integration/LabelsMobile/ExecuteNote: The URL is one continuous line with no spaces.
-
Verify that Integration Type for the method is set to
Web Service.
Test the BarTender Integration Service
- Run the file LabelsMobile.btin from
C:\Bartender\Integrations.
This opens the BarTender Integration Builder with the Labels Mobile sample web service integration.

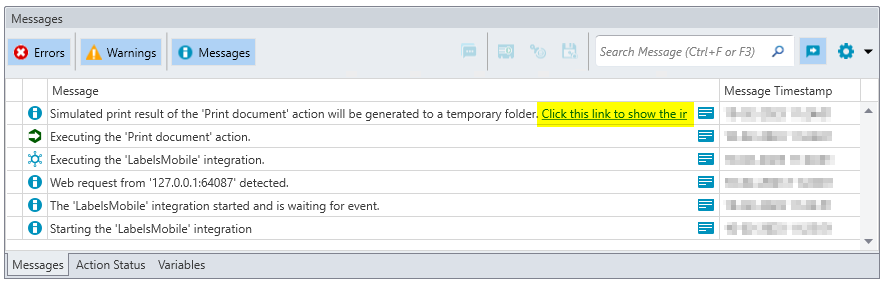
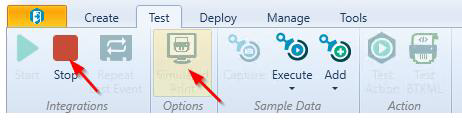
- Navigate to the Test tab, activate Simulated Print, and click Start.
- When you print from Labels Mobile in Business Central, you can follow the status in the Messages section, including a link to the simulated labels print.
Deploy the BarTender Integration Service
When your test print has been verified, the BarTender Integration can be deployed.
- First, stop the simulated print: click Stop and deactivate Simulated Print.
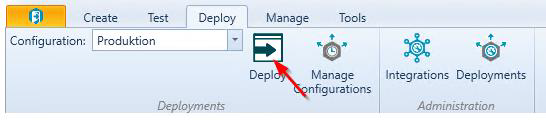
3. Navigate to the Deploy tab, click Deploy, and confirm by clicking Deploy now in the popup window.
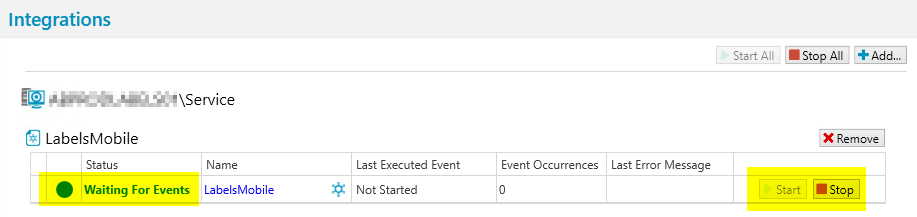
You can verify that the BarTender Integration is running by opening the BarTender Administration Console and clicking on Integrations in the left menu.
When deployed, the integration starts automatically whenever the print server is rebooted.
Important: If you plan to use Simulated Print for future testing, you must stop the deployed integration before starting the BarTender integration service in test mode, as both use the same port. After testing, stop Simulated Print and restart the integration from the Administration Console.
Troubleshooting BarTender Services
If the Business Central integration fails, restart all the BarTender services on the print server before contacting Abakion Frontdesk.

The following services should be running:
| Service | Startup Type |
|---|---|
| BarTender Integration Service | Automatic (Delayed Start) |
| BarTender Licensing Service | Automatic |
| BarTender Print Router Service | Automatic |
| BarTender Print Scheduler | Automatic (Delayed Start) |
| BarTender System Service | Automatic |
Adding New Users to Labels Mobile
- Search for Assisted Setup in Business Central.

3. Select and run Setup Mobile Flow Users.
The Labels Mobile app uses Abakion's Mobile Flow Core, so all Labels Mobile users must also exist as users in Business Central. The wizard will create the missing resources and link them with a corresponding Mobile Flow user.