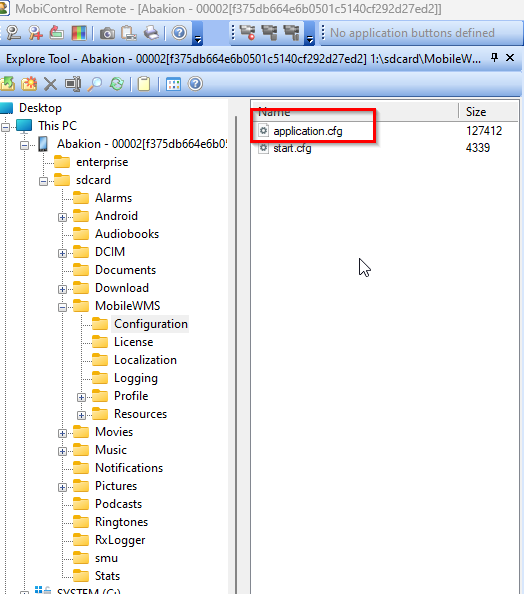
--- title: "Configure the Tasklet Scanner" slug: "installationsguide" description: "Configure Shipping Connector for Tasklet scanners with Application.cfg to add Change Agent and Change Service to the Post Shipment page." tags: ["Tasklet Scanners", "MobiControl"] updated: 2026-11-05T13:35:26Z published: 2026-11-05T13:35:26Z canonical: "docs.abakion.com/installationsguide" --- > ## Documentation Index > Fetch the complete documentation index at: https://docs.abakion.com/llms.txt > Use this file to discover all available pages before exploring further. # Configure the Tasklet Scanner To use the Shipping Connector for Tasklet, the Tasklet scanners need extra actions in their mobile configuration (Application.cfg). This guide adds **Change Agent** and **Change Service** to the Post Shipment page. ## Before you start - Install the Shipping Connector for Tasklet app in Business Central and run the assisted setup **Activate Shipping Connector for Tasklet**. Activation adds the Post Shipment menu to the WMS mobile group and removes the standard Ship menu. - You need access to SOTI MobiControl, or another way to edit the Application.cfg file on the scanners. ## Change the scanner configuration 1. In MobiControl, open the scanner and find the **Application.cfg** file. ![](https://abakion.zendesk.com/hc/article_attachments/16675968607516) 2. Find the page with `id="PostShipment"`. Replace the whole page with the code in **Step A** below. 3. Go to the end of the file. Replace the closing `</pages>` tag with the code in **Step B** below. It adds two new pages and closes the list again. 4. Save the file and restart the scanner. ### Step A: Post Shipment page Original page: ```xml        <lookupConfiguration type="PostShipment" useRegistrationCollector="true">      <header configurationKey="PostShipmentCfgHeader" automaticAccept="OnOpen"/>      <list listId="Orders"/>    </lookupConfiguration>  </page> ``` New page: ```xml <page id="PostShipment" type="Lookup" icon="mainmenushipping">    <title defaultValue="@{PageShipOrderListTitle}"/>    <lookupConfiguration type="PostShipment" useRegistrationCollector="true">      <header configurationKey="PostShipmentCfgHeader" automaticAccept="OnOpen"/>      <list listId="Orders"/>    </lookupConfiguration>    <!-- Custom -->    <actions>      <open id="ABA_ChangeShippingAgent" icon="mainmenusubstituteitem" title="@{ChangeShippingAgent}" menuPlacement="1">        <transfer property="LookupSelectedResult" to="UnplannedItemRegistrationInputValue"></transfer>        <returnTransfer property="UnplannedItemRegistrationCompleted" to="RefreshOnResume"/>      </open>      <open id="ABA_ChangeShippingAgentService" icon="mainmenusubstituteitem" title="@{ChangeShippingAgentService}" menuPlacement="2">        <transfer property="LookupSelectedResult" to="UnplannedItemRegistrationInputValue"></transfer>        <returnTransfer property="UnplannedItemRegistrationCompleted" to="RefreshOnResume"/>      </open>    </actions>    <menu numberOfPromotedItems="2"/>    <!-- Custom -->  </page> ``` ### Step B: New pages at the end of the file Original end of the file: ```xml </pages> ``` New end of the file: ```xml <!-- Custom -->  <page id="ABA_ChangeShippingAgent" type="UnplannedItemRegistration" icon="mainmenushipping">    <title defaultValue="@{ChangeShippingAgent}"/>    <unplannedItemRegistrationConfiguration type="ABA_ChangeShippingAgent" includeInputDataRowInSubmitRequest="true" useRegistrationCollector="true">      <header configurationKey="ChangeShippingAgent" clearAfterPost="true" automaticAcceptOnOpen="true" automaticAcceptAfterLastScan="true"/>      <onSuccessfulPost close="true" />    </unplannedItemRegistrationConfiguration>  </page>  <page id="ABA_ChangeShippingAgentService" type="UnplannedItemRegistration" icon="mainmenushipping">    <title defaultValue="@{ChangeShippingAgentService}"/>    <unplannedItemRegistrationConfiguration type="ABA_ChangeShippingAgentService" includeInputDataRowInSubmitRequest="true" useRegistrationCollector="true">      <header configurationKey="ChangeShippingAgentService" clearAfterPost="true" automaticAcceptOnOpen="true" automaticAcceptAfterLastScan="true"/>      <onSuccessfulPost close="true" />    </unplannedItemRegistrationConfiguration>  </page>  <!-- Custom --> </pages> ``` ## Add Colli and Show Colli The app also supports **Add Colli** (registration type `AddWaybillLine`, header `AddWaybillLineHeader`) and **Show Colli** (lookup type `WayBillLines`, header `WayBillLinesHeader`). They need their own pages in Application.cfg, which this guide does not cover yet. For how the scanner actions work and what they change in Business Central, see [Tasklet Connector – Setup and Field Mapping](https://docs.abakion.com/docs/en/tasklet-connector-setup-and-field-mapping). ## Related - [Tasklet Connector – Setup and Field Mapping](/tasklet-connector-setup-and-field-mapping.md) - [Tasklet Shipping Connector](/tasklet-shipping-connector.md)